
Getting Started with Windows Containers
Containers provide a way of running an application in a controlled environment, isolated from other applications running on the machine, and from the underlying infrastructure. They are a cost-effective way of abstracting away the machine, ensuring that the application runs in the same conditions, from development, to test, to production.
Containers started in Linux, as a virtualization method at the OS level that creates the perception of a fully isolated and independent OS, but it does not require creating a full virtual machine. People have been already using Linux containers for a while. Docker greatly simplified the containerization on Linux by offering a set of tools that make it easy to create, deploy and run applications by using containers.
Windows Server implements the container technology, and Docker API’s and tool-set are extended to support Windows Containers, offering developers who use Linux Docker the same experience on Windows Server.
There are two kinds of container images available: Windows Server Core and Nano Server. Nano Server is lightweight and only for x64 apps. Windows Server Core image is larger and has more capabilities; it allows running “Full” .NET Framework apps, such as an ASP.NET application, in containers. The higher compatibility makes it more suitable as a first step in transitioning to containers. ASP.NET Core on .NET Core apps can run on both Nano Server and Server Core, but are better suited for running on Nano Server, because of its smaller size.
The following steps show how to get started on running ASP.NET Core and ASP.NET applications on Windows containers.
Prerequisites:
- Windows 10 Anniversary Update or higher
- Visual Studio 2017
- Hyper-V and Containers enabled (can be manually enabled from Windows Features)
Containers Setting in Windows Features - Virtualization must be enabled on the machine (Docker will not start if virtualization is not enabled). This can be verified by checking the ‘Performance” tab on Task Manager.
Virtualization Status in Task Manager - Use a physical machine, not a VM, for this tutorial. Docker for Windows does not support nested virtualization
Install Docker
Install Docker for Windows – Stable channel
After installing Docker, logging out of Windows and re-login is required. Docker may prompt for that. After logging in again, Docker starts automatically.
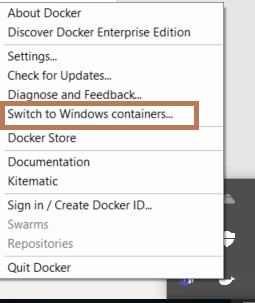
Switch Docker to use Windows Containers
By default, Docker is set to use Linux containers. Right-click on the docker tray icon and select “Switch to Windows Containers”.
Running docker version will show Server OS/arch changed to Windows after docker switched to Windows containers.
Set up an ASP.NET or ASP.NET Core application to run in containers
ASP.NET as well as ASP.NET Core applications can be run in containers. As mentioned above, there are two kinds of container images available for Windows: Nano Server and Server Core containers. ASP.NET Core apps are lightweight enough that they can run in Nano Server containers. ASP.NET apps need more capabilities and require Server Core containers.
The following walkthrough shows the steps needed to run an ASP.NET Core and an ASP.NET application in a Windows Container. To start, create an ASP.NET or ASP.NET Core Web application, or use an existing one.
Note: ASP.NET Core applications developed in Visual Studio can have Docker support automatically added using Visual Studio Tools for Docker. Until recently, Visual Studio Tools for Docker only supported Linux Docker scenarios, but in Visual Studio 2017 version 15.3, support has been added for containerizing ASP.NET Core apps as Windows Nano images. Docker support with Windows Nano Server can be added at project creation time by checking the “Enable Docker Support” checkbox and selecting Windows in the OS dropdown, or it can be added later on by right-clicking on the project in Solution Explorer, then Add -> Docker Support.
This tutorial assumes that “Docker Support” was not checked when the project was created in Visual Studio, so that the whole process of adding Docker support manually can be explained.
Publish the App
The first step is to put together in one folder all the application artifacts needed for the application to run in the container. This can be done with the publish command. For ASP.NET Core, run the following command from the project directory, which will publish the app for Release config in a folder; here it is named PublishOutput.
dotnet publish -c Release -o PublishOutput
 Or use the Visual Studio UI to publish to a folder (for ASP.NET or ASP.NET Core)
Create the Dockerfile
To build a container image, Docker requires a file with the name “Dockerfile” which contains all the commands, in order, to build a given image. Docker Hub contains base images for ASP.NET and ASP.NET Core.
Create a Dockerfile with the content shown below and place it in the project folder.
Dockerfile for ASP.NET Core application (use microsoft/aspnetcore base image)
FROM microsoft/aspnetcore:1.1
COPY ./PublishOutput/ ./
ENTRYPOINT ["dotnet", "myaspnetcorewebapp.dll"]
The instruction FROM microsoft/aspnetcore:1.1 gets the microsoft/aspnetcore image with tag 1.1 from dockerhub. The tag is multi-arch, meaning that docker figures out whether to use the Linux or Nano Server container image depending on what container mode is set. You can use as well the specific tag of the image: FROM microsoft/aspnetcore:1.1.2-nanoserver
The next instruction copies the content of the PublishOutput folder into the destination container, and the last one uses the ENTRYPOINT instruction to configure the container to run an executable: the first argument to ENTRYPOINT is the executable name, and the second one is the argument passed to the executable.
If you publish to a different location, you need to edit the dockerfile, so to avoid this, you can copy the content of the current folder into the destination container, as in the dockerfile below. The dockerfile needs to be added to the published output.
FROM microsoft/aspnetcore:1.1
COPY . .
ENTRYPOINT ["dotnet", "myaspnetcorewebapp.dll"]
Dockerfile for ASP.NET application (use microsoft/aspnet base image)
FROM microsoft/aspnet
COPY ./PublishOutput/ /inetpub/wwwroot
An entry point does not need to be specified in the ASP.NET dockerfile, because the entry point is IIS, and this is configured in the microsoft/aspnet base image.
Build the image
Run docker build command in the project directory to create the container image for the ASP.NET Core app.
docker build -t myaspnetcoreapp .
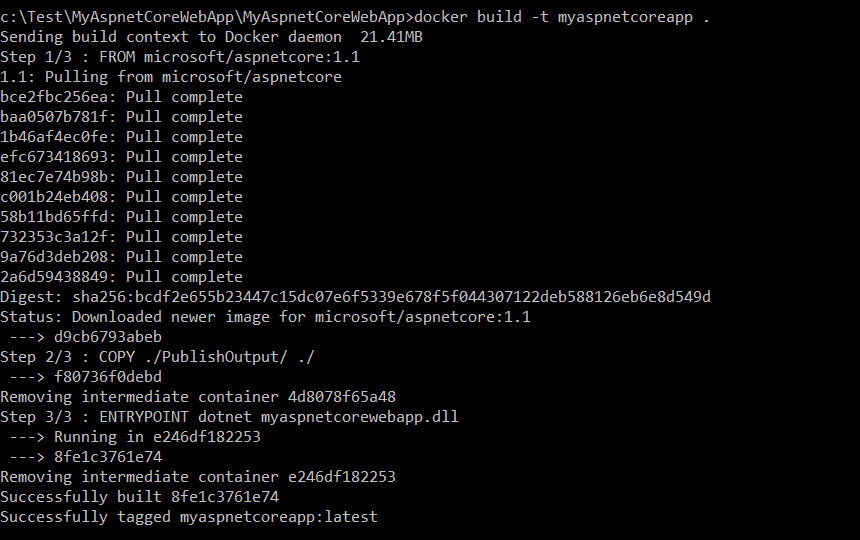
The argument -t is for tagging the image with a name. Running the docker build command will cause pulling the ASP.NET Core base image from Docker Hub. Docker images consist of multiple layers. In the example above, there are ten layers that make the ASP.NET Core image.
The docker build command for ASP.NET will take significantly longer compared with ASP.NET Core, because the images that need to be downloaded are larger. If the image was previously downloaded, docker will use the cached image.
After the container image is created, you can run docker images to display the list and size of the container images that exist on the machine. The following is the image for the ASP.NET (Full Framework):
![]()
And this is the image for the ASP.NET Core:
![]()
Note in the images above the differences in size for the ASP.NET vs ASP.NET Core containers: the image size for the ASP.NET container is 11.6GB, and the image size for the ASP.NET Core container is about ten times smaller.
Run the container
The command docker run will run the application in the container:
docker run -d -p 80:80 myaspnetcoreapp
![]() The
The -d argument tells Docker to start the image in the detached mode (disconnected from the current shell).
The -p argument maps the container port to the host port.
The ASP.NET app does not need the -p argument when running because the microsoft/aspnet image has already configured the container to listen on port 80 and expose it.
The docker ps command shows the running containers:
![]() To give the running container a name and avoid getting an automatically assigned one, use the
To give the running container a name and avoid getting an automatically assigned one, use the --name argument when with the run command:
docker run -d --name myapp myaspnetcoreapp
This name can be used instead of the container ID in most docker commands.
View the web page running in a browser
Due to a bug that affects the way Windows talks to containers via NAT (https://github.com/Microsoft/Virtualization-Documentation/issues/181#issuecomment-252671828) you cannot access the app by browsing to http://localhost. To work around this issue, the internal IP address of the container must be used.
The address of the running Windows container can be obtained with:
docker inspect -f "{{ .NetworkSettings.Networks.nat.IPAddress }}" <first chars of HASH>
![]()
Where HASH is the container ID; the name of the running container can be used instead.
Then type the URL returned into your browser: http://172.25.199.213:80 and you will see the site running.
Note that the limitation mentioned above only applies when accessing the container from localhost. Users from other machines, or other VM’s or containers running on the host, can access the container using the host’s IP and port.
Wrap up
The steps above show a simple approach for adding docker support for ASP.NET Core and ASP.NET applications.
For ASP.NET Core, in addition to the base images that help build the docker container which runs the application, there are docker images available that help compile/publish the application inside the container, so the compile/publish steps can be moved inside the Dockerfile. The Dockerfile can use several base images, each in different stages of execution. This is known as “multi-stage” build. A multi-stage build for ASP.NET Core uses the base image microsoft/aspnetcore-build such as in this github sample: https://github.com/dotnet/dotnet-docker-samples/blob/master/aspnetapp/Dockerfile
Resources to help getting started with Windows containers:
- Scott Hanselman’s blog Exploring ASP.NET Core with Docker in both Linux and Windows Containers
- Mark Russinovich’s blog about Windows containers
- NET Docker samples:
- Migrating ASP.NET applications to Windows Containers
 Light
Light Dark
Dark
1 comment
Hello – a bunch of the screenshots are not loading for me. Also, I see “Uncaught TypeError: Cannot read property ‘length’ of undefined” in the console window.