
Announcing the Fastest ASP.NET Yet, ASP.NET Core 1.1 RTM
We are happy to announce that ASP.NET Core 1.1 is now available as a stable release on nuget.org! This release includes a bunch of great new features along with many bug fixes and general enhancements. We invite you to try out the new features and to provide feedback.
To update an existing project to ASP.NET Core 1.1 you will need to do the following:
- Download and install the .NET Core 1.1 SDK
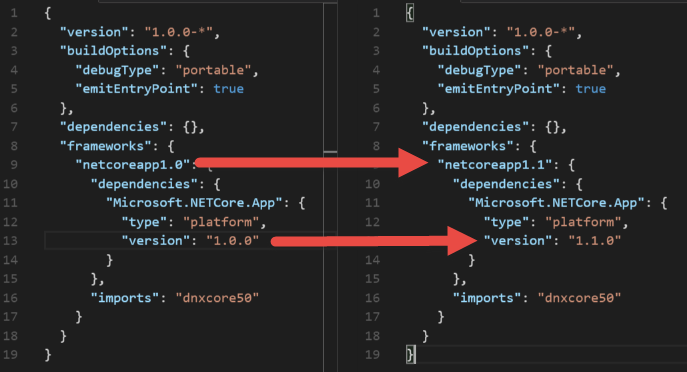
- If your application is referencing the .NET Core framework, your should update the references in your project.json file for netcoreapp1.0 or Microsoft.NetCore.App version 1.0 to version 1.1. In the default project.json file for an ASP.NET Core project running on the .NET Core framework, these two updates are located as follows:

Two places to update project.json to .NET Core 1.1 - Update your ASP.NET Core packages dependencies to use the new 1.1.0 versions. You can do this by navigating to the NuGet package manager window and inspecting the “Updates” tab for the list of packages that you can update.
Updating Packages using the NuGet package manager UI with the last pre-release build of ASP.NET Core 1.1

Side by side install
NOTE: By installing the new SDK, you will update the default behavior of the dotnet command. It will use msbuild and process csproj projects instead of project.json. Similarly, dotnet new will create a csproj profile file.
In order to continue using the earlier project.json-based tools on a per-project basis, create a global.json file in your project directory and add the “sdk” property to it. The following example shows a global.json that contrains dotnet to using the project.json-based tools:
{
    "sdk": {
        "version": "1.0.0-preview2-003131"
    }
}
Performance
We are very pleased to announce the participation of ASP.NET Core with the Kestrel webserver in the round 13 TechEmpower benchmarks. The TechEmpower standard benchmarks are known for their thorough testing of the many web frameworks that are available. In the latest results from TechEmpower, ASP.NET Core 1.1 with Kestrel was ranked as the fastest mainstream fullstack web framework in the plaintext test.
TechEmpower also reports that the performance of ASP.NET Core running on Linux is approximately 760 times faster than it was one year ago. Since TechEmpower started measuring benchmarks in March 2013, they have never seen such a performance improvement as they have observed in ASP.NET Core over the last year.
You can read more about the TechEmpower benchmarks and their latest results on the TechEmpower website.
New Web Development Features in Visual Studio 2017
including:
- The new JavaScript editor
- Embedded ESLint capabilities that help check for common mistakes in your script
- JavaScript debugging support for browser
- Updated BrowserLink features for two-way communication between your browsers and Visual Studio while debugging
Support for ASP.NET Core in Visual Studio for Mac

This first preview focuses on developing Web API applications. You’ll have a great experience creating a new project, and working with C# files, and TextMate bundle support for web file types (e.g HTML, JavaScript, JSON, .cshtml). In a future update, we’ll be adding the same first class support for these file types we have in Visual Studio which will bring IntelliSense for all of those as well.
What’s new in the ASP.NET 1.1?
This release was designed around the following feature themes in order to help developers:
- Improved and cross-platform compatible site hosting capabilities when using a host other than Windows Internet Information Server (IIS).
- Support for developing with native Windows capabilities
- Compatibility, portability and performance of middleware and other MVC features throughout the UI framework
- Improved deployment and management experience of ASP.NET Core applications on Microsoft Azure. We think these improvements help make ASP.NET Core the best choice for developing an application for the cloud.
For additional details on the changes included in this release please check out the release notes.
URL Rewriting Middleware
We are bringing URL rewriting functionality to ASP.NET Core through a middleware component that can be configured using IIS standard XML formatted rules, Apache Mod_Rewrite syntax, or some simple C# methods coded into your application. When you want to run your ASP.NET Core application outside of IIS, we want to enable those same rich URL rewriting capabilities regardless of the web host you are using. If you are using containers, Apache, or nginx you will be able to have ASP.NET Core manage this capability for you with a uniform syntax that you are familiar with.
URL Rewriting allows mapping a public URL space, designed for consumption of your clients, to whatever representation the downstream components of your middleware pipeline require as well as redirecting clients to different URLs based on a pattern.
For example, you could ensure a canonical hostname by rewriting any requests to http://example.com to instead be http://www.example.com for everything after the re-write rules have run. Another example is to redirect all requests to http://example.com to https://example.com. You can even configure URL rewrite such that both rules are applied and all requests to example.com are always redirected to SSL and rewritten to www.
We can get started with this middleware by adding a reference to our web application for the Microsoft.AspNetCore.Rewrite package. This allows us to add a call to configure RewriteOptions in our Startup.Configure method for our rewriter:
As you can see, we can both force a rewrite and redirect with different rules.
- Url Redirect sends an HTTP 301 Moved Permanently status code to the client with the new address
- Url Rewrite gives a different URL to the next steps in the HTTP pipeline, tricking it into thinking a different address was requested.
Response Caching Middleware
Response Caching similar to the OutputCache capabilities of previous ASP.NET releases can now be activated in your application by adding the Microsoft.AspNetCore.ResponseCaching and the Microsoft.Extensions.Caching.Memory packages to your application. You can add this middleware to your application in the Startup.ConfigureServices method and configure the response caching from the Startup.Configure method. For a sample implementation, check out the demo in the ResponseCaching repository.
You can now add GZipCompression to the ASP.NET HTTP Pipeline if you would like ASP.NET to do your compression instead of a front-end web server. IIS would have normally handled this for you, but in environments where your host does not provide compression capabilities, ASP.NET Core can do this for you. We think this is a great practice that everyone should use in their server-side applications to deliver smaller data that transmits faster over the network.
This middleware is available in the Microsoft.AspNetCore.ResponseCompression package. You can add simple GZipCompression using the fastest compression level with the following syntax in your Startup.cs class:
There are other options available for configuring compression, including the ability to specify custom compression providers.
WebListener Server for Windows
WebListener is a server that runs directly on top of the Windows Http Server API. WebListener gives you the option to take advantage of Windows specific features, like support for Windows authentication, port sharing, HTTPS with SNI, HTTP/2 over TLS (Windows 10), direct file transmission, and response caching WebSockets (Windows 8). This may be advantageous for you if you want to bundle an ASP.NET Core microservice in a Windows container that takes advantage of these Windows features.
On Windows you can use this server instead of Kestrel by referencing the Microsoft.AspNetCore.Server.WebListener package instead of the Kestrel package and configuring your WebHostBuilder to use Weblistener instead of Kestrel:
You can find other samples demonstrating the use of WebListener in its GitHub repository.
Unlike the other packages that are part of this release, WebListener is being shipped as both 1.0.0 and 1.1.0. The 1.0.0 version of the package can be used in production LTS (1.0.1) ASP.NET Core applications. The 1.1.0 version of the package is the next version of WebListener as part of the 1.1.0 release.
View Components as Tag Helpers
ViewComponents are an ASP.NET Core display concept that provides for a razor view that is triggered from a server-side class that inherits from the ViewComponent base class. You can now invoke from your views using Tag Helper syntax and get all the benefits of IntelliSense and Tag Helper tooling in Visual Studio. Previously, to invoke a View Component from a view you would use the Component.InvokeAsync method and pass in any View Component arguments using an anonymous object:
@await Component.InvokeAsync("Copyright", new { website = "example.com", year = 2016 })
Instead, you can now invoke a View Component like you would any Tag Helper while getting Intellisense for the View Component parameters:

This gives us the same rich intellisense and editor support in the razor template editor that we have for TagHelpers. With the Component.Invoke syntax, there is no obvious way to add CSS classes or get tooltips to assist in configuring the component like we have with the TagHelper feature. Finally, this keeps us in “HTML Editing” mode and allows a developer to avoid shifting into C# in order to reference a ViewComponent they want to add to a page.
To enable invoking your View Components as Tag Helpers simply add your View Components as Tag Helpers using the @addTagHelpers directive:
@addTagHelper "*, WebApplication1"
Middleware as MVC filters
Middleware typically sits in the global request handling pipeline. But what if you want to apply middleware to only a specific controller or action? You can now apply middleware as an MVC resource filter using the new MiddlewareFilterAttribute. For example, you could apply response compression or caching to a specific action, or you might use a route value based request culture provider to establish the current culture for the request using the localization middleware.
To use middleware as a filter you first create a type with a Configure method that specifies the middleware pipeline that you want to use:
You then apply that middleware pipeline to a controller, an action or globally using the MiddlewareFilterAttribute:
Cookie-based TempData provider
To use the cookie-based TempData provider you register the CookieTempDataProvider service in your ConfigureServices method after adding the MVC services as follows:
services.AddMvc();
services.AddSingleton<ITempDataProvider, CookieTempDataProvider>();
View compilation
The Razor syntax for views provides a flexible development experience where compilation of the views happens automatically at runtime when the view is executed. However, there are some scenarios where you do not want the Razor syntax compiled at runtime. You can now compile the Razor views that your application references and deploy them with your application. To enable view compilation as part of publishing your application,
- Add a reference to “Microsoft.AspNetCore.Mvc.Razor.ViewCompilation.Design” under the “dependencies” section.
- Add a reference to “Microsoft.AspNetCore.Mvc.Razor.ViewCompilation.Tools” under the tools section
- Add a postpublish script to invoke view compiler:
"scripts": {

   "postpublish": "dotnet razor-precompile --configuration %publish:Configuration% --framework %publish:TargetFramework% --output-path %publish:OutputPath% %publish:ProjectPath%"

}
Azure App Service logging provider
The Microsoft.AspNetCore.AzureAppServicesIntegration package allows your application to take advantage of App Service specific logging and diagnostics. Any log messages that are written using the ILogger/ILoggerFactory abstractions will go to the locations configured in the Diagnostics Logs section of your App Service configuration in the portal (see screenshot). We highly recommend using this logging provider when deploying an application to Azure App Service. Prior to this feature, it was very difficult to capture log files without a third party provider or hosted service.
Usage:
Add a reference to the Microsoft.AspNetCore.AzureAppServicesIntegration package and add the one line of code to UseAzureAppServices when configuring the WebHostBuilder in your Program.cs.
  var host = new WebHostBuilder()
    .UseKestrel()
    .UseAzureAppServices()
    .UseStartup<Startup>()
    .Build();
NOTE: UseIISIntegration is not in the above example because UseAzureAppServices includes it for you, it shouldn’t hurt your application if you have both calls, but explicitly calling UseIISIntegration is not required. Once you have added the UseAzureAppServices method then your application will honor the settings in the Diagnostics Logs section of the Azure App Service settings as shown below. If you change these settings, switching from file system to blob storage logs for example, your application will automatically switch to logging to the new location without you redeploying.

Azure Key Vault configuration provider
Azure Key Vault is a service that can be used to store secret cryptographic keys and other secrets in a security hardened container on Azure. You can set up your own Key Vault by following the Getting Started docs. The Microsoft.Extensions.Configuration.AzureKeyVault package then provides a configuration provider for your Azure Key Vault. This package allows you to retrieve configuration from Key Vault secrets on application start and hold it in memory, using the normal ASP.NET Core configuration abstractions to access the configuration data.
Basic usage of the provider is done like this:
For an example on how to add the Key Vault configuration provider see the sample here: https://github.com/aspnet/Configuration/tree/dev/samples/KeyVaultSample
Redis and Azure Storage Data Protection Key Repositories
The Microsoft.AspNetCore.DataProtection.AzureStorage and Microsoft.AspNetCore.DataProtection.Redis packages allow storing your Data Protection keys in Azure Storage or Redis respectively. This allows keys to be shared across several instances of a web application so that you can share an authentication cookie, or CSRF protection across many load balanced servers running your ASP.NET Core application. As data protection is used behind the scenes for a few things in MVC it’s extremely probable once you start scaling out you will need to share the keyring. Your options for sharing keys before these two packages would be to use a network share with a file based key repository.
Examples:
Azure:
services.AddDataProtection()
  .PersistKeysToAzureBlogStorage(new Uri(“<blob URI including SAS token>”));
Redis:
// Connect
var redis = ConnectionMultiplexer.Connect("localhost:6379");
// Configure
services.AddDataProtection()
  .PersistKeysToRedis(redis, "DataProtection-Keys");
NOTE: When using a non-persistent Redis instance then anything that is encrypted using Data Protection will not be able to be decrypted once the instance resets. For the default authentication flows this would usually just mean that users are redirected to login again. However, for anything manually encrypted with Data Protections Protect method you will not be able to decrypt the data at all. For this reason, you should not use a Redis instance that isn’t persistent when manually using the Protect method of Data Protection. Data Protection is optimized for ephemeral data.
In our initial release of dependency injection capabilities with ASP.NET Core, we heard feedback that there was some friction in enabling 3rd party providers. With this release, we are acting on that feedback and introducing a new IServiceProviderFactory interface to enable those 3rd party containers to be configured easily in ASP.NET Core applications. This interface allows you to move the construction of the container to the WebHostBuilder and allow for further customization of the mappings of your container in a new ConfigureContainer method in the Startup class.
Developers of containers can find a sample demonstrating how to connect their favorite provider, including samples using Autofac and StructureMap on GitHub.
This additional configuration should allow developers to use their favorite containers by adding a line to the Main method of their application that reads as simple as “UseStructureMap()”
Added Support for WebSockets
WebSockets are now supported for ASP.NET Core with an additional middleware component. Add a reference to the Microsoft.AspNetCore.WebSockets package and you will be able to add the web sockets feature in the Startup/Configure method with this syntax:
app.UseWebSockets();
Your project will then have access to a WebSockets property on the HttpContext object. You can write your own middleware for the pipeline to interpret and interact with the requests handed to your application by a websocket. You could add this middleware to your configured pipeline with some code like the following:
app.Use(async (context, next) =>
{
  if (context.WebSockets.IsWebSocketRequest)
  {
    var webSocket = await context.WebSockets.AcceptWebSocketAsync();
    await DoSomethingCool(context, webSocket);
  }
  else
  {
    await next();
  }
});
The websocket object has methods to SendAsync and ReceiveAsync data. For some samples, check out the samples folder in the WebSockets repository.
Summary
The ASP.NET Core 1.1 release improves significantly on the previous release of ASP.NET Core. With improved tooling in the Visual Studio 2017 RC and new tooling in Visual Studio for Mac, we think you’ll find web development to be a delightful experience. This is a fully supported release and we encourage you to use the new features to better support your applications. You will find a list of known issues with workarounds on GitHub, should you run into trouble. We will continue to improve the fastest mainstream full-stack framework available on the web, and want you to join us. Download Visual Studio 2017 RC and Visual Studio for Mac from https://visualstudio.com and get the latest .NET Core SDK from https://dot.net
 Light
Light Dark
Dark
0 comments