
Developing high level workflows in Microsoft Dynamics CRM 4.0 Titan (Web Editor)
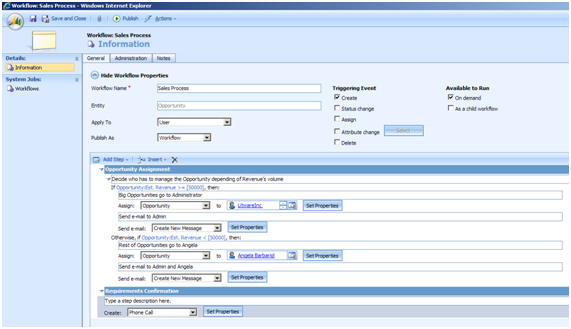
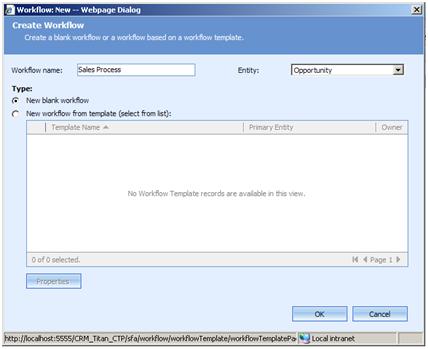
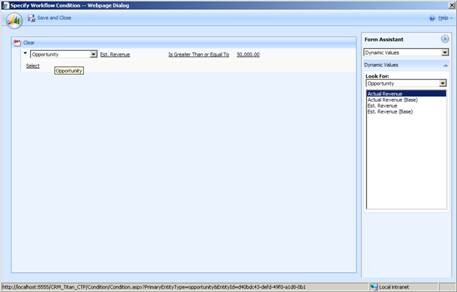
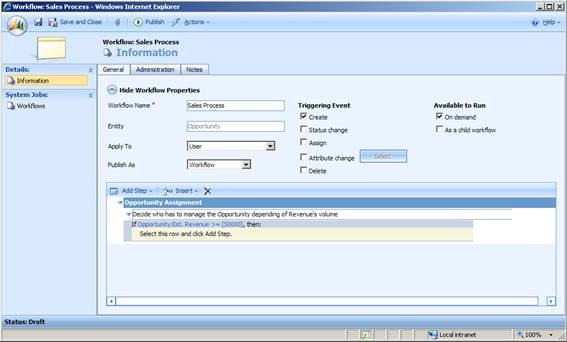
In Microsoft Dynamics CRM 4.0 ‘Titan’ we can choose to develop workflows among two types of workflows, but both of them are internally based on WF (Windows Workflows Foundation, which is part of .NET 3.x). So, we can choose between the following: – High level workflows with CRM Web client as development environment: o It is suitable for business administrators who want to create basic workflows – Low level workflows with Visual Studio and WF as development environment: o It is suitable for .NET developers who have to develop complex and powerful workflows. By the way, SharePoint v3 & MOSS-2007 are following a similar pattern, high level workflows created with Office SharePoint Designer and low level workflows developed with Visual Studio and WF. So, in this blog-posting I’m gonna talk about the first type, I mean, about “High level workflows with CRM Web client as development environment”. The most important change to workflows (visible for end-users) in Microsoft Dynamics CRM 4.0 is the new Web-based user interface. Users no longer need access to the Microsoft Dynamics CRM server to create, modify, and monitor workflows (like when creating workflows in CRM 3.0). Instead, end-users can perform these actions on their own computers. Therefore, workflow is now much more visible and useful for Microsoft Dynamic CRM end-users (Business administrators, for instance). New Web User Interface for creating workflows. The new user interface exposes the workflow life cycle to end users so they can: • Create workflows • Run workflows • Monitor workflows Users with adequate permissions can participate in all of these phases. The following screen shot shows a Workflow (CRM 4.0 Titan web based workflow) already finished: Creating a basic Workflow So, what I’m gonna do now, is to create that high level workflow, so you can see how ease is to make it with the CRM web workflow editor. 1. Start Dynamics CRM 4.0 web client and in the navigation pane, click Settings, and then click Workflows. 2. Click New. Then the ‘Create Workflow’ window appears: 3. In the Workflow name box, type a name for the workflow. For instance, I typed “Sales Process”. 4. In the Entity box, select the entity you want to base on this workflow, in this case Opportunity. 5. Under Type, select New blank workflow, and then click OK. Then we have the workflow web editor, which is logically empty, at the moment, like the following screen-shot: 6. Under Available to Run, select On demand. So, actually, it should be kind of the following screen-shot: Then, instead of directly creating actions (steps), we are first going to create a stage, because we’re going to distribute all our actions within stages. Stages are not mandatory, but they are good to classify our steps and internally it is good for workflow persistence (persistence in database can be based on stages). That is why I’m creating this workflow split in stages. 7. Click Add Step, and then click ’Stage’ and write on its description, ‘Opportunity Assignment’. So we have our first stage! 8. Then, we want to check about the opportunity’s volume. So, if it is a big opportunity, we’ll assign it to any person, and so on. So, what we gotta do now is add a new “check condition” and configure it as the following screen shot, I mean, in case that the opportunity is greater than 50.000, it will be a big opportunity son we’ll execute several activities. The following is how we’ll configure that “if then”:
Once we have finished that control sentence, we should see our workflow as the following:
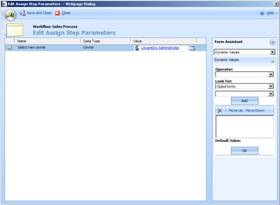
9. Then, we click on the ‘Select this row and Add Step’ and we create an assignment step. So, in our case, we want to assign this opportunity to the “Administrator” (could be any other real user, etc.). Here is how we configure it:
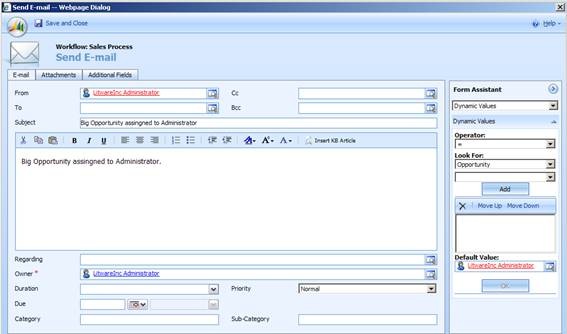
10. After that, but within same “if then”, we want to send an e-mail to the target user (Administrator), so he’ll be aware of this opportunity. We add a new step, called “Send E-mail”. Here is how we can configure an e-mail:
11. Now we do both two steps, but in this case within the ‘else’. And of course, because it is for smaller opportunities, we should assign it to any other user. Also, we can send a notification about it (email).
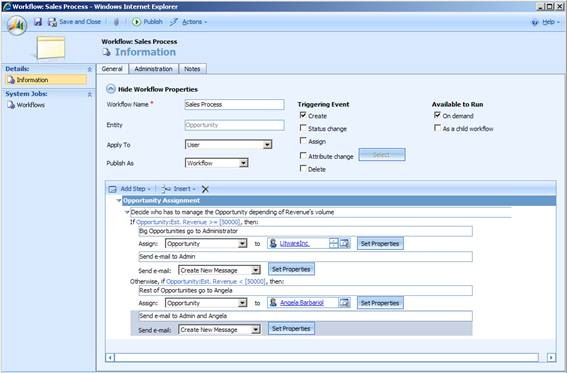
So, at this moment, our first stage and workflow would look like this:
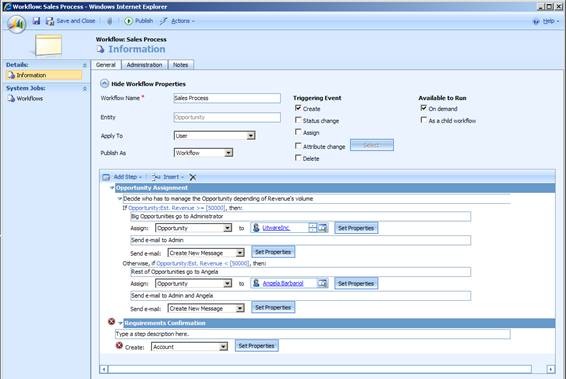
12. Then, we create a second stage, called “Requirements Confirmation”.
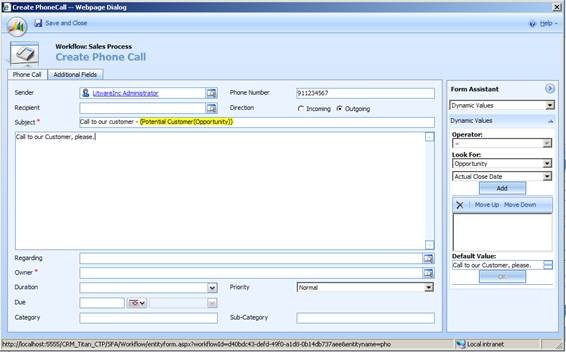
After creating that stage, we add a “Create Record” step where we specify that we want to create a Phone Call.
Here is how it looks like before selecting the “Phone Call” type:
13. And down below we can see how we can create a phone call from within our Workflow!
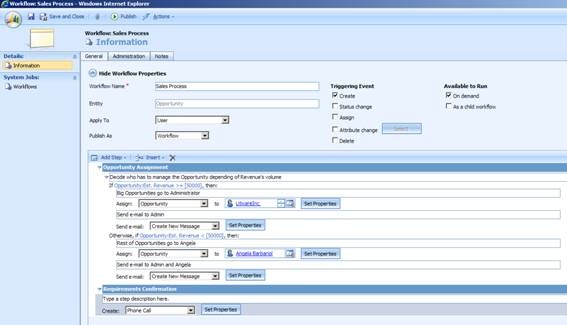
14. So, at the end of our work, this is how it would like (our finished workflow):
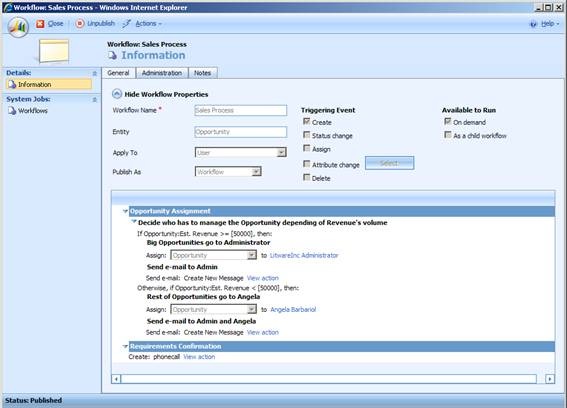
Finally, when we publish our workflow, it changes a little bit, basically it has a cleaner look. J
So far so good! We have finished creating our workflow. Now what we have to do is test it!
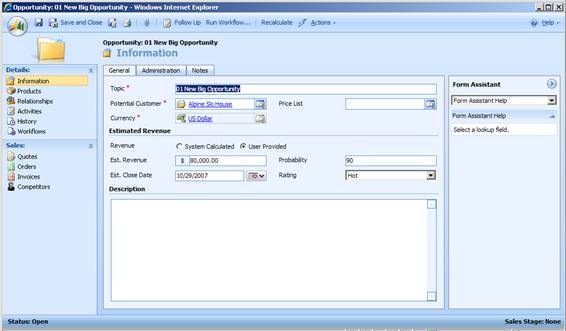
We gotta go to sales, Opportunities and then create a new opportunity. Depending of the way you’d like the workflow to go, write a “Estiamted Revenue” greater or smaller than 50.000 (the currency will be the one selected in your entity, Euro, U.S. Dollar, etc.).
Here you can see how I tested my workflow creating an opportunity:
Just after you save your new opportunity, the workflow will be launched!. So, wait a few seconds and after that you could check that your opportunity is assigned to the Administrator or to the other person you selected.
Another tip…, you can open again your workflow and monitor how it executed. See that option on the left menu after opening your workflow.
So!, next important milestone could be trying another workflow development but from Visual Studio and WF (Workflow Foundation)!!. That is a bit more complicated, but it unleashes all .NET and WF potential!!. 🙂
![]()
 Light
Light Dark
Dark
0 comments