
Live Unit Testing in Visual Studio 2017 Enterprise
Live Unit Testing is present in the Enterprise edition of Visual Studio 2017 and it’s available for C# and VB projects that target the .NET Framework. [UPDATE 5/23/2017 : We now also support .NET Core Framework. Check out this post announcing .NET Core 2.0 Preview 1 to learn about it.] This is a more comprehensive blog than the one we published in November. In this blog, we focus on all capabilities including some that were not mentioned in the earlier blog. It also includes an updated video that demos all these capabilities. FAQs are covered as well at the end.
This is a productivity feature, which provides real-time feedback directly in the editor on how code changes are impacting your unit tests and your code coverage. This will help you maintain quality by keeping the tests passing as you make changes. It will also remind you when you need to write additional unit tests as you are making bug fixes and adding features.
The Live Unit Testing capabilities in Visual Studio 2017 Enterprise are highlighted below:
- Easy to Start, Stop, Pause or Restart
- View coverage information in the editor as you type
- Quickly navigate to failed test
- Seamlessly debug failed test, edit and continue without having to restart
- Include/Exclude targeted test methods or projects for large solutions
- Integrated with Test Explorer
- Configurable with Tools/Options/Settings
- Adaptable to work with three popular unit testing frameworks
- FAQs
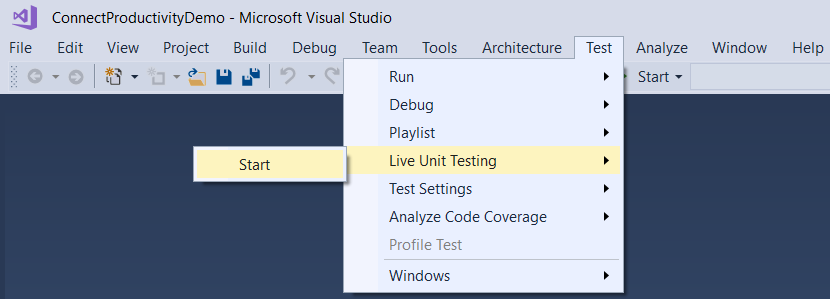
Easy to Start, Stop, Pause or Restart
To enable Live Unit Testing, go to the Test command of the top-level menu bar, choose “Live Unit Testing”, then “Start”:
At any time, you can temporarily pause or completely stop Live Unit Testing; for example, when you are in the middle of a refactoring, and you know that your tests will be broken for a while. It is as simple as opening the Test menu, selecting Live Unit Testing, and choosing one of the following options:
- Pause to suspend Live Unit Testing. When Live Unit Testing is paused, you do not see any coverage visualization in the editor, but all the data that is collected so far is preserved. When you are ready to resume, select Continue from the Live Unit Testing menu. Live Unit Testing will do the necessary work to catch up with all the edits that have been made while it was paused and will update the glyphs appropriately.
- Stop to completely stop Live Unit Testing. When Live Unit Testing is started after it had been stopped, it takes longer to show the glyphs than when it was paused and resumed. This is because it loses all data when it is stopped.
- Restart is the equivalent to selecting Stop and immediately selecting Start to start Live Unit Testing again.
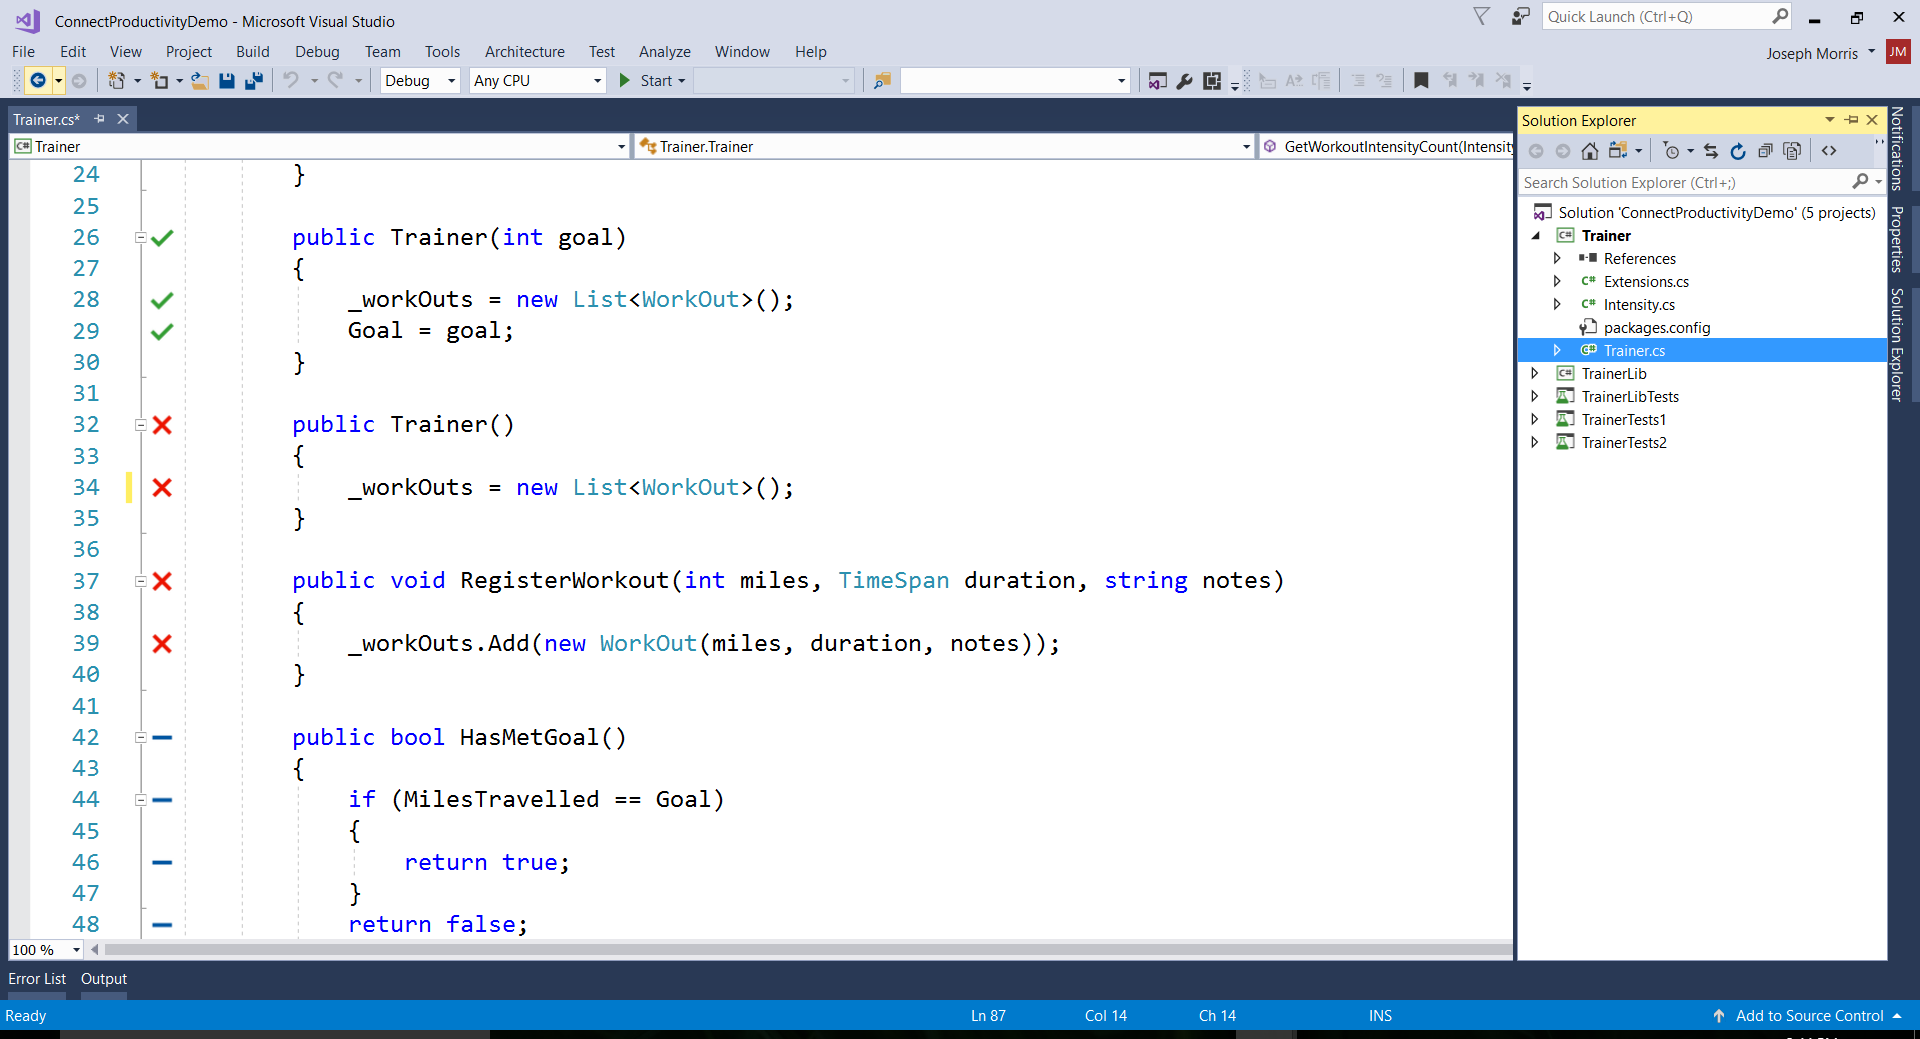
View coverage information in the editor as you type
Once enabled, Live Unit Testing helps you quickly see whether the code you’re writing is covered and if the tests that cover it are passing without leaving the editor. Unit test results and coverage visualizations appear on a line-by-line basis in the code editor.
There are three potential states for any given line:
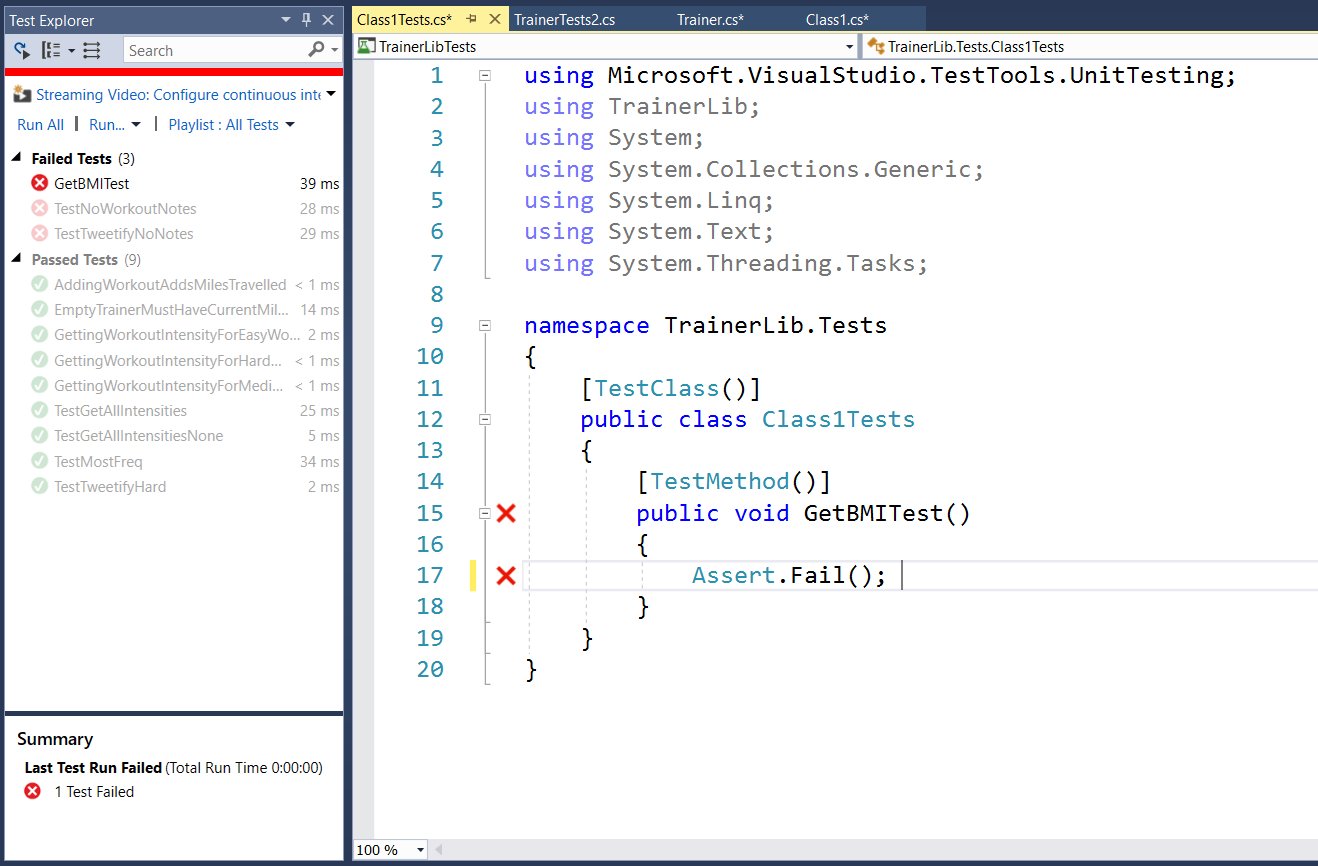
| A line of executable code that is covered by at least one failing test is decorated with a red “x”. | |
| A line of executable code that is covered by only passing tests is decorated with a green “✓”. | |
| A line of executable code that is not covered by any test is decorated it with a blue dash “-” |
Live Unit Testing coverage visualization is updated immediately as you modify code in the code editor. While processing the edits, visualization changes to indicate that the data is not up-to-date, as shown below. Once processing is done, it transitions to one of the final states described earlier:
Quickly navigate to failed test
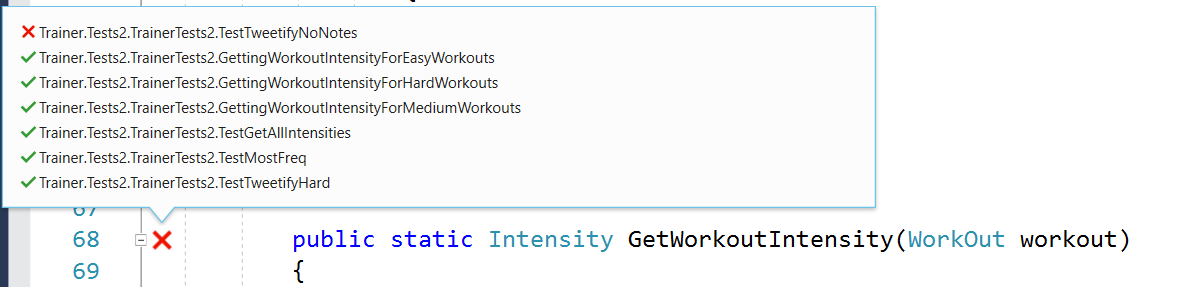
At any point in time you can hover over the “✓” or “x” to see how many tests are hitting the given line, as seen in image below:
![]()
To see what tests are exercising the given line, click on “✓” or “x”.
When you hover over the failed test in the tool tip, it expands to provide additional info to give more insight into the failure:
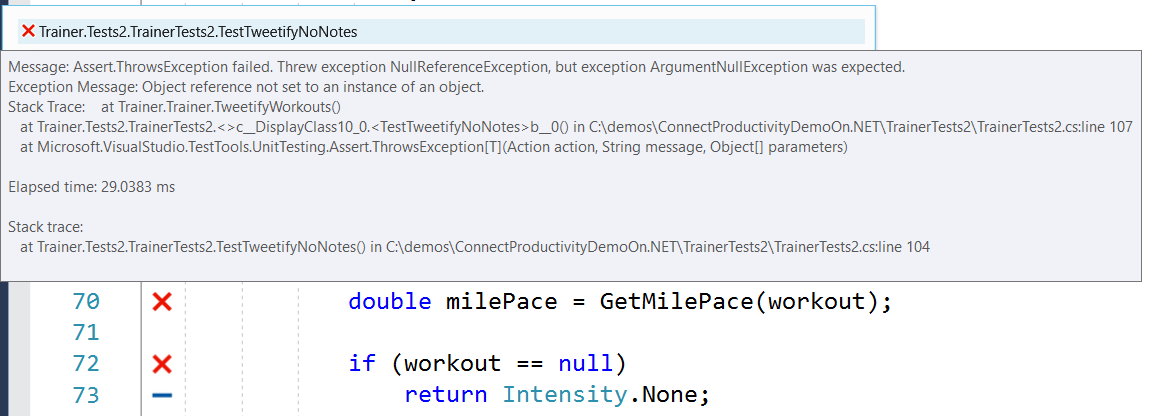
To navigate directly to the failed test, click on it in the expanded UI.
Seamlessly debug failed test, edit and continue without having to restart
From the failed test, you can easily debug to the product code, make edits, and continue, without having to pause or stop Live Unit Testing. However, if you want Live Unit Testing to pause when you are debugging then there is an option in Tools/Options page, as shown in section 7 below, for Live Unit Testing to do that.
Include/Exclude targeted test methods or projects for large solutions
Live unit testing enables you to avoid the overhead of continuously running the unit tests for code that you aren’t touching or affecting, especially when you are dealing with a large code base. When you enable Live Unit Testing on a solution with 10 or more projects, you will see a dialog box, that gives a choice to include all or exclude all projects:

If you select Yes, you get coverage for all projects. If you select No, then Live Unit Testing excludes all projects from Live Unit Testing. You can then go ahead and include targeted tests, by right clicking a test project in solution explorer and choosing Live Tests/Include:
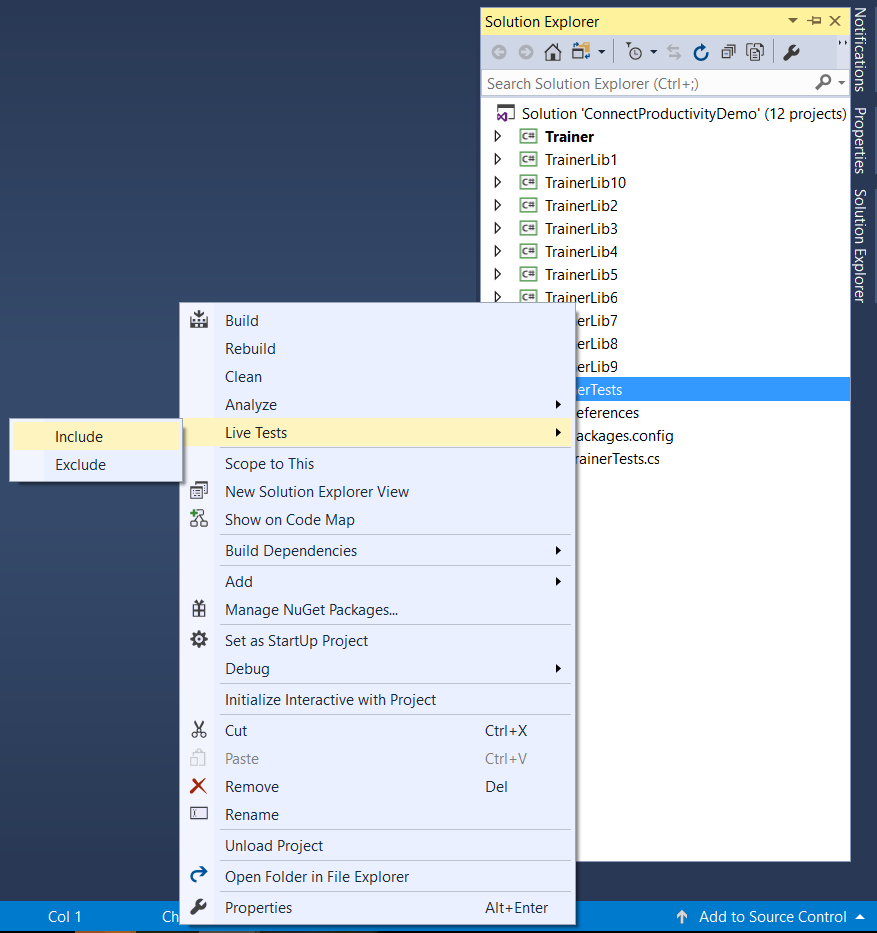
The smallest unit of inclusion in or exclusion from Live Unit Testing is a test method.
You can also include or exclude tests by right-clicking in the code editor:
- If you right click anywhere inside the method then that method can be included or excluded.
- If you right click outside the method body but somewhere inside the containing class, then all tests inside that class can be included or excluded.
- If you right click outside the class but somewhere inside the file, then all tests in that file can be included or excluded.
The last include/exclude action always wins. If you had explicitly excluded some tests within a class and go back to it later and include the entire containing class, then all tests inside that class will get included. This includes the tests that were previously explicitly excluded.
Include/Exclude state is saved as a user setting and is remembered when a solution is closed and reopened.
See FAQs section below for more information on how to exclude tests.
Integrated with Test Explorer
The Test Explorer Window and Live Unit Testing are synchronized. As you change your code, Live Unit Testing runs the impacted tests, and only those Tests are shown bright in the Test Explorer Window. The non-impacted tests are dimmed out as shown in image below:
Configurable with Tools/Options/Settings
To configure the available options for Live Unit Testing go to Visual Studio’s Options from the Tools menu, and select Live Unit Testing in the left pane of the Options dialog. The configurable options include:
- Whether Live Unit Testing runs automatically when a solution is opened.
- Whether Live Unit Testing pauses when a solution is built and debugged, or when a system’s battery power falls below a specified threshold.
- The interval after which a test case times out; the default is 30 seconds.
- The number of test processes that Live Unit Testing would create.
- The Live Unit Testing log information written to the output window. Options include no logging (None), error messages only (Error), error and informational messages (Info – this is the default), or all detail (Verbose).

Adaptable to work with three popular unit testing frameworks
Live Unit Testing in Visual Studio works with three popular unit testing frameworks: MSTest, xUnit.net, and NUnit. The adapters and frameworks referenced in every project in the solution must meet or exceed the minimum versions given below else Live Unit Testing will give an error. You can get these from NuGet.org.
| Test Framework | Visual Studio Adapter Version | Framework version |
| xUnit.net | xunit.runner.visualstudio version 2.2.0-beta3-build1187 | xunit 2.0 |
| NUnit | NUnit3TestAdapter version 3.5.1 | NUnit version 3.5.0 |
| MSTest | MSTest.TestAdapter 1.1.4-preview [UPDATE 5/23/2017 : Minimum version needed is now updated to MSTest.TestAdapter 1.1.11] | MSTest.TestFramework 1.0.5-preview [UPDATE 5/23/2017 : Minimum version needed is now updated to MSTest.TestFramework 1.1.11] |
If you have older adapter and test framework references from your existing projects, be sure to remove them (make sure you remove the reference to Microsoft.VisualStudio.QualityTools.UnitTestFramework, if you are using MSTest.) and add the new ones for Live Unit Testing to work.
FAQs
You can find latest Live Unit Testing FAQs on our MSDN documentation wiki.
Q: Does Live Unit Testing work with .NET Core?
A: Yes. Live Unit Testing works with .NET Core and .NET Frameworks. Support for .NET Core was added recently in Visual Studio 2017 version 15.3 Preview.
Q: Why doesn’t Live Unit Testing work when I turn it on?
A: Output Window (when Live Unit Testing drop down is selected) should tell you why Live Unit Testing is not working. Live Unit testing may not work because of one of the following reasons:
- If NuGet packages referenced by the projects in the solution have not been restored, then Live Unit Testing will not work. Doing an explicit build of the solution or restoring NuGet packages on the solution before turning Live Unit Testing on should resolve this issue.
- If you are using MSTest-based tests in your projects, make sure that you remove the reference to Microsoft.VisualStudio.QualityTools.UnitTestFramework and add references to the latest MSTest NuGet packages (see above under the “Adaptable to work with three popular unit testing frameworks” section).
- At least one project in your solution should have either a NuGet reference or direct reference to xUnit, NUnit or MSTest test framework. This project should also reference corresponding Visual Studio test adapters NuGet package. Visual Studio test adapter can also be referenced through a .runsettings file. The .runsettings file will need to have an entry like the one below:
<RunSettings>
<RunConfiguration>
<TestAdaptersPaths>c:\Path\To\Your\TestAdapter\</TestAdaptersPaths>
</RunConfiguration>
</RunSettings> |
Q: Can I customize my Live Unit Testing builds?
A: If your solution requires custom steps to build for instrumentation (Live Unit Testing) that are not required for the “regular” non-instrumented build, then you can add code to your project or .targets files that checks for the BuildingForLiveUnitTesting property and performs custom pre/post build steps. You can also choose to remove certain build steps (like publishing or generating packages) or to add build steps (like copying prerequisites) to a Live Unit Testing build based on this project property. This will not alter your regular build in any way and will only impact Live Unit Testing builds. For e.g., there may be a target which produces NuGet packages during a regular build. You probably do not want NuGet packages to be generated after every edit you make. So, you can disable that target in Live Unit Testing build by doing something like the following:
<Target Name="GenerateNuGetPackages" BeforeTargets="AfterBuild" Condition="'$(BuildingForLiveUnitTesting)' != 'true'">
<Exec Command='"$(MSBuildThisFileDirectory)..\tools\GeneratePackages '/>
</Target> |
Q: Why do I get the following error when Live Unit Testing tries to build my solution “… appears to unconditionally set ‘<OutputPath>’ or ‘<OutDir>’. Live Unit Testing will not execute tests from the output assembly”?
A: This can happen if the build process for your solution unconditionally overrides the <OutputPath> or <OutDir> such that it does not fall under <BaseOutputPath>. In such cases, Live Unit Testing will not work because it also overrides these to ensure that build artifacts are dropped to a folder under <BaseOutputPath>. If you must override the location where you want your build artifacts to be dropped in a regular build, then override the <OutputPath> conditionally and based on <BaseOutputPath>. For e.g. if your build is overriding the <OutputPath> as shown below:
<Project>
<PropertyGroup>
<OutputPath>$(SolutionDir)Artifacts\$(Configuration)\bin\$(MSBuildProjectName)</OutputPath>
</PropertyGroup>
</Project> |
Then you can replace it with the text below:
<Project>
<PropertyGroup>
<BaseOutputPath Condition="'$(BaseOutputPath)' == ''">$(SolutionDir)Artifacts\$(Configuration)\bin\$(MSBuildProjectName)\</BaseOutputPath>
<OutputPath Condition="'$(OutputPath)' == ''">$(BaseOutputPath)</OutputPath>
</PropertyGroup>
</Project> |
This ensures that <OutputPath> lies within the <BaseOutputPath> folder.
Do not override <OutDir> directly in your build process; override <OutputPath> instead for build artifacts to be dropped to a specific location.
Q: I want the artifacts of a Live Unit Testing build to go to a specific location instead of the default location under the .vs folder. How can I change that?
A: Set the LiveUnitTesting_BuildRoot user level environment variable to the path where you want the Live Unit Testing build artifacts to be dropped.
Q: How is running tests from Test Explorer window different from running tests in Live Unit Testing?
A: There are several differences:
- Running or debugging tests from the Test Explorer window runs regular binaries, whereas Live Unit Testing runs instrumented binaries. If you want to debug instrumented binaries, adding a Launch method call in your test method causes the debugger to launch whenever that method is executed (including when it is executed by Live Unit Testing), and you can then attach and debug the instrumented binary. However, our hope is that instrumentation is transparent to you for most user scenarios, and you do not need to debug instrumented binaries.
- Live Unit Testing does not create a new AppDomain to run tests, but tests run from the Test Explorer window do create a new AppDomain.
- Live Unit Testing runs tests in each test assembly sequentially, whereas if you run multiple tests from the Test Explorer window and you selected the Run Tests in Parallel button, they will run in parallel.
- Discovery and execution of tests in Live Unit Testing goes through version 2 of TestPlatform, whereas the Test Explorer window still uses version 1. You should not notice a difference in most cases though.
- Test Explorer currently runs tests in a single-threaded apartment (STA) by default, whereas Live Unit Testing runs tests in a multithreaded apartment (MTA). To have MSTest tests run in STA in Live Unit Testing, decorate the test method or the containing class with the <STATestMethod> or <STATestClass> attribute that can be found in the MSTest.STAExtensions 1.0.3-beta NuGet package. For NUnit, decorate the test method with the < RequiresThread(ApartmentState.STA)> attribute, and for xUnit, with the <STAFact> attribute.
Q: How do I exclude tests from participating in Live Unit Testing?
A: Please refer to include/exclude functionality mentioned above for user specific setting. This is extremely useful when you want to run a specific set of tests for a particular edit session or to persist your own personal preferences. For solution specific settings, you can apply the ExcludeFromCodeCoverageAttribute programmatically to exclude methods, properties, classes, or structures from getting instrumented by Live Unit Testing. Additionally, you can also set <ExcludeFromCodeCoverage> property to “true” in your project file, to exclude the whole project from getting instrumented. The tests which have not been instrumented will still be run by Live Unit Testing but coverage from those will not be visualized.
You can check if “Microsoft.CodeAnalysis.LiveUnitTesting.Runtime” is loaded in the current AppDomain and disable tests based on that. For e.g. you could do something like the following with xUnit:
[ExcludeFromCodeCoverage]
public class SkipLiveFactAttribute : FactAttribute
{
private static bool s_lutRuntimeLoaded = AppDomain.CurrentDomain.GetAssemblies().Any(a => a.GetName().Name == "Microsoft.CodeAnalysis.LiveUnitTesting.Runtime");
public override string Skip => s_lutRuntimeLoaded ? "Test excluded from Live Unit Testing" : "";
}
public class Class1
{
[SkipLiveFact]
public void F()
{
Assert.True(true);
}
} |
Q: Why are Win32 PE headers different in instrumented assemblies built by Live Unit testing?
A: There is a known bug that may result in Live Unit Testing builds failing to embed the following Win32 PE Header data. Tests that rely on these values may fail when executed by Live Unit testing:
- File Version (specified by AssemblyFileVersionAttribute in code)
- Win32 Icon (specified by /win32icon: on command line)
- Win32 Manifest (specified by /win32manifest: on command line)
Q: Why does Live Unit testing keep building my solution all the time even if I am not making any edits?
A: This can happen if the build process of your solution generates code which are part of the solution itself, and your build target files do not have appropriate inputs and outputs specified. Targets should be given a list of inputs and outputs so that MSBuild can perform the appropriate up-to-date checks and determine whether a new build is required. Live Unit Testing will kick off a build whenever it detects that source files have changed. Because the build of your solution generates source files, Live Unit Testing will get into infinite build loop. If, however the inputs and outputs of the target are checked then when Live Unit Testing starts the second build (after detecting the newly generated source files from previous build), it will break out of the loop because the inputs and outputs checks will indicate that everything is up-to-date.
Q: How does Live Unit testing work with the Lightweight Solution Load feature?
A: Live Unit Testing currently doesn’t work well with the Lightweight Solution load feature if all projects in the solution are not yet loaded. You may get incorrect coverage information in such scenarios.
Q: Why does Live Unit Testing not capture coverage from a new process created by a test?
A: This is a known issue which we were not able to fix in Visual Studio 2017 version 15.0. It is now fixed in Visual Studio 2017 version 15.2.
Q: Why does nothing happen after I include or exclude tests from Live Test Set?
A: This is a known issue which we were not able to fix in Visual Studio 2017 version 15.0. It is now fixed in Visual Studio 2017 version 15.2.
Q: Why do I not see any icons in the editor even though Live Unit Testing seems to be running the tests based on the messages in the output window?
A: This will happen if the assemblies that Live Unit Testing is operating upon is not instrumented for any reason. For e.g. Live Unit Testing is not compatible with projects that set <UseHostCompilerIfAvailable>false</UseHostCompilerIfAvailable>. In this case, your build process will need to be updated to either not set this or change it to false for Live Unit Testing to work.
Q: How do I collect more detailed logs to file bug reports?
A: You can do several things to collect more detailed logs:
- Go to Tools > Options > Live Unit Testing and change the logging option to verbose. This causes more detailed logs to be shown in the output window.
- Set the LiveUnitTesting_BuildLog user environment variable to the path of the file you want to use to capture the MSBuild log. Detailed MSBuild log messages from Live Unit Testing builds can then be retrieved from this file.
- Create a user-level environment variable named VS_UTE_DIAGNOSTICS and set it to 1 (or any value) and restart Visual Studio. Now you should see lots of logging in the Output – Tests tab in Visual Studio.
Conclusion
Live Unit Testing will improve your productivity, test coverage and software quality. .NET developers, check out this feature in Visual Studio 2017. For developers who are part of a team that practices test-driven development, Live Unit Testing gamifies their workflow; in other words, all their tests will fail at first, and as they implement each method, they will see them turn green. It will evoke the same feeling as a nod of approval from your coach, who is watching you intently from the sidelines, as you practice your art!
Watch this Live Unit Testing video, where we demonstrate this feature:
 |
Joe Morris, Senior Program Manager, Visual Studio
@_jomorris
Joe has been with Microsoft for 19 years, with a particular focus on static analysis and developer productivity for the last three years. |
 |
Manish Jayaswal, Principal Engineering Manager, Visual Studio
@jayaswalmk
Manish has years of management experience in commercial software development with deep technical expertise in compiler technology, debugger, programming languages, quality assurance and engineering system. |
 Light
Light Dark
Dark
1 comment
Hi,
I started using VS unit testing and removed all other testing tools like nCrunch. I want to know the status of the test runs like how nCrunch displays at the right bottom of visual studio. It would be cool feature to include. And is it possible to add the feature of right click menu to debug from the test or any other code.
Eagerly waiting for new updates.
Thank you,
Dheeraj