Visual Basic Windows Phone 7 Series #11. How to create an accelerometer for Windows Phone 7
Previously, I explained how to create a panorama and pivot effect for Windows Phone 7. In this blog post, I want to share a sample that will help you to create an accelerometer for Windows Phone 7. An accelerometer is a device that measures the proper acceleration of the device. It is a sensor that measures acceleration forces caused by moving the sensor. In this application the accelerometer feature will allow you to determine the orientation and the motion of the phone.
Now I will demonstrate how to create an accelerometer for Windows Phone 7, using Visual Basic for Windows Phone Developer Tools. Sounds interesting? So let’s begin.
But hey, wait a minute! Before you create the accelerometer application, you need to install the following applications:
- Visual Studio 2010 Professional, Premium, or Ultimate. If you do not have any of the releases, you can download any of the following trial versions as per your preference: Professional, Premium, or Ultimate.
- Windows Phone Developer Tools RTW
- Visual Basic
for Windows Phone Developer Tools – RTW
Note: You can install the newer version- Windows Phone Developer Tools 7.1 Beta instead of the above mentioned two tools as it will take comparatively less time. However, this sample was created using the previous version.
The accelerometer can be created in 4 simple steps as follows:
- Create a sample application and add controls
- Add event handlers
- Build and debug the application
- Rebuild in the release mode before publishing
Step 1 – Create a sample application and add controls
Create a sample application
- Create a new project and browse to the “Silverlight for Windows Phone” node.
- Select the “Windows Phone Application” template.
- Enter a name for the application.

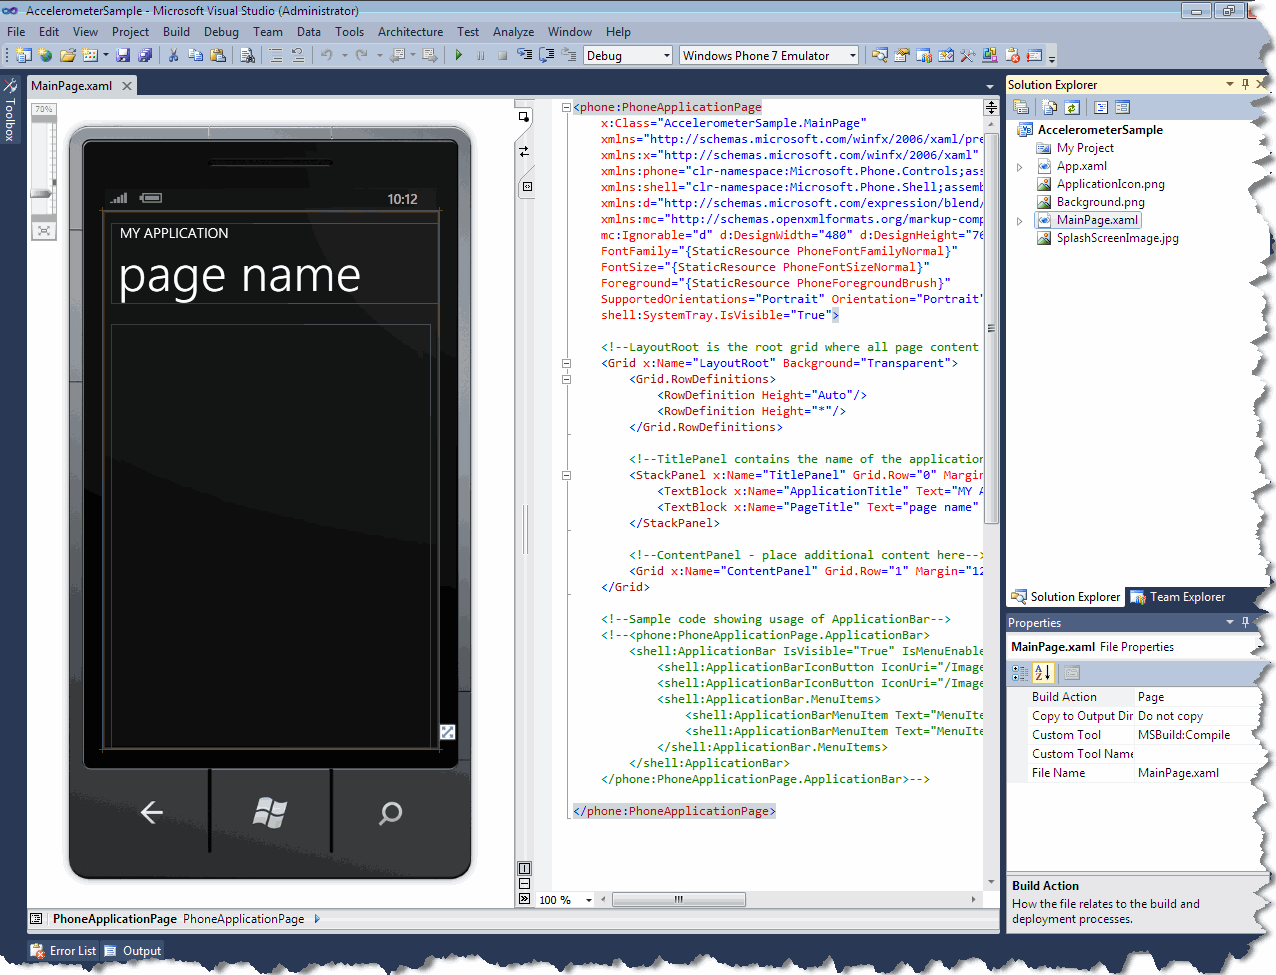
- Click OK. The MainPage.xaml page is displayed.

- In Solution Explorer, right-click the application name and then select Add Reference.
- Select Microsoft.Devices.Sensors from the list, and then click OK.

Add controls
- Click the MY APPLICATION text. In the Properties window, change the text property to “ACCELEROMETER SAMPLE”.
- Click the page name text. In the Properties window, change the Text property to “accelerometer”.
- In Solution Explorer, right-click the application name, and then add a new folder.
- Rename the new folder as “Images”, add the required images to the folder.
- From the toolbox, drag and drop the TextBlock control to the design surface.
- Click the TextBlock control. In the Properties window, change the Text property to “status:”
- From the toolbox, drag and drop another TextBlock control to the design surface.
- Click the TextBlock control. In the Properties window, change the Text property to “accelerometer stopped”
- From the toolbox, drag and drop the third TextBlock control to the design surface.
- Click the TextBlock control. In the Properties window, change the Text property to “x:”
- From the toolbox, drag and drop the fourth TextBlock control to the design surface.
- Click the TextBlock control. In the Properties window, change the Text property to “y:”
- From the toolbox, drag and drop the fifth TextBlock control to the design surface.
- Click the TextBlock control. In the Properties window, change the Text property to “z:”
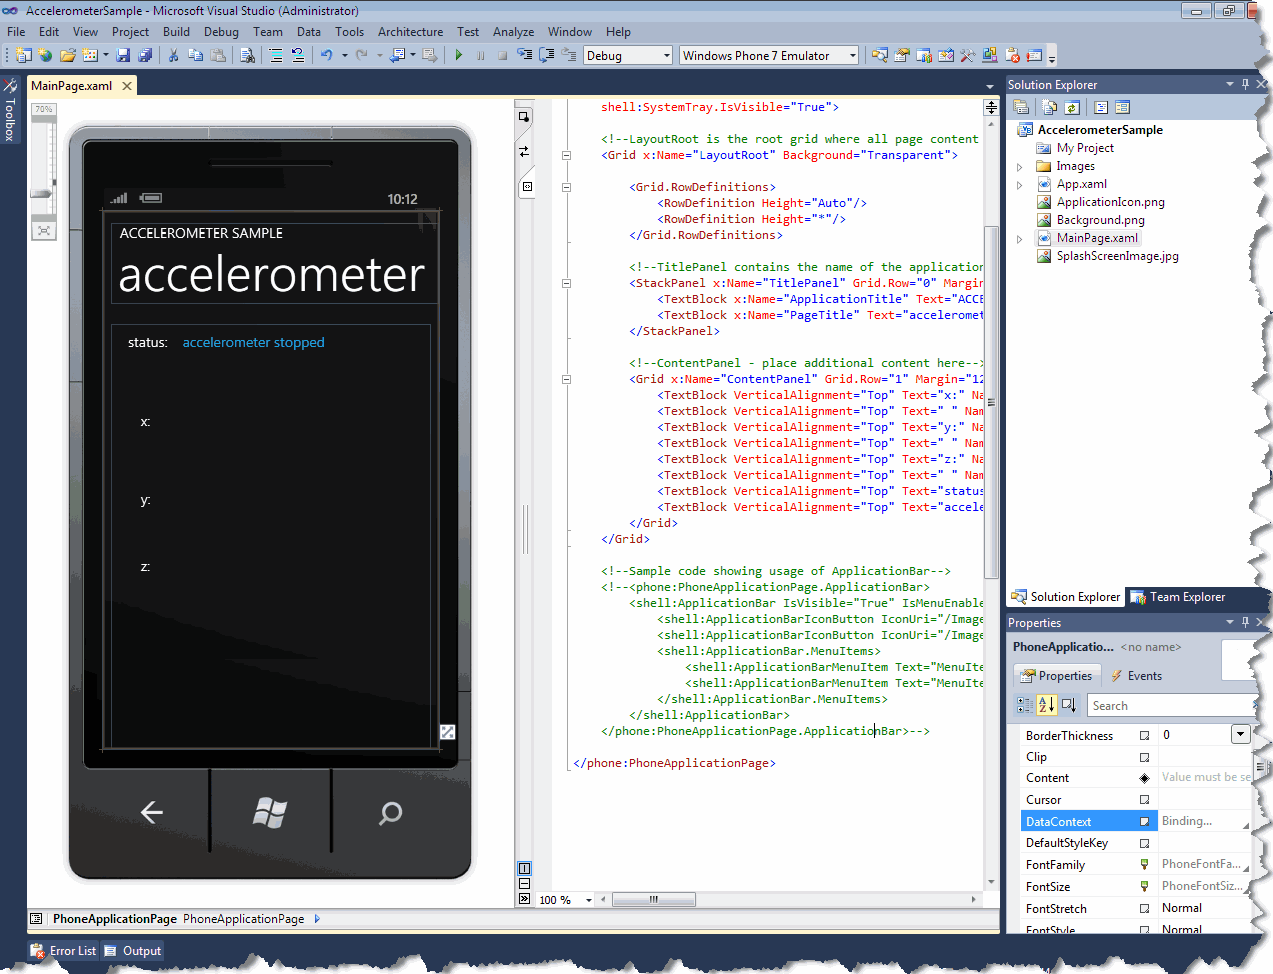
- From the toolbox, drag and drop another 3 TextBlock controls to the design surface, and place each of them to next to the “x:”, “y:”, and “z:” TextBlock controls respectively.
- To set the height, width, alignment and other properties of all the TextBlock controls, add the following XAML code:
<TextBlock VerticalAlignment=”Top” Text=”x:” Name=”XLabel” Style=”{StaticResource PhoneTextNormalStyle}” Margin=”42,124,386,0″></TextBlock>
<TextBlock VerticalAlignment=”Top” Text=” “ Name=”XTextBlock” Style=”{StaticResource PhoneTextExtraLargeStyle}” Margin=”66,100,20,0″ Foreground=”{StaticResource PhoneAccentBrush}”></TextBlock>
<TextBlock VerticalAlignment=”Top” Text=”y:” Name=”YLabel” Style=”{StaticResource PhoneTextNormalStyle}” Margin=”42,236,386,0″></TextBlock>
<TextBlock VerticalAlignment=”Top” Text=” “ Name=”YTextBlock” Style=”{StaticResource PhoneTextExtraLargeStyle}” Margin=”68,212,52,0″ Foreground=”{StaticResource PhoneAccentBrush}”></TextBlock>
<TextBlock VerticalAlignment=”Top” Text=”z:” Name=”ZLabel” Style=”{StaticResource PhoneTextNormalStyle}” Margin=”42,332,386,0″></TextBlock>
<TextBlock VerticalAlignment=”Top” Text=” “ Name=”ZTextBlock” Style=”{StaticResource PhoneTextExtraLargeStyle}” Margin=”66,308,54,0″ Foreground=”{StaticResource PhoneAccentBrush}”></TextBlock>
<TextBlock VerticalAlignment=”Top” Text=”status:” Name=”statusLabel” Style=”{StaticResource PhoneTextNormalStyle}” Margin=”24,11,0,0″ HorizontalAlignment=”Left” Width=”72″ />
<TextBlock VerticalAlignment=”Top” Text=”accelerometer stopped” Name=”statusTextBlock” Style=”{StaticResource PhoneTextNormalStyle}” Foreground=”{StaticResource PhoneAccentBrush}” Margin=”102,11,6,0″ />
Your application now looks like this:

Step2 – Add event handlers
It is essential to add event handlers to the application because they help to initialize the application bar and control the accelerometer by handling the change in readings.
To add event handlers, do the following:
- Open the MainPage.xaml.vb page.
- To declare a private variable of the accelerometer type, add the following code in the MainPage class:
Inherits PhoneApplicationPage
Private accelerometer As Accelerometer
- To create a constructor of the PhoneApplicationPage object, add the following code:
#Region “Initialization”
”’ <summary>
”’ Constructor for the PhoneApplicationPage object.
”’ In this method, the Application Bar is initialized.
”’ </summary>
Public Sub New()
InitializeComponent()
ApplicationBar = New ApplicationBar()
ApplicationBar.IsVisible = True
Dim startStopButton As New ApplicationBarIconButton(New Uri(“/Images/startstop.png”, UriKind.Relative))
startStopButton.Text = “on/off”
AddHandler startStopButton.Click, AddressOf startStopButton_Click
ApplicationBar.Buttons.Add(startStopButton)
End Sub
#End Region
Note: This method also initializes an application bar. This application bar consists of “On” and “Off” buttons to control the accelerometer.
- To create the user interface and create an event handler for the On and Off buttons, add the following code:
#Region “User Interface”
”’ <summary>
”’ Click handler for the start/stop button.
”’ </summary>
”’ <param name=”sender”></param>
”’ <param name=”e”></param>
Private Sub startStopButton_Click(ByVal sender As Object, ByVal e As EventArgs)
‘ If the accelerometer is null, it is initialized and started
If accelerometer Is Nothing Then
‘ Instantiate the accelerometer sensor object
accelerometer = New Accelerometer()
‘ Add an event handler for the ReadingChanged event.
AddHandler accelerometer.ReadingChanged, AddressOf accelerometer_ReadingChanged
‘ The Start method could throw and exception, so use a try block
Try
statusTextBlock.Text = “starting accelerometer”
accelerometer.Start()
Catch exception As AccelerometerFailedException
statusTextBlock.Text = “error starting accelerometer”
End Try
Else
‘ if the accelerometer is not null, call Stop
Try
accelerometer.Stop()
accelerometer = Nothing
statusTextBlock.Text = “accelerometer stopped”
Catch exception As AccelerometerFailedException
statusTextBlock.Text = “error stopping accelerometer”
End Try
End If
End Sub
#End Region
Note: This method controls the accelerometer. If initially the accelerometer is null, it is initialized and started. And if the accelerometer value is not null, then it is stopped. This method also defines a try catch block that displays errors and exceptions appropriately.
- To create an event handler that handles the change in readings, add the following code:
#Region “Accelerometer Event Handling”
”’ <summary>
”’ The event handler for the accelerometer ReadingChanged event.
”’ BeginInvoke is used to pass this event args object to the UI thread.
”’ </summary>
”’ <param name=”sender”></param>
”’ <param name=”e”></param>
Private Sub accelerometer_ReadingChanged(ByVal sender As Object, ByVal e As AccelerometerReadingEventArgs)
Deployment.Current.Dispatcher.BeginInvoke(Sub() MyReadingChanged(e))
End Sub
”’ <summary>
”’ Method for handling the ReadingChanged event on the UI thread.
”’ This sample just displays the reading value.
”’ </summary>
”’ <param name=”e”></param>
Private Sub MyReadingChanged(ByVal e As AccelerometerReadingEventArgs)
If accelerometer IsNot Nothing Then
statusTextBlock.Text = accelerometer.State.ToString()
XTextBlock.Text = e.X.ToString(“0.00”)
YTextBlock.Text = e.Y.ToString(“0.00”)
ZTextBlock.Text = e.Z.ToString(“0.00”)
End If
End Sub
#End Region
Note: This method handles the change of reading for the accelerometer as well as handles the change of reading on the UI thread. This enables to display the reading value on the screen.
There you are! Now your accelerometer application for Windows Phone 7 is ready! You just need to build and debug the application.
Step 3 – Build and debug the application
- To build the application, select Build > Build Solution. The project should build without any errors. If there are errors, check the earlier steps, correct the errors, and then build the application again.
- To debug the application, set the deployment target of the application to “Windows Phone 7 Emulator”.
- Select Debug > Start Debugging. The emulator window is displayed.

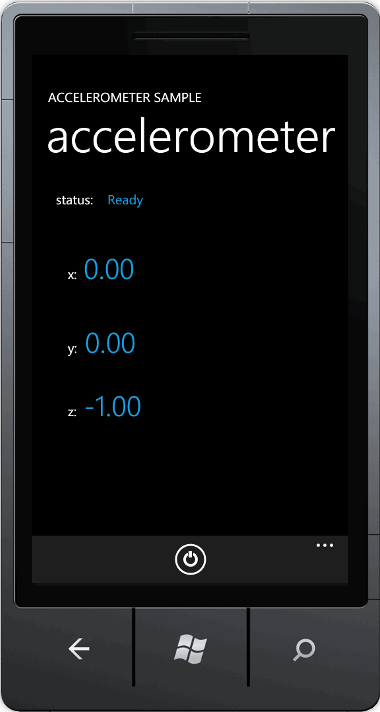
- Do you want to test the accelerometer settings? No problem, click “On” and presto! The status of accelerometer changes. The reading of the coordinate change as the phone’s orientation and position is changed.

- To stop the accelerometer click “Off”.

Note: To stop debugging the application, select Debug > Stop Debugging.
Step4 – Rebuild in the release mode before publishing
- On the standard toolbar, change the configuration manager to Release.
- To rebuild the application, select Build > Rebuild. The XAP file of the application is generated, which is the package that you will have to submit in the marketplace to publish the application. You can also locate this XAP file in the BinRelease folder.
Finally, to submit your application to the market place, you can refer to upload your application walkthrough.
Summary
That’ it! Wasn’t that amazing? You have successfully created an accelerometer for Windows Phone 7, that too in just 4 steps! It’s pretty easy, right? I am sure you must have enjoyed and had a lot of fun creating this application.
You can find the full source code for the accelerometer application here. This application uses general Silverlight and Visual Basic features that are applicable for different application types including Windows Phone application.


 Light
Light Dark
Dark
0 comments