
Setup continuous deployment to Microsoft Azure Government using Visual Studio Team Services
Continuous integration (CI) and continuous deployment (CD) help teams reliably deliver quality apps to end customers at a faster pace of update. From code through build, test, and deployment you can define efficient and fully managed pipelines that automate and control the entire process.
Release Management in Visual Studio Team Services is a powerful service that enables CD for various applications. Onetime configuration and repeated execution of the release pipelines means the automated delivery process is started whenever a new build is available.
Visual Studio Team Services enables requests to Azure Government environments with a CD process using service endpoints (Azure classic service endpoint for requests using management certificate or credentials, Azure resource manager service endpoint for requests using service principal authentication).
Visual Studio Team Services is currently not available in Microsoft Azure Government.
In this article, we’ll look at how you can configure continuous deployment for an Azure web site in Azure Government with a Team Services account. We’ll authenticate using service principal authentication.
Note that this process would require orchestrating builds & deployments, and storing the build artifacts outside the isolated environment. In case you require stricter data restrictions for your application, you can configure a private agent on a VM in Azure Government. Refer to this for more details.
Get set up
Begin with a CI build
Before you begin, you’ll need a CI build that publishes your Web Deploy package. To set up CI for your specific type of app, see:
Create the Azure app service
An Azure App Service is where we’ll deploy the Web App. Create a new web app in your subscription from the Azure Government portal.
Generate a service principal
- Download & run this Powershell script in an Azure Powershell window to generate required data for Service Principal based Azure service connection. Running this script would prompt you for:
- The name of your Azure Subscription
- A password that you would like to set for the Service Principal that is going to be created
- You should also provide the target environment’s name (Azure Government environment name) for your subscription in the environmentName parameter.
- Once successful, the script would output the following details for the Azure Service Endpoint.
- Connection Name
- Subscription Id
- Subscription Name
- Service Principal Client Id
- Service Principal key
- Tenant Id
Configure a VSTS endpoint
- From your Visual Studio Account, navigate to your Team Project and click on the gear icon.

- Click the Services tab and click on ‘New Service Endpoint’ in the left pane.

- From the drop-down, select ‘Azure Resource Manager’ option.
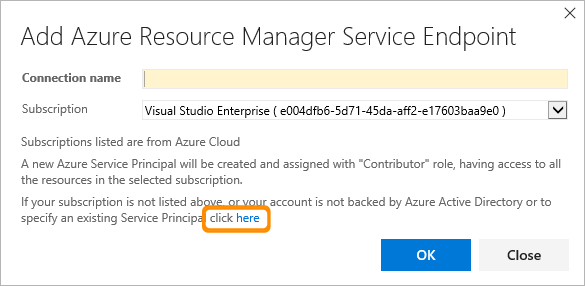
- In the dialog, click the link at end of the text “If your subscription is not listed or to specify an existing service principal, click here”, which will switch to manual entry mode.
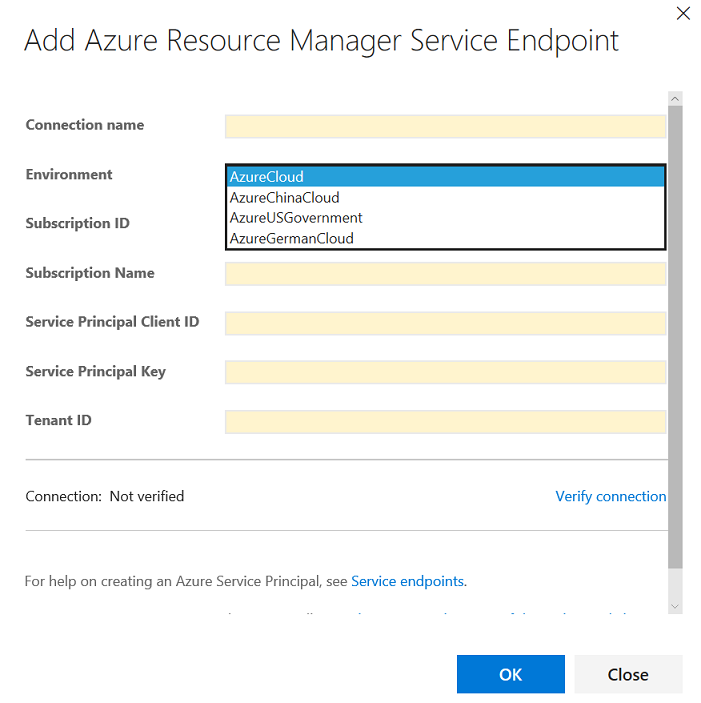
- Give the endpoint a friendly name, choose the target environment name and enter the details obtained from execution of the script while creating a service principal.
Define and test your CD release process
Continuous deployment (CD) means starting an automated release process whenever a new successful build is available. Your CD release process picks up the artifacts published by your CI build and then deploys them to your Azure web site.
- Do one of the following:
- If you’ve just completed a CI build (see above), choose the link to the completed build (for example, Build 1634). In the build’s Summary tab under Deployments, choose Create release followed by Yes. This starts a new release definition that’s automatically linked to the build definition.
- Open the Releases tab of the Build & Release hub, open the + drop-down in the list of release definitions, and choose Create release definition
- Select the Azure App Service Deployment template and choose Next.
- In Source… make sure your CI build definition for the Web deploy package is selected as the artifact source.
- Select the Continuous deployment check box, and then choose Create.
- Select the Deploy Azure App Service task and configure it as follows:
| Task step | Parameters |
Deploy: Azure App Service Deploy Deploy the app to Azure App Services |
|
6. Edit the name of the release definition, choose Save, and choose OK. Note that the default environment is named Environment1, which you can edit by clicking directly on the name.
You’re now ready to create a release, which means to start the process of running the release definition with the artifacts produced by a specific build.
We welcome your comments and suggestions to help us continually improve your Azure Government experience. To stay up to date on all things Azure Government, be sure to subscribe to our RSS feed and to receive emails, click “Subscribe by Email!” on the Azure Government Blog. To experience the power of Azure Government for your organization, sign up for an Azure Government Trial.
 Light
Light Dark
Dark
0 comments