
Smart solutions 6: Income predictor for Dynamics NAV
We’re back with new learnings from our work with maching learning – and with a question for you:
What if you could pick from a library of published Machine Learning Models, each one made by experts in their field, and build it into your business solution?
In previous posts we looked at:
Integration to Azure Machine Learning (ML) models built in to Dynamics NAV, and
Creating and publishing your own machine learning model and calling it from Dynamics NAV.
In this post we will look at the sample model “Income Predictor” and how to make it available for Dynamics NAV. The purpose is to get some hands-on in Azure ML Studio, and to then see how to link it to Dynamics NAV.
The income predictor model
The income predictor model is an example from the book “Free ebook: Microsoft Azure Essentials: Azure Machine Learning“. The model is a walkthrough that builds a learning experiment from scratch which takes input about a person such as their age, gender, education and more, and based on that it predicts whether the person will be earning more than 50.000 per year or not. Use it for credit checks, scoring of customers, salary evaluation of your employees, etc.
The example, starting in chapter 3, covers how to get started with the Azure ML Studio, how to create an ML experiment, how to train it based on a sample dataset and how to evaluate the predictions compared to random guessing. It also includes some of the data manipulation and cleanup that may be needed to get good data. The example is completely without code or script. Just drag and drop modules and set properties. It includes selecting a type of model (Two-class boosted decision tree) and applying it to some of your sample data, using the rest of your sample data to verify the result. After the model is trained, it gets published as a web service, and Azure ML Studio will even create an Excel sheet that can call your published model to test it. Once you can call the model from Excel, of course we want to call it from Dynamics NAV.
Create and train the model
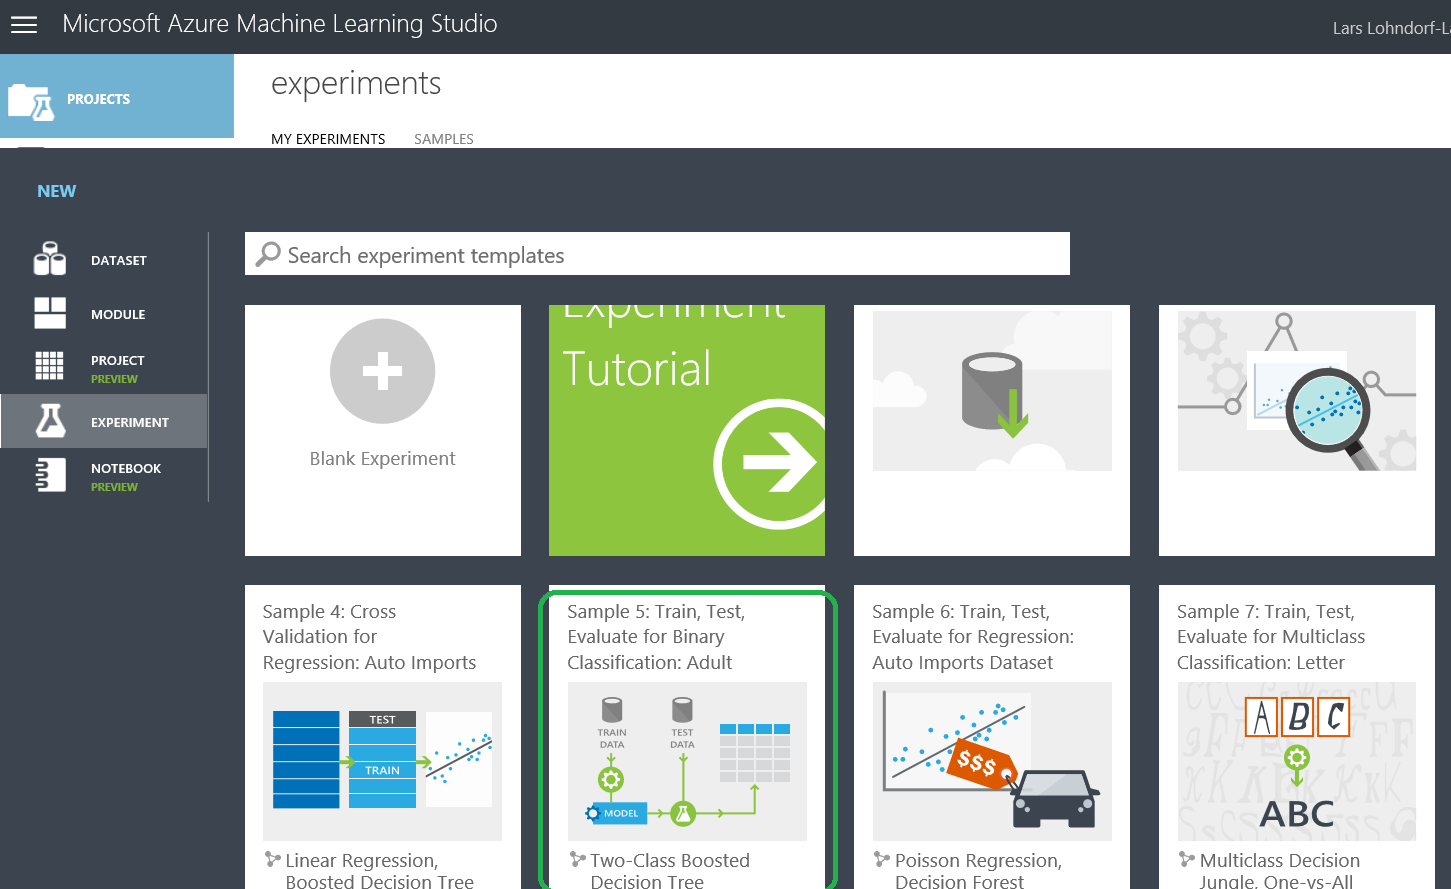
Follow the steps in the ebook to make an experiment from scratch, or you can just pick a ready-made sample. To use the sample, go to Azure ML Studio. Select Experiments -> new, and then select the sample “Sample 5: Train, Test, Evaluate for Binary Classification: Adult Dataset”, and select “Open in studio”:
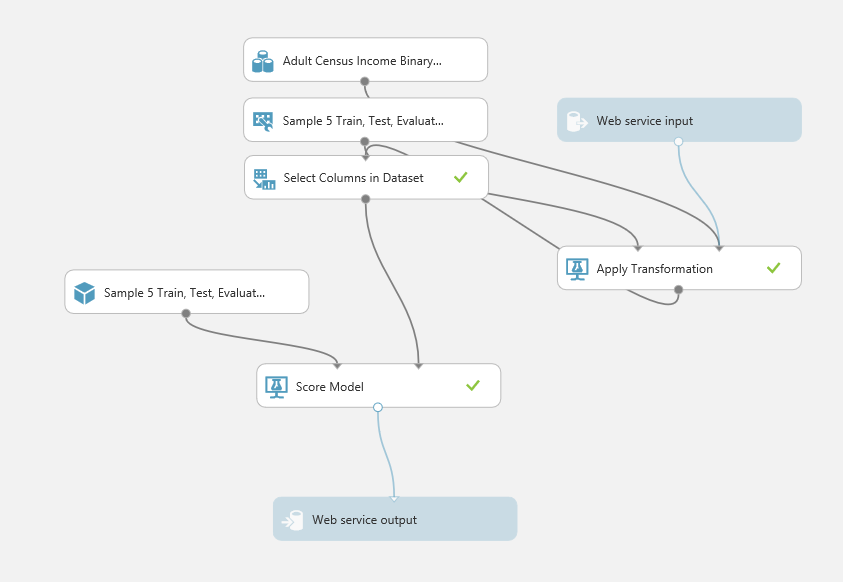
In the studio, add Web Service- Input and Output to the model so that Dynamics NAV can access it: Search for “Web Service”, then drag and drop Input and Output into the model. Connect your “Web service input” to “Select columns in Dataset”, and connect “Web service output” to the output of the “Evaluate Model”:
SAVE, then RUN the model.
Publish the model to the web
Click “SET UP WEB SERVICE”. If this is not enabled, then save and run the project (again). Select “Predictive web service [recommended]”. Notice that this re-arranges the model by getting rid of unnecessary modules. This is because at this point, the model is fully trained, so we graduate it and send it into production. Save and run the experiment again. It should now look like this:
After running the experiment, click on the first module “Apply Transformation”, then click on the Output (1), and select Visualize. notice that this has 15 columns, which is important, as the input we send via the web service must match this.
Visualize the last module “Score Model”, and see that this one has 14 columns. The columns that we are interested in are the last two: “Scored Label” and “Scored Probability”. This is the outcome that we are interested in.
Save and run it again, then click “DEPLOY WEB SERVICE”. Copy the API key that you get, click “REQUEST/RESPONSE” and copy the POST URI. This is the two bits of information you need to access your new income predictor web service. Scroll down below the URI to see a sample request with the 15 input-columns. Copy this, as this shows the columns that your request must match.
Sample C/AL code is provided below. Implement this in Dynamics NAV 2017 or Dynamics NAV 2018, and then update the Key and the URI in the Initialize function at the top. then run it. Hopefully it will work, and give you prediction and probability on the input you send. And you now have integration from Dynamics NAV to a trained model in Azure.
Suggestions for additional exercises:
- Make a predictor service available from the Employee Card to say whether an employee should be making more or less than 50.000.
- Edit the module “Select columns in dataset” to remove the columns that you dont want.
- Find another model, add web service in/Output and connect that to Dynamics NAV.
Sample C/AL Code
Create a new codeunit in NAV and create these global variables:
| Name | DataType | Subtype |
| AzureMLConnector | Codeunit | Azure ML Connector |
| Result | Text | |
| Result2 | Text |
Then copy this code to the OnRun trigger:
AzureMLConnector.Initialize(
 'I1i+9Pa1gUKIlteK8Ytj9k6euOUEe9OK5KG1Vcssub/C9Rhnbzo+Lmf5CJHz33NL1OpFgGDiWUPAkT8HKxZjnQ==',
 'https://ussouthcentral.services.azureml.net/workspaces/c352c6279dff4d908723a35a740e0c5d/services/a8620f768c8946b495d0df009788de12/execute?api-version=2.0&details=true ',
 30);

AzureMLConnector.SetInputName('input1');
 AzureMLConnector.SetOutputName('output1');

AzureMLConnector.AddInputColumnName('age');
 AzureMLConnector.AddInputColumnName('workclass');
 AzureMLConnector.AddInputColumnName('fnlwgt');
 AzureMLConnector.AddInputColumnName('education');
 AzureMLConnector.AddInputColumnName('education-num');
 AzureMLConnector.AddInputColumnName('marital-status');
 AzureMLConnector.AddInputColumnName('occupation');
 AzureMLConnector.AddInputColumnName('relationship');
 AzureMLConnector.AddInputColumnName('race');
 AzureMLConnector.AddInputColumnName('sex');
 AzureMLConnector.AddInputColumnName('capital-gain');
 AzureMLConnector.AddInputColumnName('capital-loss');
 AzureMLConnector.AddInputColumnName('hours-per-week');
 AzureMLConnector.AddInputColumnName('native-country');
 AzureMLConnector.AddInputColumnName('income');

AzureMLConnector.AddInputRow;
 AzureMLConnector.AddInputValue('42');
 AzureMLConnector.AddInputValue('Private');
 AzureMLConnector.AddInputValue('159449');
 AzureMLConnector.AddInputValue('Masters');
 AzureMLConnector.AddInputValue('13');
 AzureMLConnector.AddInputValue('Married-civ-spouse');
 AzureMLConnector.AddInputValue('Exec-managerial');
 AzureMLConnector.AddInputValue('Not-in-family');
 AzureMLConnector.AddInputValue('White');
 AzureMLConnector.AddInputValue('Male');
 AzureMLConnector.AddInputValue('0');
 AzureMLConnector.AddInputValue('0');
 AzureMLConnector.AddInputValue('40');
 AzureMLConnector.AddInputValue('United-States');
 AzureMLConnector.AddInputValue('<=50K');

AzureMLConnector.SendToAzureML;

IF AzureMLConnector.GetOutput(1,13,Result) THEN
 IF AzureMLConnector.GetOutput(1,14,Result2) THEN
 MESSAGE('Prediction is %1, probability %2',Result,Result2)
Enjoy!


