Smart solutions 5: Basic integration of Dynamics NAV and an Azure Machine Learning Web Service
In the previous post we looked at enabling the built-in integration of Dynamics NAV and Time Series, which uses a Machine Learning (ML) model to predict inventory or cash requirements. This time we will make a very basic example with the sole aim of sending data from Dynamics NAV as input into an ML model that is running as a web service, and receive a result back from the model.
Make the model
Go to https://studio.azureml.net and if you haven’t yet, create a new account. The free account is fine for testing and experimenting.
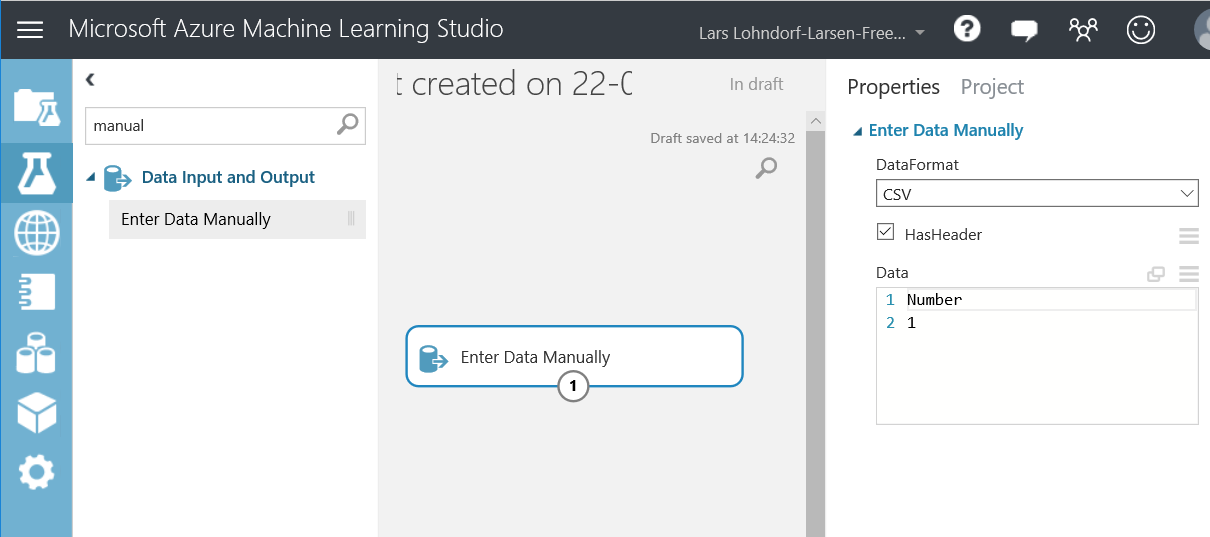
In the bottom left hand, click “+NEW”, and select “Blank Experiment”. This will open a canvas, ready to drag and drop modules to. In the textbox “Search experiment items”, search for “Manual” to find “Enter Data Manually”, drag and drop this to the canvas. In properties for this module set the following details:
DataFormat = CSV
HasHeader = selected
Data =
1 Number
2 1
(line 1 is “Number” and line 2 is the number 1. This will be important in the next step, as it indicates what datatype will be sent to the next module).
Search for “Script” to find an “Execute R Script” module, and drag that to the canvas. In Properties, delete the auto-generated script and let it run just this:
dataset1 <- maml.mapInputPort(1) # class: data.frame
 dataset1 <- dataset1 * 2
 maml.mapOutputPort("dataset1");
This script maps the input to a dataset, then multiplies the data with 2, and passes the result to the Out-port. Connect the two modules by dragging the Output from “Enter Data Manually” to the left input port of the R module.
This is all the functionality we need, so next steps is to take the parameter via a web service: Add modules “Web Service Input” and “Web Service Output”, and connect them, and your experiment should look like this:

Save and run and publish
Using the tool bar below your experiment, first SAVE, then RUN, then “DEPLOY WEB SERVICE”. On the page that opens up, copy the API key. Click on “REQUEST/RESPONSE” and copy the POST URI from there. This is the two values you need in NAV to integrate to your model.
Connect from NAV
Go to NAV, and create a new codeunit. Create a new variable:
Name = AzureMLConnector
DataType = Codeunit
Subtype = 2001
Codeunit 2001 was new in NAV 2017. For this example, NAV 2018 has been used.
Initialize it using the key and URI you saved, and timeout which we can set to 30:
AzureMLConnector.Initialize(
 'HacrBpLD1ollmDrestofkey==',
 'https://ussouthcentral.services.azureml.net/restoflink',
 30);
In your model, the name of the Web Service Input and Output was input1 and output1, and the input name was Number. Or go back and verify this, as you must match the naming correctly in the next three lines of C/Al code:
AzureMLConnector.SetInputName('input1');
 AzureMLConnector.SetOutputName('output1');
 AzureMLConnector.AddInputColumnName('Number');
Now specify the data you want to send to the model. This must also match the model. Remember that all this model does, is multiply a number, so let’s send a number to the model:
AzureMLConnector.AddInputRow;
 AzureMLConnector.AddInputValue('17');
 AzureMLConnector.SendToAzureML;
And finally, get the result back, using a new Variable “Result” of type Text:
IF AzureMLConnector.GetOutput(1,1,Result) THEN
 MESSAGE('Result is %1',Result);
The whole codeunit should look like this (key and API URI are scrambled):
===
 OBJECT Codeunit DELETEME99789 Azure ML Integration Test
 {
 OBJECT-PROPERTIES
 {
 Date=09-01-18;
 Time=11:06:36;
 Modified=Yes;
 Version List=;
 }
 PROPERTIES
 {
 OnRun=BEGIN
 AzureMLConnector.Initialize(
 'HackBpLD1rElmDRestofkey==',
 'https://ussouthcentral.services.azureml.net/RestofURI',
 30);

AzureMLConnector.SetInputName('input1');
 AzureMLConnector.SetOutputName('output1');
 AzureMLConnector.AddInputColumnName('Number');
AzureMLConnector.AddInputRow;
AzureMLConnector.AddInputValue('17');
AzureMLConnector.SendToAzureML;

IF AzureMLConnector.GetOutput(1,1,Result) THEN
MESSAGE('Result is %1',Result);
END;

}
CODE
{
VAR
AzureMLConnector@1000 : Codeunit 2001;
Result@1001 : Text;

BEGIN
END.
}
}
===
Recommended next reading
The free ebook “Microsoft Azure Essentials: Azure Machine Learning” gives a great intro into the Microsoft Azure Machine Learning Studio. And if not the whole book, then spend some time on Chapter 3 which gives a hands-on walkthrough of setting up a model to predict an individual’s income.
In a future post we will see how to integrate this income predictor to Dynamics NAV, so understanding what goes on on the ML side is a good investment, and this book is a great place to start.