Web App with Vnet Only Access using App Gateway - PowerShell Automation
Azure Web Apps provide a managed environment (PaaS) for hosting web applications. These environments have low operations and management overhead, which makes them a popular choice when moving applications to the cloud. The standard Web App offering is a multi-tenant environment configured for public access (with a publically accessible endpoint). When organizations want to host private web applications, e.g. internal line of business applications, this can be problematic. Moreover, some organizations (e.g. Government) have requirements that all access to applications come through a Trusted Internet Connection (TIC), which means that all traffic to the web application has to be routed through an on-prem network into the cloud via VPN or Express Route connections. The web applications should not be accessible directly from the Internet through their public endpoints.
In such cases, the Azure App Service Environment (ASE) is an option. The ASE is a managed deployment of the App Service Environment into a private Virtual Network, which can then be peered with an on-prem network. It is, however, a premium service that comes with some added costs and complexity that may not fit with all application requirements. There is also a features that allows the Web App to be integrated with a virtual network through a Point-to-Site VPN connection but additional steps would still need to be taken to prevent public access to the application. There are also situations where existing virtual network configurations prohibit such connections and the Virtual Network integration may not be the right tool either.
In this blog post, I will describe a third way to restrict access to a Web App such that only connections from a virtual network are allowed. The solution involves front-ending the Web App with an Azure Application Gateway and restricting access to the Web App such that only connections from the Gateway are allowed. It is not straightforward (or even possible) to complete this configuration through the Azure portal, so I will present the configuration steps in the form of PowerShell scripts. The workflow has been tested in Azure Government. At the end of the configuration, the deployment should look something like this:
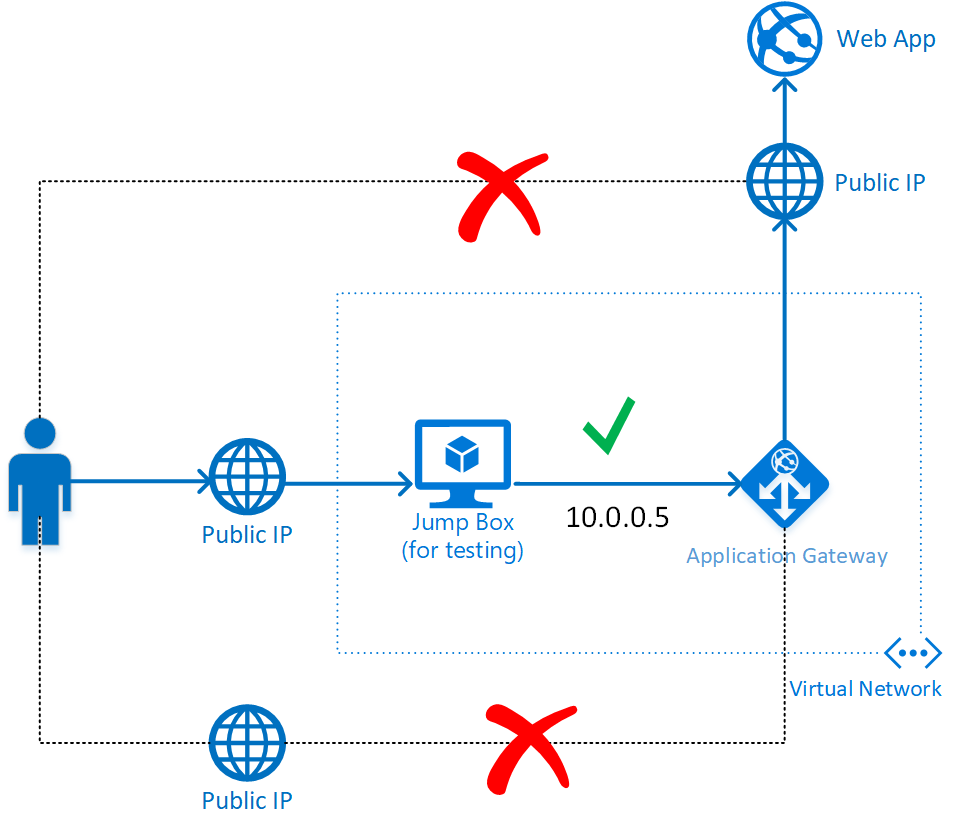
When looking at the diagram, start from the point of view of the Web App. Out of the box, it is configured with a public IP and a DNS name, but the IP restrictions on the web app will be configured such that we only allow access from a single public IP. The IP that will be allowed is the public IP of the Application Gateway. However, we will make sure that the public IP on the Gateway is not connected to any HTTP listeners, and consequently, nobody can reach the Web App (or anything else) through the public IP of the Gateway. The Gateway public IP is only attached to give us an object handle on the IP address, which is needed for configuration of the Web App's IP restrictions. Finally, a Jump Box will be configured to allow testing of the setup. In production, this can be skipped of course and just connect through virtual network or on-prem resources.
The first step is configuring some basic parameters, please edit this part and use appropriate settings.
[ps]
$ResourceGroupName = "NAME OF RESOURCE GROUP"
$Location = "REGION NAME" #e.g., usgovtexas
$WebAppName = $ResourceGroupName + $(Get-Random)
$AppServicePlanTier = "Standard"
$CertificatePath = "PATH TO CERTFICATE PFX FILE"
$CertificatePassword = ConvertTo-SecureString -String "CERT PASSWORD" -AsPlainText -Force
$ApplicationGatewaySku = "Standard_Small"
$ApplicationGatewayInstances = 2 #To get SLA, 2 instances are needed
$JumpBoxUsername = "Administrator"
$JumpBoxPassword = ConvertTo-SecureString -String "JUMPBOX ADMIN PASSWORD" -AsPlainText -Force
[/ps]
Using the settings, deploy a Web App, which will then be locked down (in a later step):
[ps]
$rg = Get-AzureRmResourceGroup -Name $ResourceGroupName -ErrorAction 0 -ErrorVariable NotPresent
if ($NotPresent) {
$rg = New-AzureRmResourceGroup -Name $ResourceGroupName -Location $Location
}
$asp = Get-AzureRmAppServicePlan -Name $WebAppName -ResourceGroupName $rg.ResourceGroupName -ErrorAction 0 -ErrorVariable NotPresent
if ($NotPresent) {
$asp = New-AzureRmAppServicePlan -Name $WebAppName -Location $rg.Location -ResourceGroupName $rg.ResourceGroupName -Tier $AppServicePlanTier
}
$webApp = Get-AzureRmWebApp -Name $WebAppName -ResourceGroupName $rg.ResourceGroupName -ErrorAction 0 -ErrorVariable NotPresent
if ($NotPresent) {
$webApp = New-AzureRmWebApp -Name $WebAppName -Location $rg.Location -AppServicePlan $WebAppName -ResourceGroupName $rg.ResourceGroupName
}
[/ps]
Next step is creating a Virtual Network and an App Gateway. If you already have a Virtual Network, you should be able to modify the name of the network and maybe the subnet selections to make the code work for your scenario.
[ps]
$gwName = $rg.ResourceGroupName + "-gw"
$gwVnetName = $rg.ResourceGroupName + "-gwvnet"
$gwIpConfigName = $rg.ResourceGroupName + "-gwipconf"
$gwPublicIpName = $rg.ResourceGroupName + "-gwip"
$vnet = Get-AzureRmVirtualNetwork -Name $gwVnetName -ResourceGroupName $rg.ResourceGroupName -ErrorVariable NotPresent -ErrorAction 0
if ($NotPresent) {
# subnet for AG
$subnet1 = New-AzureRmVirtualNetworkSubnetConfig -Name subnet01 -AddressPrefix 10.0.0.0/24
$Subnet2 = New-AzureRmVirtualNetworkSubnetConfig -Name subnet02 -AddressPrefix 10.0.1.0/24
# vnet for AG
$vnet = New-AzureRmVirtualNetwork -Name $gwVnetName -ResourceGroupName $rg.ResourceGroupName -Location $Location -AddressPrefix 10.0.0.0/16 -Subnet $subnet1,$subnet2
}
# Retrieve the subnet object for AG config
$subnet=$vnet.Subnets[0]
# Create a new IP configuration
$gipconfig = New-AzureRmApplicationGatewayIPConfiguration -Name $gwIpConfigName -Subnet $subnet
$publicip = Get-AzureRmPublicIpAddress -Name $gwPublicIpName -ResourceGroupName $rg.ResourceGroupName -ErrorVariable NotPresent -ErrorAction 0
if ($NotPresent) {
# Create a public IP address
$publicip = New-AzureRmPublicIpAddress -ResourceGroupName $rg.ResourceGroupName -name $gwPublicIpName -location $rg.Location -AllocationMethod Dynamic
}
#Grab only the original URL for the app
$hostnames = $webApp.DefaultHostName
# Create a backend pool with the hostname of the web app
$pool = New-AzureRmApplicationGatewayBackendAddressPool -Name appGatewayBackendPool -BackendFqdns $hostnames
# Define the status codes to match for the probe
$match = New-AzureRmApplicationGatewayProbeHealthResponseMatch -StatusCode 200-401 #Allow access denied
# Create a probe with the PickHostNameFromBackendHttpSettings switch for web apps
$probeconfig = New-AzureRmApplicationGatewayProbeConfig -name webappprobe -Protocol Https -Path "/" -Interval 30 -Timeout 120 -UnhealthyThreshold 3 -PickHostNameFromBackendHttpSettings -Match $match
# Define the backend http settings
$poolSetting = New-AzureRmApplicationGatewayBackendHttpSettings -Name appGatewayBackendHttpSettings -Port 443 -Protocol Https -CookieBasedAffinity Disabled -RequestTimeout 120 -PickHostNameFromBackendAddress -Probe $probeconfig
# Create a new front-end port
$fp = New-AzureRmApplicationGatewayFrontendPort -Name frontendport01 -Port 443
$fp2 = New-AzureRmApplicationGatewayFrontendPort -Name frontendport02 -Port 80
# Create a new front end IP configuration
$fipconfig = New-AzureRmApplicationGatewayFrontendIPConfig -Name fipconfig01 -PrivateIPAddress 10.0.0.5 -Subnet $subnet
#Also one with a public IP, but we will not connect this one to a listener
$fipconfig2 = New-AzureRmApplicationGatewayFrontendIPConfig -Name fipconfig02 -PublicIPAddress $publicip
$cert = New-AzureRmApplicationGatewaySSLCertificate -Name cert01 -CertificateFile $CertificatePath -Password $CertificatePassword
# Create a new listener using the front-end ip configuration and port created earlier
$listener = New-AzureRmApplicationGatewayHttpListener -Name listener01 -Protocol Https -FrontendIPConfiguration $fipconfig -FrontendPort $fp -SslCertificate $cert
$listener2 = New-AzureRmApplicationGatewayHttpListener -Name listener02 -Protocol Http -FrontendIPConfiguration $fipconfig -FrontendPort $fp2
# Create a new rule
$rule = New-AzureRmApplicationGatewayRequestRoutingRule -Name rule01 -RuleType Basic -BackendHttpSettings $poolSetting -HttpListener $listener -BackendAddressPool $pool
# Add a redirection configuration using a permanent redirect and targeting the existing listener
$redirectconfig = New-AzureRmApplicationGatewayRedirectConfiguration -Name redirectHttptoHttps -RedirectType Permanent -TargetListener $listener -IncludePath $true -IncludeQueryString $true
$rule2 = New-AzureRmApplicationGatewayRequestRoutingRule -Name rule02 -RuleType Basic -HttpListener $listener2 -RedirectConfiguration $redirectconfig
# Define the application gateway SKU to use
$sku = New-AzureRmApplicationGatewaySku -Name $ApplicationGatewaySku -Tier Standard -Capacity $ApplicationGatewayInstances
#Predefined policy with min TLS 1.1
$sslpolicy = New-AzureRmApplicationGatewaySslPolicy -PolicyType Predefined -PolicyName AppGwSslPolicy20170401
$appgw = Get-AzureRmApplicationGateway -Name $gwName -ResourceGroupName $rg.ResourceGroupName -ErrorVariable NotPresent -ErrorAction 0
if ($NotPresent) {
# Create the application gateway
$appgw = New-AzureRmApplicationGateway -Name $gwName -ResourceGroupName $rg.ResourceGroupName -Location $Location `
-BackendAddressPools $pool -BackendHttpSettingsCollection $poolSetting -Probes $probeconfig `
-FrontendIpConfigurations $fipconfig,$fipconfig2 -GatewayIpConfigurations $gipconfig `
-FrontendPorts $fp,$fp2 -HttpListeners $listener,$listener2 -RequestRoutingRules $rule,$rule2 -Sku $sku `
-SslPolicy $sslpolicy -SSLCertificates $cert -RedirectConfigurations $redirectconfig
}
[/ps]
The are few important points to notice in this script:
- The probe configuration uses the
-PickHostNameFromBackendAddresssetting, which is needed to make it work with a Web App. - The probe configuration allows error 401, if the Web App responds with access denied because the application requires user credentials, which would not be presented by the health probe (e.g., if you have AAD authentication on).
- We configure a dynamic public IP address and attach it to a frontend IP configuration, but this IP configuration is never attached to an HTTP listener. We only use the public IP to have easy access to the Gateway IP when configuring the IP restrictions on the Web App (see below).
- The Gateway will redirect from HTTP to HTTPS if users try to connect with HTTP.
- An SSL cert is uploaded from a file. You will have to generate a self signed one (e.g., using the
New-SelfSignedCertificatePowerShell cmdlet) or obtain one from a Certificate Authority. - The SSL policy is set to require at least TLS 1.1 to be compliant with latest recommendations. You can read more about that here.
With the Gateway in place, the Web App needs to be locked down to only allow access from the Gateway:
[ps]
$publicip = Get-AzureRmPublicIpAddress -Name $gwPublicIpName -ResourceGroupName $rg.ResourceGroupName
$r = Get-AzureRmResource -ResourceGroupName $rg.ResourceGroupName -ResourceType Microsoft.Web/sites/config -ResourceName "$WebAppName/web" -ApiVersion 2016-08-01
$p = $r.Properties
$p.ipSecurityRestrictions = @()
$restriction = @{}
$restriction.Add("ipAddress", $publicip.IpAddress)
$restriction.Add("subnetMask","255.255.255.255")
$p.ipSecurityRestrictions+= $restriction
Set-AzureRmResource -ResourceGroupName $rg.ResourceGroupName -ResourceType Microsoft.Web/sites/config -ResourceName "$WebAppName/web" -ApiVersion 2016-08-01 -PropertyObject $p -Force
[/ps]
There is an important thing to note about the Application Gateway IP address. It is a dynamic public IP; it is not possible to configure an Application Gateway with a reserved public IP and consequently, it could change. It is a very unlikely event, but if the Application Gateway is redeployed, it could change IP address, which means that the users would no longer be able to access the Web App. The code snipped above can be run again at any time to update the IP restrictions on the Web App. One could in fact create an Azure Automation step to periodically check whether the IP addresses are consistent and update accordingly or it could be part of the operations and management workflow of the application. It is a rare event, but it could happen and automated remediation would be encouraged, but that is beyond the scope of this blog post.
Last step is to deploy a jump box VM to test the set up. As mentioned, this step is only needed if there are no resources in the Virtual Network (or a peered network) from which the Gateway can be reached. The script below is just a suggestion, please adjust according to your needs.
[ps]
$cred = New-Object System.Management.Automation.PSCredential ($JumpBoxUsername, $JumpBoxPassword)
New-AzureRmVm `
-ResourceGroupName $rg.ResourceGroupName `
-Name "JumpBox" `
-Location $rg.Location `
-VirtualNetworkName $vnet.Name `
-SubnetName $vnet.Subnets[1].Name `
-SecurityGroupName "JumpBoxNSG" `
-PublicIpAddressName "JumpBoxIP" `
-ImageName "Win2016Datacenter" `
-Size "Standard_DS3_v2" `
-Credential $cred
[/ps]
To test the setup, log into the jump box and add the Gateway IP to the C:\Windows\System32\drivers\etc\hosts file if there is no DNS server attached to your VNET to provide name resolution for the private IP address on the Gateway. Then try to connect to the Web App with the DNS name assigned to the private IP. Also verify that you cannot access it any other way.
And that's it, you now have a Web App, which is no longer accessible from the public endpoint, but is accessible through a private IP address in a Virtual Network (or a peered network).
Please let me know if you have comments/questions/suggestions.