Ronin Building Blocks - Network Template
I am a strong believer in building security into the solution from the ground up in general but when it comes to IoT it is pretty much mandatory. There seems to be a consistent stream of exploits and attacks on connected devices so to properly defend my solution against this I will start any deployment with a more traditional networking take. This is only a single layer of the security that will be introduced to the solution throughout the project.
A very key point to remember here is that no security solution is impenetrable and the security I apply here is my opinion of the appropriate technique. If you are to follow my lead on your project in taking this approach you will want to run security reviews and penetration testing with a security specialist and or firm. Seeing this solution is not being built for production I will not be taking this cost on myself.
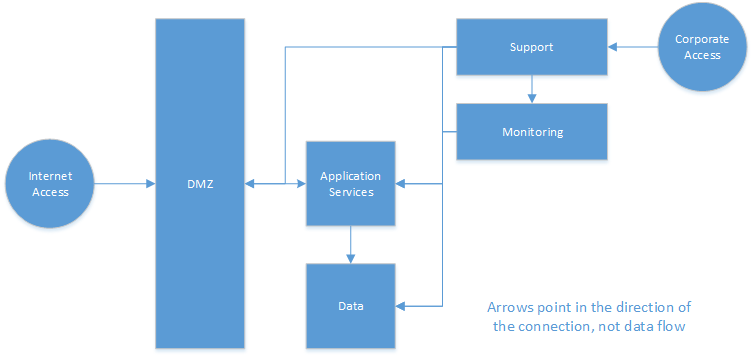
When designing my network, I have several different zones that each have their own functions and trust levels making them ideal candidates for subnets.
- DMZ: as in any traditional solution a DMZ is a great demarcation point between the front end “low trust” zone. I will host the front-end services that are accessible to the internet or untrusted clients. If required by the solution the DMZ will have the ability to connect with the Application Services zone over controlled network ports and protocols.
- Application Service: This will host most of the logic associated with the application and is where most the “real work” happens. This zone is a higher trust with access to data stores and if required having the ability to reach out to the DMZ.
- Data: This will host any data stores that can take part in a network, including IaaS hosted databases. This zone should have as little business logic in it as possible. The initial plans it to lock this zone down so it cannot reach out to the application services or other zones requiring them always to establish the connection.
- Monitoring: is a zone used to centralize the monitoring logic for the overall solution. Much of the monitoring and instrumentation will occur on the specific instances but at regular intervals this zone will receive the most current information. The reason for this zone is to reduce the chance that a compromised Data, Application Service or DMZ zone does not allow the bad actor to destroy the logs that will provide evidence of the intrusion.
- Support: this zone is used to house support tools and the jump boxes, ideally only being accessible by VPN connections from the corporate network of the solution operator.
I am going to build the ARM (Azure Resource Manager) template to get the core elements of this structure in place and adjust them later as some of the decisions are finalized. If you have not used an ARM template before it is a mandatory skill for Azure Development.
The entry point template for my deployment is called azuredeploy.json (“the template”) with a parameters file of azuredeploy.parameters.json (“the parameter file”). The first thing I do is create the template with parameters. The only parameters I will ask for are the network name and CIDR addresses that correspond to the network and each subnet contained in it.
 {
  "$schema": "https://schema.management.azure.com/schemas/2015-01-01/deploymentTemplate.json#",
  "contentVersion": "1.0.0.0",
  "parameters":
  {
    "networkName":
    {
      "type": "string",
      "defaultValue": "IoTNetwork",
      "minLength": 3,
      "maxLength": 63,
      "metadata":
      {
        "description": "The name of the virtual network"
      }
    },
    "networkCIDR":
    {
      "type": "string",
      "defaultValue": "192.168.0.0/16",
      "minLength": 9,
      "maxLength": 19,
      "metadata":
      {
        "description": "The CIDR address of the network e.g. 192.168.0.0/16"
      }
    },
    "dmzCIDR":
    {
      "type": "string",
      "defaultValue": "192.168.1.0/24",
      "minLength": 9,
      "maxLength": 19,
      "metadata":
      {
        "description": "The CIDR address of the DMZ subnet e.g. 192.168.1.0/24"
      }
    },
    "appServicesCIDR":
    {
      "type": "string",
      "defaultValue": "192.168.2.0/24",
      "minLength": 9,
      "maxLength": 19,
      "metadata":
      {
        "description": "The CIDR address of the application services subnet e.g. 192.168.2.0/24"
      }
    },
    "dataCIDR":
    {
      "type": "string",
      "defaultValue": "192.168.3.0/24",
      "minLength": 9,
      "maxLength": 19,
      "metadata":
      {
        "description": "The CIDR address of the DMZ subnet e.g. 192.168.3.0/24"
      }
    },
    "monitoringCIDR":
    {
      "type": "string",
      "defaultValue": "192.168.4.0/24",
      "minLength": 9,
      "maxLength": 19,
      "metadata":
      {
        "description": "The CIDR address of the monitoring subnet e.g. 192.168.4.0/24"
      }
    },
    "supportCIDR":
    {
      "type": "string",
      "defaultValue": "192.168.5.0/24",
      "minLength": 9,
      "maxLength": 19,
      "metadata":
      {
        "description": "The CIDR address of the support subnet e.g. 192.168.4.0/24"
      }
    }
  },
  "variables": { },
  "resources": [ ],
  "outputs": {}
}
Notice in the template above I am trying to keep the required parameters to a minimum while defining default values and descriptions for each parameter. I did this to follow the guidance defined as best practices for creating ARM templates.
The next piece I will do is add each of these parameter values into the parameter file.
 {
  "$schema": "https://schema.management.azure.com/schemas/2015-01-01/deploymentParameters.json#",
  "contentVersion": "1.0.0.0",
  "parameters":
  {
    "networkName": { "value": "RoninNetTemplate" },
    "networkCIDR": { "value": "192.168.0.0/16" },
    "dmzCIDR": { "value": "192.168.1.0/24" },
    "appServicesCIDR": { "value": "192.168.2.0/24" },
    "dataCIDR": { "value": "192.168.3.0/24" },
    "monitoringCIDR": { "value": "192.168.4.0/24" },
    "supportCIDR": { "value": "192.168.5.0/24" }
  }
}
Now I will run the script to test it out and make sure there are no errors in it. I will use the following PowerShell command each time I want to deploy the template.
 <#
Select the proper account and subscription
#>
Login-AzureRmAccount
Set-AzureRmContext -SubscriptionId {Place your own subscription Id Here}
<#
Checks to see if the resource group exists
#>
function Test-ResourceGroupExists
{
  Param
  (
    [string]$name
  )
  Get-AzureRmResourceGroup -Name $name -ErrorAction SilentlyContinue

  return $?
}

<#
Creates the resource group if it does not exist
#>
function Create-ResourceGroupIfNotExists
{
  Param
  (
    [string]$name,
    [string]$location
  )
  $success = $false
  if(!(Test-ResourceGroupExists -name $name))
  {
    Write-Host 'Resource group does not exist, attempting to create it.'
    New-AzureRmResourceGroup -Name $name -Location $location -ErrorAction SilentlyContinue
    $success = $?
  }
  else
  {
    $success = $true
  }

  return $success
}

<#
Define common variables
#>
$resourceGroupName = 'RoninNetRG'
$location = 'East US'
$templateFile = 'C:\Templates\azuredeploy.json'
$templateParameterFile = 'C:\Templates\azuredeploy.parameters.json'

if(Create-ResourceGroupIfNotExists -name $resourceGroupName -location $location)
{
  New-AzureRmResourceGroupDeployment -ResourceGroupName $resourceGroupName -TemplateFile $templateFile -TemplateParameterFile $templateParameterFile

  if($?)
  {
    Write-Host 'script deployment successful'
  }
  else
  {
    Write-Host 'script deployment failed'
  }
}
else
{
  Write-Host 'Resource Group does not exist and could not be created... aborting script'
}
This PS1 file can now be used to deploy my VNET each time once I finish the template file. I now populate the template resources subnet structure to reflect the network I want by adding the following information to the variables and resources section of the template file.
 "variables":
{
  "DmzSubnetName": "Dmz",
  "DmzSubnetResourceId": "[concat(variables('DmzSubnetName'), '_sg')]",
  "AppServicesSubnetName": "AppServices",
  "AppServicesSubnetResourceId": "[concat(variables('AppServicesSubnetName'), '_sg')]",
  "DataSubnetName": "Data",
  "DataSubnetResourceId": "[concat(variables('DataSubnetName'), '_sg')]",
  "MonitoringSubnetName": "Monitoring",
  "MonitoringSubnetResourceId": "[concat(variables('MonitoringSubnetName'), '_sg')]",
  "SupportSubnetName": "Support",
  "SupportSubnetResourceId": "[concat(variables('SupportSubnetName'), '_sg')]"
},
"resources":
[
  {
    "apiVersion": "2016-03-30",
    "type": "Microsoft.Network/virtualNetworks",
    "name": "[parameters('networkName')]",
    "location": "[resourceGroup().location]",
    "comments": "Virtual network based on the Ronin template.",
    "properties": {
      "addressSpace": { "addressPrefixes": [ "[parameters('networkCIDR')]" ] },
        "subnets":
        [
          { "name": "[variables('DmzSubnetName')]", "properties": { "addressPrefix": "[parameters('dmzCIDR')]" } },
          { "name": "[variables('AppServicesSubnetName')]", "properties": { "addressPrefix": "[parameters('appServicesCIDR')]" } },
          { "name": "[variables('DataSubnetName')]", "properties": { "addressPrefix": "[parameters('dataCIDR')]" } },
          { "name": "[variables('MonitoringSubnetName')]", "properties": { "addressPrefix": "[parameters('monitoringCIDR')]" } },
          { "name": "[variables('SupportSubnetName')]", "properties": { "addressPrefix": "[parameters('supportCIDR')]" } }
       ]
     }
  }
]
Running this script now I can see the following network created in the Azure Portal.
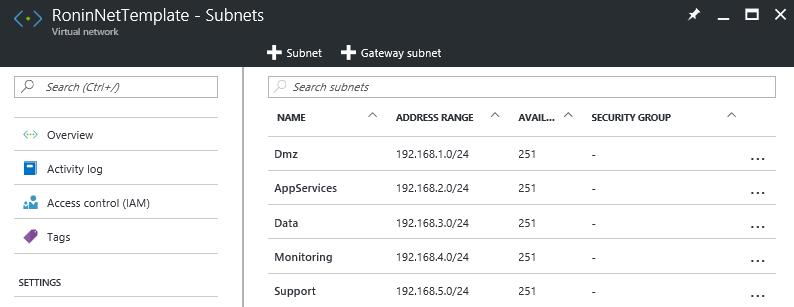
This looks exactly how I want it but there currently are no network security groups defined to control the access to and from the various network. In this next section I will put those controls in place.
The first thing I do is define the security groups that will be used to control access to the various subnets. In the section below the basic rules are defined. As I move forward with this template in the specific implementations I will just need to add or remove additional rules. This section is in the resource directly above the network definition from the previous step.
   {
    "apiVersion": "2016-03-30",
    "type": "Microsoft.Network/networkSecurityGroups",
    "name": "[variables('DmzSubnetResourceId')]",
    "location": "[resourceGroup().location]",
    "comments": "Security group to control access to the DMZ subnet",
    "properties": {
      "securityRules": [
        {
          "name": "Allow_Mqtts",
          "properties": {
            "description": "Allow Device Connection",
            "protocol": "Tcp",
            "sourcePortRange": "*",
            "sourceAddressPrefix": "Internet",
            "destinationAddressPrefix": "*",
            "destinationPortRange": "8883",
            "access": "Allow",
            "direction": "Inbound",
            "priority": 100
          }
        }
      ]
    }
  },
  {
    "apiVersion": "2016-03-30",
    "type": "Microsoft.Network/networkSecurityGroups",
    "name": "[variables('AppServicesSubnetResourceId')]",
    "location": "[resourceGroup().location]",
    "comments": "Security group to control access to the application services subnet",
    "properties": {
      "securityRules": [
        {
          "name": "Allow_Rest",
          "properties": {
            "description": "Allow REST calls from the network",
            "protocol": "Tcp",
            "sourcePortRange": "*",
            "sourceAddressPrefix": "[parameters('networkCIDR')]",
            "destinationAddressPrefix": "*",
            "destinationPortRange": "10080",
            "access": "Allow",
            "direction": "Inbound",
            "priority": 100
          }
        },
        {
          "name": "Allow_SupportSubnet",
          "properties": {
            "description": "Allow all access from the support network",
            "protocol": "*",
            "sourcePortRange": "*",
            "sourceAddressPrefix": "[parameters('supportCIDR')]",
            "destinationAddressPrefix": "*",
            "destinationPortRange": "*",
            "access": "Allow",
            "direction": "Inbound",
            "priority": 101
          }
        },
        {
          "name": "Allow_KpiMonitoring",
          "properties": {
            "description": "Allow the monitoring subnet to query logs and KPI",
            "protocol": "Tcp",
            "sourcePortRange": "*",
            "sourceAddressPrefix": "[parameters('monitoringCIDR')]",
            "destinationAddressPrefix": "*",
            "destinationPortRange": "10100",
            "access": "Allow",
            "direction": "Inbound",
            "priority": 102
          }
        }
      ]
    }
  },
  {
    "apiVersion": "2016-03-30",
    "type": "Microsoft.Network/networkSecurityGroups",
    "name": "[variables('DataSubnetResourceId')]",
    "location": "[resourceGroup().location]",
    "comments": "Security group to control access to the data subnet",
    "properties": {
      "securityRules": [
        {
          "name": "Allow_SupportSubnet",
          "properties": {
            "description": "Allow all access from the support network",
            "protocol": "*",
            "sourcePortRange": "*",
            "sourceAddressPrefix": "[parameters('supportCIDR')]",
            "destinationAddressPrefix": "*",
            "destinationPortRange": "*",
            "access": "Allow",
            "direction": "Inbound",
            "priority": 101
          }
        },
        {
          "name": "Allow_KpiMonitoring",
          "properties": {
            "description": "Allow the monitoring subnet to query logs and KPI",
            "protocol": "Tcp",
            "sourcePortRange": "*",
            "sourceAddressPrefix": "[parameters('monitoringCIDR')]",
            "destinationAddressPrefix": "*",
            "destinationPortRange": "10100",
            "access": "Allow",
            "direction": "Inbound",
            "priority": 102
          }
        }
      ]
    }
  },
  {
    "apiVersion": "2016-03-30",
    "type": "Microsoft.Network/networkSecurityGroups",
    "name": "[variables('MonitoringSubnetResourceId')]",
    "location": "[resourceGroup().location]",
    "comments": "Security group to control access to the monitoring subnet",
    "properties": {
      "securityRules": [
        {
          "name": "Allow_SupportSubnet",
          "properties": {
            "description": "Allow all access from the support network",
            "protocol": "*",
            "sourcePortRange": "*",
            "sourceAddressPrefix": "[parameters('supportCIDR')]",
            "destinationAddressPrefix": "*",
            "destinationPortRange": "*",
            "access": "Allow",
            "direction": "Inbound",
            "priority": 101
          }
        }
      ]
    }
  },
  {
    "apiVersion": "2016-03-30",
    "type": "Microsoft.Network/networkSecurityGroups",
    "name": "[variables('SupportSubnetResourceId')]",
    "location": "[resourceGroup().location]",
    "comments": "Security group to control access to the support subnet",
    "properties": {
      "securityRules": [
        {
          "name": "Allow_RDP",
          "properties": {
            "description": "Allow RDP access to the support network",
            "protocol": "Tcp",
            "sourcePortRange": "*",
            "sourceAddressPrefix": "Internet",
            "destinationAddressPrefix": "*",
            "destinationPortRange": "3389",
            "access": "Allow",
            "direction": "Inbound",
            "priority": 101
          }
        }
      ]
    }
  }
Notice in the support network that I have allowed RDP from the internet. This is clearly not what I will want to do in production etc. Restricting this rule at a later point to use a VPN or a specific IP address of a known client is the approach I would take.
To make the appropriate ties to the network the first thing I need to do is add some depends on statements letting the resource manager know the proper order to create resources or they may not be ready when I need them. I add the following statement under the comments property in the network definition.
 "dependsOn": [
  "[concat('Microsoft.Network/networkSecurityGroups/', variables('DmzSubnetResourceId'))]",
  "[concat('Microsoft.Network/networkSecurityGroups/', variables('AppServicesSubnetResourceId'))]",
  "[concat('Microsoft.Network/networkSecurityGroups/', variables('DataSubnetResourceId'))]",
  "[concat('Microsoft.Network/networkSecurityGroups/', variables('MonitoringSubnetResourceId'))]",
  "[concat('Microsoft.Network/networkSecurityGroups/', variables('SupportSubnetResourceId'))]"
]
I then assign the security groups to their appropriate subnets by changing the properties in each subnet definition to include it.
 "subnets": [
{
  "name": "[variables('DmzSubnetName')]",
  "properties":
  {
    "addressPrefix": "[parameters('dmzCIDR')]",
    "networkSecurityGroup": { "id": "[resourceId('Microsoft.Network/networkSecurityGroups', variables('DmzSubnetResourceId'))]" }
  }
},
{
  "name": "[variables('AppServicesSubnetName')]",
  "properties":
  {
    "addressPrefix": "[parameters('appServicesCIDR')]",
    "networkSecurityGroup": { "id": "[resourceId('Microsoft.Network/networkSecurityGroups', variables('AppServicesSubnetResourceId'))]" }
  }
},
{
  "name": "[variables('DataSubnetName')]",
  "properties":
  {
    "addressPrefix": "[parameters('dataCIDR')]",
    "networkSecurityGroup": { "id": "[resourceId('Microsoft.Network/networkSecurityGroups', variables('DataSubnetResourceId'))]" }
  }
},
{
  "name": "[variables('MonitoringSubnetName')]",
  "properties":
  {
    "addressPrefix": "[parameters('monitoringCIDR')]",
    "networkSecurityGroup": { "id": "[resourceId('Microsoft.Network/networkSecurityGroups', variables('MonitoringSubnetResourceId'))]" }
  }
},
{
  "name": "[variables('SupportSubnetName')]",
  "properties":
  {
    "addressPrefix": "[parameters('supportCIDR')]",
    "networkSecurityGroup": { "id": "[resourceId('Microsoft.Network/networkSecurityGroups', variables('SupportSubnetResourceId'))]" }
  }
}]
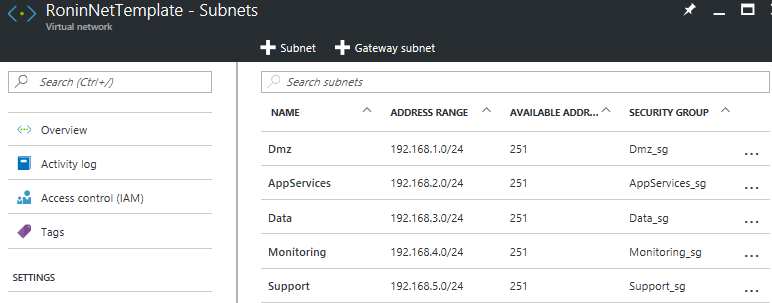
Running the script now will deploy the entire network with security groups in place giving me my template that will be the starting point for the solution. You can see the details in the image below
Now that the standard network template for my project has been created I can use it to enforce my trust zones within the solution adding another layer to my security.