Ronin – Key Vault
The first thing I am going to do is setup a standard way to work with and store the solutions primary secrets and cryptographic materials. I find that as a developer I am called on to decide or at least make recommendations on how to handle implementations of protocols, tools and technologies that need access to secrets and or cryptographic materials. I obviously see merit in this if the proper security review is in place to protect everyone from myself! Once the system goes into production should the operations team really trust me with these sensitive materials? Enter Azure Key Vault (Key Vault).
Key Vault is an Azure based PaaS service that can be used to encrypt keys and secrets (e.g. connection strings, X509 certificates etc.) through the use of a Hardware Security Module (HSM). HSMs are used quite frequently in data centers so I would not expect any less in our solution. The Azure Key Vault Service can store the keys in a FIPS 140-2 Level 2 validated HSM, adding the level of security I am looking for at the same time as enabling a separation concerns for the developer and operations.
The separation of concerns comes from providing the ability to upload an manage the secrets and keys to Operations while granting my application access in to use them. The solution makes requests of the Key Vault to retrieve secrets or decrypt values using named keys based on the permissions setup by the Operations team. The named keys cannot be retrieved by the solution making it a great defense technique, but as with all public cloud services it has consumption throttles in place. These consumption throttles are based on 10 second windows making this something I want to use in a well thought out fashion (e.g. use it when required and appropriate vs. trying to use it for every sing transaction in the system).
I am going to use my organizations Azure Active Directory to support my solution's interactions with the Key Vault so I will not have to setup one of my own. The Key Vault will sit outside of my Virtual Network and have its own life cycle. In fact, once I setup the Key Vault I would probably leverage the same one for other solutions in the same region, thus allowing my operations team to reduce the number of interactions they need to perform in the case of general key rollovers etc.
To setup the Key Vault I use a simple ARM template again. The first part of the template is to define the parameters of interest, the goal being to make as few parameters as possible while making the template reusable.
 "parameters":
{
  "keyVaultName":
  {
    "type": "string",
    "defaultValue": "[concat(uniqueString(subscription().id), 'vault')]",
    "metadata": { "description": "Name of the vault" }
  },
  "adUserObjectId":
  {
    "type": "string",
    "metadata": { "description": "Object Id of the AD user. Get using Get-AzureRmADUser or Get-AzureRmADServicePrincipal cmdlets" }
  },
  "skuName":
  {
    "type": "string",
    "defaultValue": "Premium",
    "allowedValues": [ "Standard", "Premium" ],
    "metadata": { "description": "SKU for the vault" }
  }
}
In the template above you can see that I will support 3 parameters
- keyVaultName: the name of the Key Vault to be created.
- adUserObjectId: this is the id of the user that will be the administrator of the Key Vault. This id can be obtained by running the GetAzureRmADUser or Get-AzureRmADServicePrincipal powershell cmdlets.
- skuName: this is the service offering within Key Vault that I want to use. My immediate reaction is usually to take the smaller SKU (standard) and just change to the appropriate one based on my needs depending on what environment I am in. For Key Vault, I prefer looking at the Premium SKU seeing it offers true HSM, not just software based
The variables section will be used to hold values that must be consistent, mitigating against human error, or adding values that I may want to surface at a later time to a parameter for customizations.
 "variables":
{
  "tenantId": "[subscription().tenantId]",
  "enableForDeployment": true,
  "enableForDiskEncryption": true,
  "enableForTemplateDeployment": true,
  "secretsPermissions": "all",
  "keysPermissions": "all"
},
It is worth noting that in the variables above the tenant Id uses the subscriptions tenant id for deploying the Key Vault.
I will deploy the Key Vault without any secrets or keys but will associate the user identified by the adUserObjectId to it in the role of administrator.
 "resources":
[
  {
    "type": "Microsoft.KeyVault/vaults",
    "name": "[parameters('keyVaultName')]",
    "apiVersion": "2015-06-01",
    "location": "[resourceGroup().location]",
    "properties":
    {
      "enabledForDeployment": "[variables('enableForDeployment')]",
      "enabledForDiskEncryption": "[variables('enableForDiskEncryption')]",
      "enabledForTemplateDeployment": "[variables('enableForTemplateDeployment')]",
      "tenantId": "[variables('tenantId')]",
      "accessPolicies":
      [
        {
          "tenantId": "[variables('tenantId')]",
          "objectId": "[parameters('adUserObjectId')]",
          "permissions":
          {
            "keys": ["[variables('keysPermissions')]"],
            "secrets": ["[variables('secretsPermissions')]"]
          }
        }
      ],
      "sku":
      {
        "name": "[parameters('skuName')]",
        "family": "A"
      }
    }
  }
]
I decided not to deploy any secrets or keys so I can force the separation of concerns. In this scenario although the standard operations team can deploy the Key Vault for use in the solution their needs to be a security officer or other trusted authority with the security materials to setup the keys and secrets.
The final piece is to output the newly created Key Vault object, allowing me to use this from other scripts or get the important details in my PowerShell session without much work.
 "outputs":
{
  "vault":
  {
    "type": "object",
    "value": "[reference(parameters('keyVaultName'))]"
  }
}
Building a parameter file is easy as you can see here.
 {
  "$schema": "https://schema.management.azure.com/schemas/2015-01-01/deploymentParameters.json#",
  "contentVersion": "1.0.0.0",
  "parameters":
  {
    "keyVaultName": { "value": "RoninVault" },
    "adUserObjectId": { "value": "xxxxxxx-xxxx-xxxx-xxxx-xxxxxxxxxxxx" },
    "skuName": { "value": "Premium" }
  }
}
To deploy the Key Vault using the ARM template and parameter file I run a PowerShell script as seen here.
 <#
Select the proper account and subscription
#>
Login-AzureRmAccount
Set-AzureRmContext -SubscriptionId ‘xxxxxxx-xxxx-xxxx-xxxx-xxxxxxxxxxxx’

<#
Checks to see if the resource group exists
#>
function Test-ResourceGroupExists
{
  Param
  (
    [string]$name
  )

  Get-AzureRmResourceGroup -Name $name -ErrorAction SilentlyContinue

  return $?
}

<#
Creates the resource group if it does not exist
#>
function Create-ResourceGroupIfNotExists
{
  Param
  (
    [string]$name,
    [string]$location
  )

  $success = $false

  if(!(Test-ResourceGroupExists -name $name))
  {
    Write-Host 'Resource group does not exist, attempting to create it.'
    New-AzureRmResourceGroup -Name $name -Location $location -ErrorAction SilentlyContinue

    $success = $?
  }
  else
  {
    $success = $true
  }

  return $success
}

<#
Define common variables
#>
$resourceGroupName = 'RoninSecrets'
$location = 'East US'
$templateFile = './azuredeploy.keyvault.json'
$templateParameterFile = './azuredeploy.keyvault.parameters.json'

if(Create-ResourceGroupIfNotExists -name $resourceGroupName -location $location)
{
  New-AzureRmResourceGroupDeployment -ResourceGroupName $resourceGroupName -TemplateFile $templateFile -TemplateParameterFile $templateParameterFile

  if($?)
  {
    Write-Host 'script deployment successful'
  }
  else
  {
    Write-Host 'script deployment failed'
  }
}
else
{
  Write-Host 'Resource Group does not exist and could not be created... aborting script'
}
Once I run the script I see that the Key Vault has deployed successfully.
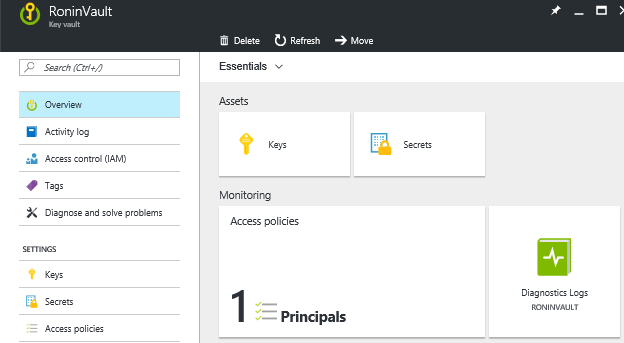
With the Key Vault created I could continue to add additional principals with varying rights, but for the time being I will keep it with myself possessing full permissions. For production reasons, I would do a security review and determine the appropriate levels of access by user to keep with a least privilege mindset.
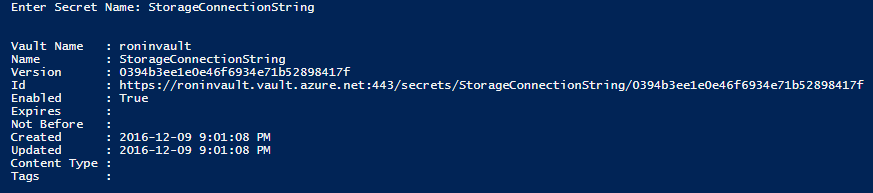
To add a secret, I am going to use a simple script that prompts for the secret name and value. Based on the input it will submit the secret to the store that can later be retrieved by name.
 $subscriptionId = ‘xxxxxxx-xxxx-xxxx-xxxx-xxxxxxxxxxxx’

<#
Select the proper account and subscription
#>
Login-AzureRmAccount
Set-AzureRmContext -SubscriptionId $subscriptionId

$vaultName = 'RoninVault'
$secretName = Read-Host -Prompt "Enter Secret Name"
$secretValue = Read-Host -Prompt "Enter password" -AsSecureString

Set-AzureKeyVaultSecret -VaultName $vaultName -Name $secretName -SecretValue $secretValue
Once this runs I will get the following output outlining the details of the secret entry.
This works great for strings and generally simple data, but to store a certificate as a secret I need to handle it a bit different.
 $subscriptionId = ‘xxxxxxx-xxxx-xxxx-xxxx-xxxxxxxxxxxx’

<#
Select the proper account and subscription
#>
Login-AzureRmAccount
Set-AzureRmContext -SubscriptionId $subscriptionId

function Get-PfxLocation
{
  [string]$resultingFilePath = $null
  [Reflection.Assembly]::LoadWithPartialName("System.Windows.Forms") | Out-Null
  [System.Windows.Forms.Application]::EnableVisualStyles()

  $browse = New-Object System.Windows.Forms.OpenFileDialog
  $browse.filter = "Certificate (*.pfx)| *.pfx"

  if ($browse.ShowDialog() -eq "OK")
  {
    $resultingFilePath = $browse.filename
  }

  $browse.Dispose()

  return $resultingFilePath
}

$vaultName = 'RoninVault'
$secretName = Read-Host -Prompt "Enter Secret Name"
$pfxFile = Get-PfxLocation
$securePassword = Read-Host -Prompt "Enter PFX Password" -AsSecureString
$password = [Runtime.InteropServices.Marshal]::PtrToStringAuto([Runtime.InteropServices.Marshal]::SecureStringToBSTR($securePassword))

$collection = New-Object System.Security.Cryptography.X509Certificates.X509Certificate2Collection
$collection.Import($pfxFile, $password, [System.Security.Cryptography.X509Certificates.X509KeyStorageFlags]::Exportable)
$clearBytes = $collection.Export([System.Security.Cryptography.X509Certificates.X509ContentType]::Pkcs12)
$fileContentEncoded = [System.Convert]::ToBase64String($clearBytes)
$secretValue = ConvertTo-SecureString -String $fileContentEncoded -AsPlainText –Force

Set-AzureKeyVaultSecret -VaultName $vaultName -Name $secretName -SecretValue $secretValue -ContentType 'application/x-pkcs12'
This technique will use the .NET file browser to retrieve a PFX file and store the Base64String representation of it. The following output shows the metadata associated with the certificate stored as a secret in my Key Vault.

Finally, to add a key to the hardware HSM I can use the following script.
 $subscriptionId = ‘xxxxxxx-xxxx-xxxx-xxxx-xxxxxxxxxxxx’

<#
Select the proper account and subscription
#>
Login-AzureRmAccount
Set-AzureRmContext -SubscriptionId $subscriptionId

function Get-PfxLocation
{
  [string]$resultingFilePath = $null
  [Reflection.Assembly]::LoadWithPartialName("System.Windows.Forms") | Out-Null
  [System.Windows.Forms.Application]::EnableVisualStyles()

  $browse = New-Object System.Windows.Forms.OpenFileDialog
  $browse.filter = "Certificate (*.pfx)| *.pfx"

  if ($browse.ShowDialog() -eq "OK")
  {
    $resultingFilePath = $browse.filename
  }

  $browse.Dispose()

  return $resultingFilePath
}

$vaultName = 'RoninVault'
$keyName = Read-Host -Prompt "Enter Key Name"
$pfxFile = Get-PfxLocation
$securePassword = Read-Host -Prompt "Enter PFX Password" -AsSecureString
$password = [Runtime.InteropServices.Marshal]::PtrToStringAuto([Runtime.InteropServices.Marshal]::SecureStringToBSTR($securePassword))

Add-AzureKeyVaultKey -VaultName $vaultName -Name $keyName -KeyFilePath $pfxFile -KeyFilePassword $securePassword -Destination HSM
I see a bit different output because I am working with a key instead of secret.

Now that I have the Key Vault deployed and have added both keys and secrets. The only think left is to setup the application to access the key vault and begin using it in my solution.
The following script will create an Active Directory application and an associated Service Principal. The Service Principal is used to both authenticate the application and associated permissions in Key Vault. It is important in an production system to have a security review performed to determine the appropriate permissions to grant.
 $subscriptionId = ‘xxxxxxx-xxxx-xxxx-xxxx-xxxxxxxxxxxx’

<#
Select the proper account and subscription
#>
Login-AzureRmAccount
Set-AzureRmContext -SubscriptionId $subscriptionId

$startDate = [System.DateTime]::Now
$endDate = $startDate.AddYears(2)
$applicationPassword = [Guid]::NewGuid()

$vaultName = Read-Host -Prompt "Enter Key Vault Name:"
$displayName = Read-Host -Prompt "Enter Application Name:"
$identifierUri = [string]::Format("https://localhost:8080/{0}{1}", $displayName,[Guid]::NewGuid().ToString("N"))
$homePage = "https://localhost/$($displayName)"

$activeDirectoryApplication = New-AzureRmADApplication -DisplayName $vaultName -HomePage $homePage -IdentifierUris $identifierUri  -StartDate $startDate -EndDate $endDate -Password $applicationPassword
$servicePrincipal = New-AzureRmADServicePrincipal -ApplicationId $activeDirectoryApplication.ApplicationId
Set-AzureRmKeyVaultAccessPolicy -VaultName $vaultName -ObjectId $servicePrincipal.Id -PermissionsToKeys all -PermissionsToSecrets all -PermissionsToCertificates all

Write-Host "Client Id: $($servicePrincipal.ApplicationId)"
Write-Host "Client Secret: $($applicationPassword)"
Now that the environment is configured I can validate my access to the Key Vault from a .NET console application. I create a windows console application and add the Microsoft.Azure.KeyVault NUGET package to the project, providing an easy to use interop layer for Key Vault. Using the Client Id and Client Key output when I registered the application in Azure Active Directory I can authenticate as follows.
 private const string ClientId = @"XXXXXXXX-XXXX-XXXX-XXXX-XXXXXXXXXXXX";
private const string ApplicationKey = @"XXXXXXXX-XXXX-XXXX-XXXX-XXXXXXXXXXXX";

public static async Task<string> GetToken(string authority, string resource, string scope)
{
  var credential = new ClientCredential(ClientId, ApplicationKey);
  var authenticationContext = new AuthenticationContext(authority, null);

  return (await authenticationContext.AcquireTokenAsync(resource, credential)).AccessToken;
}
This retrieves the access token when the application first attempts to perform an operation on the Key Vault using the client. To create the client and receive the secret I inserted called StorageConnectionString I use the URL that was output when it was inserted or I can obtain it through the portal.
 private const string SecretId = "https://roninvault.vault.azure.net/secrets/StorageConnectionString/0394b3ee1e0e46f6934e71b52898417f";

var vaultClient = new KeyVaultClient(GetToken);
var secret1 = vaultClient.GetSecretAsync(SecretId).Result;
var value = secret1.Value;
This returns the desired value from the secret store, validating it's functionality and completing this piece of the solution.
It is important to remember that if you are accessing the Key Vault from a locked down virtual network it is done using HTTPS port 443 for most commands but additionally HTTP port 80 is used to retrieve the certificate revocation list at times.