Note
Access to this page requires authorization. You can try signing in or changing directories.
Access to this page requires authorization. You can try changing directories.
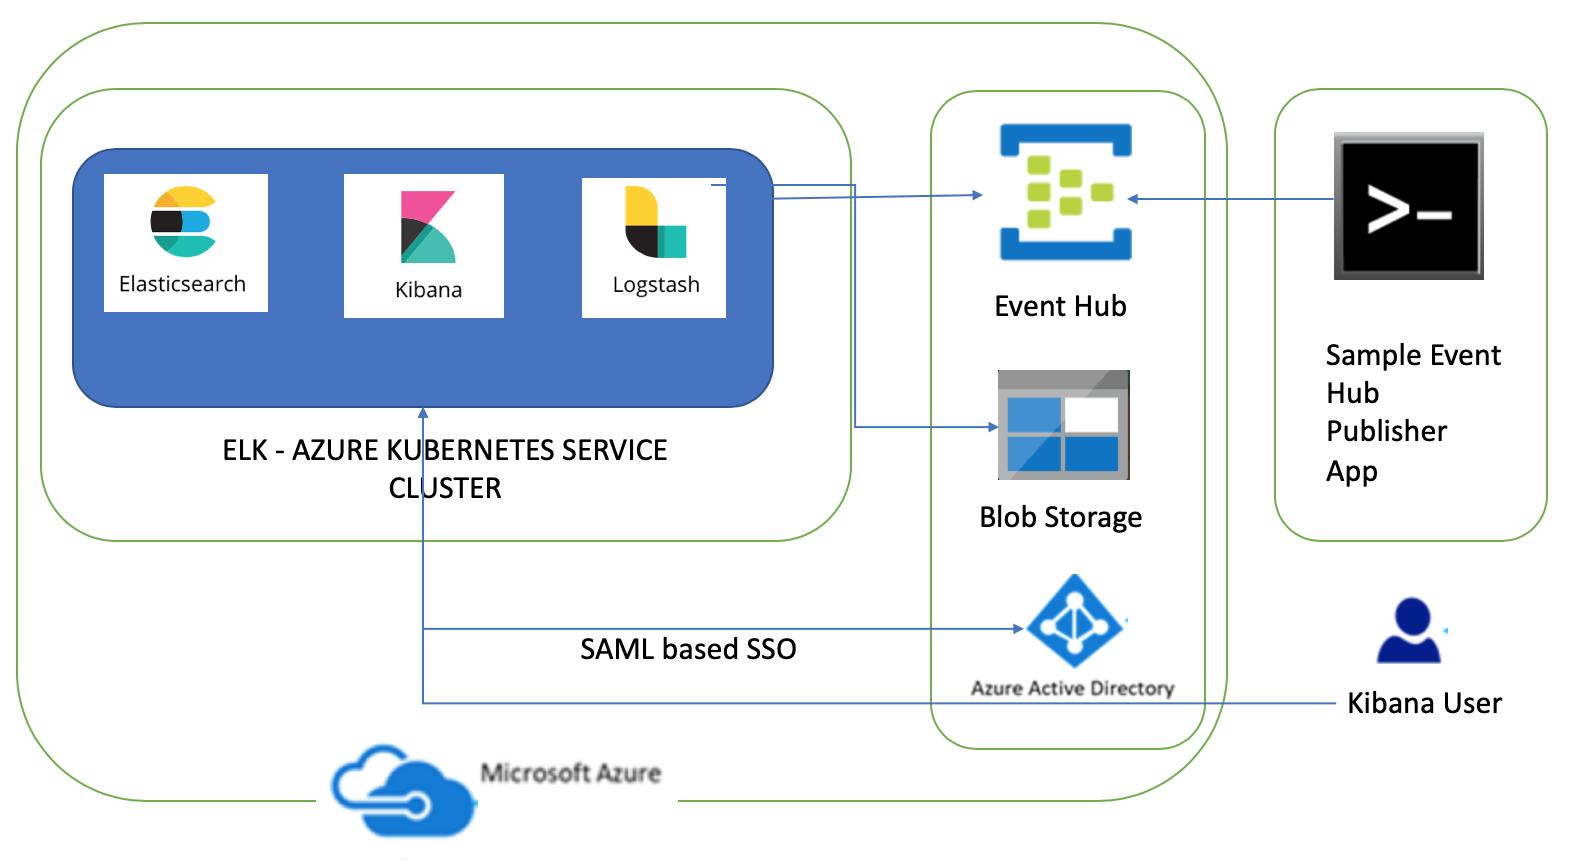
This is second part of the series on deploying Elasticsearch, Logstash and Kibana (ELK) to Azure Kubernetes Service cluster. In this article I am going to share steps needed to enable Azure AD SAML based single sign on to secure Elasticsearch and Kibana hosted in AKS. I will also go through steps needed to secure communications in ELK cluster. The first part describes steps needed to deploy ELK to AKS and consume messages from Azure Event Hub
The third part describes steps needed to ingest Azure Redis Cache messages into Elasticsearch using Logstash's Redis plugin.
https://blogs.msdn.microsoft.com/atverma/2018/10/14/ingest-azure-redis-cache-messages-into-elasticsearch-logstash-and-kibana-cluster-deployed-in-azure-kubernetes-service-aks
Using SAML SSO for Elasticsearch with AAD means that Elasticsearch does not need to be seeded with any user accounts from the directory. Instead, Elasticsearch is able to rely on the claims sent within a SAML token in response to successful authentication to determine identity and privileges. I have referred to this article to enable SAML based single sign on for Elasticsearch.
Kibana, as the user facing component, interacts with the user’s browser and receives all the SAML messages that the Azure AD sends to the Elastic Stack Service Provider. Elasticsearch implements most of the functionality a SAML Service Provider needs. It holds all SAML related configuration in the form of an authentication realm and it also generates all SAML messages required and passes them to Kibana to be relayed to the user’s browser. It finally consumes all SAML Responses that Kibana relays to it, verifies them, extracts the necessary authentication information and creates the internal authentication tokens based on that. The component diagram has been updated to add Azure AD SAML based SSO integration.
The dev tools used to develop these components are Visual Studio for Mac/VS Code, AKS Dashboard, kubectl, bash and openssl. The code snippets in this article are mostly yaml snippets and are included for reference only as formatting may get distorted thus please refer to GitHub repository for formatted resources.
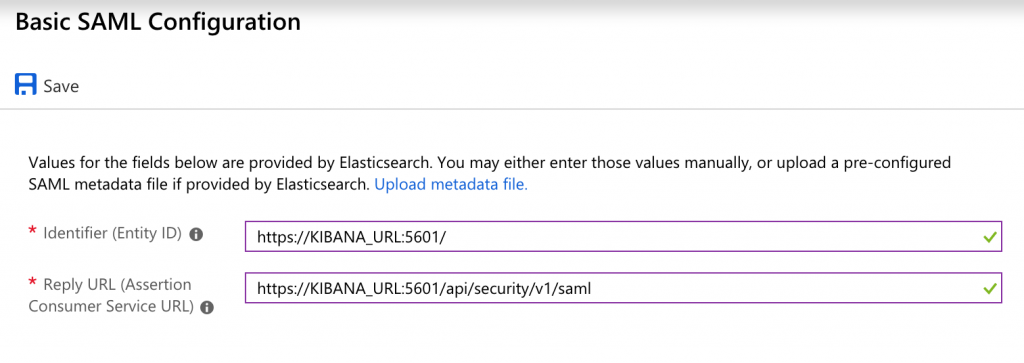
Before any messages can be exchanged between an Identity Provider and a Service Provider, one needs to know the configuration details and capabilities of the other. This configuration and the capabilities are encoded in an XML document, that is the SAML Metadata of the SAML entity. Thus we need to create non-gallery enterprise application within Azure AD. Please refer to these documents at msdn and elastic for more details as I am going to share main pointers as listed below
- In Azure Portal, navigate to
Azure Active Directory > Enterprise Applications > New application > Non-gallery applicationand create an Application. - Configure Single Sign on and specify Identifier and Reply URL. You need to update KIBANA_URL placeholder with DNS of Kibana as displayed below based on your Kibana endpoint. Please note that Reply URL needs to be an HTTPS endpoint. I will also cover securing ELK cluster in this article where I am going to share steps needed to enable TLS for Kibana.
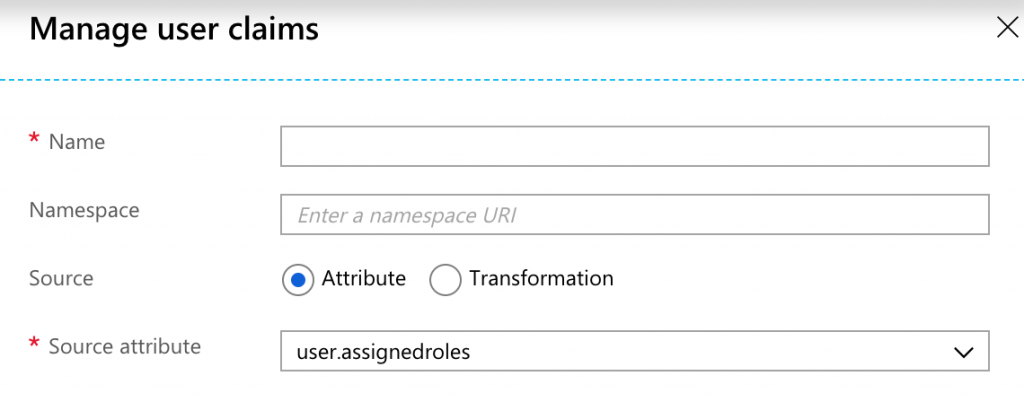
- Add a new User Claim by specifying 'Name' and 'Namespace' and select 'user.assignedroles' as source attribute. Role mappings will be defined in Elasticsearch for this claim based on which Elasticsearch roles are assigned to each user. I have specified name as role and namespace as https://schemas.microsoft.com/ws/2008/06/identity/claims/role. Based on values you specify you will need to Elasticsearch.yml.
- Application Roles: The application roles are defined in the application's registration manifest. When a user signs into the application, Azure AD emits a
rolesclaim for each role that the user has been granted individually to the user and from their group membership. In order to add a role, you will need to edit the manifest for this App by navigating toAzure Active Directory > App Registrations > Select Application and Edit Manifest. Please refer to this document about creating App Roles in Azure AD. Create a few roles by editing manifest as displayed below and save the manifest.
- Assign Role to users: In order to assign roles to users, add a few users. Navigate to
Azure Active Directory > Enterprise Applications > Select application > Users and Groups > Add Userand assign roles you created in previous step to these users. These roles are going to be mapped to Elasticsearch roles using role_mapping API in subsequent sections. - Finally, download Federation Metadata Xml and take note of Azure AD Identifier URL as these are going to be needed later for setting up SAML based SSO in Elasticsearch. Since I have specified Elasticsearch as Application name, the name of this file is Elasticsearch.xml.


X-Pack security enables you to encrypt traffic to, from, and within your Elasticsearch cluster. Connections are secured using Transport Layer Security (TLS), which is commonly referred to as "SSL". TLS requires X.509 certificates to perform encryption and authentication of the application that is being communicated with. In order for the communication between nodes to be truly secure, the certificates must be validated. The recommended approach for validating certificate authenticity in a Elasticsearch cluster is to trust the certificate authority (CA) that signed the certificate. By doing this, as nodes are added to your cluster they just need to use a certificate signed by the same CA and the node is automatically allowed to join the cluster. Additionally, it is recommended that the certificates contain subject alternative names (SAN) that correspond to the node’s IP address and DNS name so that hostname verification can be performed.
However, I will be generating self signed certificates using elasticsearch-certutil command line tool. You can read more about setting up TLS on a Cluster. I already have Elasticsearch cluster running which I had created during first part of this series and I am going to harness the same to create self signed certificates. If you have certificates, you need to skip steps listed below to generate certificates.
- Generate new local CA by running command
bin/elasticsearch-certutil ca. The output file name iselastic-stack-ca.p12and password is Password1$. Change the name and password based on your preferences. - Generate self signed certificate
bin/elasticsearch-certutil cert --ca elastic-stack-ca.p12 --dns sample-elasticsearch. Enter password for CA (elastic-stack-ca.p12). The output file name iselastic-certificates.p12and password is Password1$. Change the name and password based on your preferences. The --dns parameter value 'sample-elasticsearch' is the Elasticsearch host name and needed for host name verification(especially for Logstash pipeline since hostname verification can't be turned off when ssl is enabled). - Generate a cert to configure Kibana to encrypt communications between the browser and Kibana server
bin/elasticsearch-certutil cert --pem -ca elastic-stack-ca.p12 --dns KIBANA_URL. Update the --dns parameter value based on your DNS for Kibana endpoint. This is the same value which was specified during SAML configuration. The output file name iscertificate-bundle.zip. If you unzip this folder, you will seeinstance.crtandinstance.keyfiles which we are going to need for setting up TLS in Kibana.
I have generated certs on existing Elasticsearch container, thus the next step is to copy these certs from AKS container to local machine. I will use kubectl command line tool to copy these files from AKS container to certs folder on my machine as displayed below
kubectl cp default/sample-elasticsearch-0:elastic-stack-ca.p12 /Users/username/certs/elastic-stack-ca.p12`` kubectl cp default/sample-elasticsearch-0:elastic-certificates.p12 /Users/username/certs/elastic-certificates.p12 `` kubectl cp default/sample-elasticsearch-0:certificate-bundle.zip /Users/username/certs/certificate-bundle.zip
After copying these files to local machine, I used OpenSSL utility to create elastic-stack-ca.pem file which Kibana and Logstash will need to communicate with TLS enabled Elasticsearch openssl pkcs12 -in /Users/username/certs/elastic-stack-ca.p12 -clcerts -nokeys -chain -out /Users/username/certs/elastic-stack-ca.pem
Now that certificates needed to enable TLS are ready, the next step is to create Elasticsearch, Logstash and Kibana resources. I will share couple of ways in which certificates and IDP federation metadata xml files can be deployed to ELK containers. In the first option, I am going to create custom docker images for Elasticsearch, Logstash and Kibana by bundling files needed to enable TLS and setup SAML based SSO. In the second option, I will create Secrets in Kubernetes for these files and mount these files instead of custom docker images.
The second option is an afterthought after I posted this blog since I didn't like the idea of bundling certificates and files into docker image. The second option uses Secrets and Command concepts which are explained in subsequent sections. Thus instead of composing a new article, I have decided to update the existing article. The headers of steps which are specific to option A or option B have been updated.
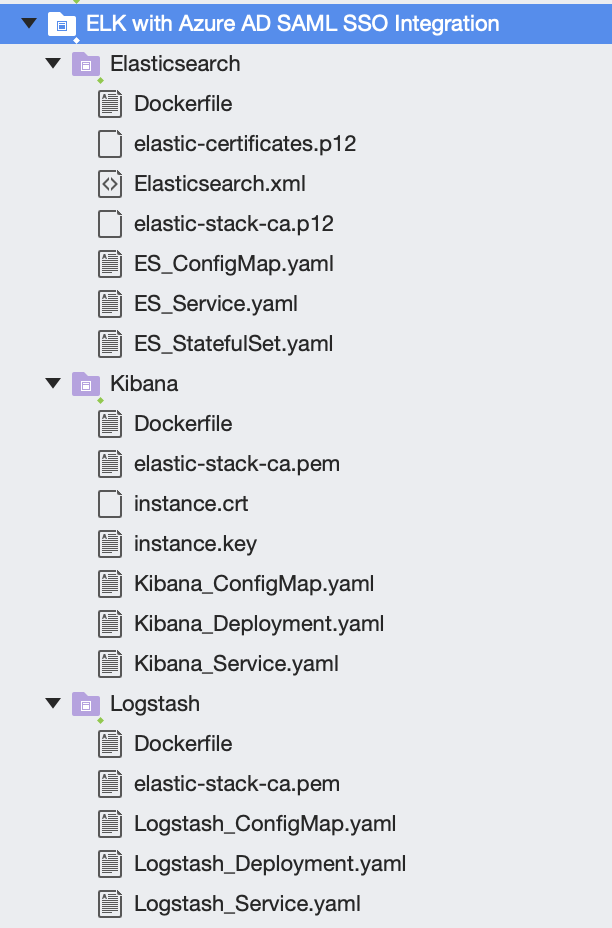
The solution structure of source code which you can download from GitHub is displayed below and you can see that I have copied cert files created in steps above and Elasticsearch.xml (Federation Metadata Xml). You will also see Dockerfiles per folder which I will need to create custom images (needed for first option only as mentioned above). I haven't committed certificates and IDP federation metadata xml thus you need to copy files you have created to corresponding folders before building docker images.
The next step is to create Elasticsearch, Logstash and Kibana resources in AKS. Part 1 of this series provides detailed overview of these resources thus in this article I will only cover differences and changes needed to enable SSO and TLS as compared to Part 1 files.
Copy elastic-stack-ca.p12, elastic-certificates.p12 and Elasticsearch.xml to Elasticsearch folder. No changes are needed in ES_PersistentVolumeClaim.yml and ES_Service.yml files. The complete yaml files needed to enable TLS and deploy Elasticsearch to AKS can be downloaded from GitHub.
Elasticsearch DockerFile copies certs and federation metadata xml to config folder of Elasticsearch and sets keystore and truststore passwords. You need to update file names and passwords based on your specified values in previous steps.
FROM docker.elastic.co/elasticsearch/elasticsearch:6.4.1COPY --chown=elasticsearch:elasticsearch elastic-stack-ca.p12 /usr/share/elasticsearch/config/COPY --chown=elasticsearch:elasticsearch elastic-certificates.p12 /usr/share/elasticsearch/config/COPY --chown=elasticsearch:elasticsearch Elasticsearch.xml /usr/share/elasticsearch/config/RUN /bin/bash -c "echo Password1$ | /usr/share/elasticsearch/bin/elasticsearch-keystore add xpack.security.transport.ssl.keystore.secure_password -xf"RUN /bin/bash -c "echo Password1$ | /usr/share/elasticsearch/bin/elasticsearch-keystore add xpack.security.transport.ssl.truststore.secure_password -xf"RUN /bin/bash -c "echo Password1$ | /usr/share/elasticsearch/bin/elasticsearch-keystore add xpack.security.http.ssl.keystore.secure_password -xf"RUN /bin/bash -c "echo Password1$ | /usr/share/elasticsearch/bin/elasticsearch-keystore add xpack.security.http.ssl.truststore.secure_password -xf;"
The commands to build and publish docker images to Docker Hub are
- Build Docker Image: docker build -t testelasticsearch .
- Tag Docker Image: docker tag testelasticsearch {YOUR_DOCKER_REPO}
- Publish Image to Docker Hub: docker push {YOUR_DOCKER_REPO}
Please update {YOUR_DOCKER_REPO} placeholder with your docker repository.
Since in second option, no custom docker files are needed, I am going to create secret for certificates and federation xml files. Kubernetes will save secret in base64 format. The command to create a secret from multiple files is
kubectl create secret generic elasticsearchsecret --from-file=./Elasticsearch/elastic-certificates.p12 --from-file=./Elasticsearch/Elasticsearch.xml --from-file=./Elasticsearch/elastic-stack-ca.p12
The main pointers about changes needed to this resource as compared to first part of this series are
- SSL is enabled for Elasticsearch:
xpack.security.transport.ssl.enabled: true,xpack.security.http.ssl.enabled: true - Verification of certificate is set
xpack.security.transport.ssl.verification_mode: certificate - Keystore and Truststore type is
PKCS12, path is location of cert bundled in imageelastic-certificates.p12and password is Password1$. Update these values based on your specified values. - Cross origin resource sharing is enabled
http.cors.enabled: true - Two realms are specified i.e. native and saml under
xpack: security: authc: realms:. Order of native realm is 0 so it will take precedence over saml realm. idp.metadata.pathis path of the Federation metadata xml which was downloaded from Azure AD SAML configuration.idp.entity_idis the Azure AD identifier URL which was copied from Azure AD SAML configuration.sp.entity_idis the Kibana endpointsp.acsis the Kibana reply URLsp.logoutis the Kibana logout URLattributes.principalis mapped to namespace of the name user claim configured in Azure ADattributes.groupsis mapped to namespace of the role user claim configured in Azure AD
apiVersion: v1kind: ConfigMapmetadata: name: sample-elasticsearch-configmap namespace: defaultdata: elasticsearch.yml: | cluster.name: "sample-elasticsearch-cluster" network.host: 0.0.0.0 discovery.zen.minimum_master_nodes: 1 # Update max_local_storage_nodes value based on number of nodes node.max_local_storage_nodes: 1 xpack.security.enabled: true xpack.monitoring.collection.enabled: true xpack.security.transport.ssl.enabled: true xpack.security.transport.ssl.verification_mode: certificate xpack.license.self_generated.type: trial xpack.ssl.keystore.type: PKCS12 xpack.ssl.keystore.path: "elastic-certificates.p12" xpack.ssl.keystore.password: Password1$ xpack.ssl.truststore.type: PKCS12 xpack.ssl.truststore.path: "elastic-certificates.p12" xpack.ssl.truststore.password: Password1$ xpack.security.transport.ssl.keystore.path: "elastic-certificates.p12" xpack.security.transport.ssl.truststore.path: "elastic-certificates.p12" xpack.security.http.ssl.enabled: true xpack.security.http.ssl.keystore.path: "elastic-certificates.p12" xpack.security.http.ssl.truststore.path: "elastic-certificates.p12" xpack.ssl.verification_mode: certificate http.cors.enabled: true http.cors.allow-origin: "*" http.max_header_size: 16kb xpack: security: authc: realms: native1: type: native order: 0 saml1: type: saml order: 2 idp.metadata.path: "/usr/share/elasticsearch/config/Elasticsearch.xml" idp.entity_id: "AZURE_AD_IDENTIFIER_URL" sp.entity_id: "https://KIBANA_URL:5601/" sp.acs: "https://KIBANA_URL:5601/api/security/v1/saml" sp.logout: "https://KIBANA_URL:5601/logout" attributes.principal: "https://schemas.xmlsoap.org/ws/2005/05/identity/claims/name" attributes.groups: "https://schemas.microsoft.com/ws/2008/06/identity/claims/role" role_mapping.yml: |
Update ES_Statefulset.yaml file to point to Docker image image: YOUR_ELASTICSEARCH_IMAGE
I have created ES_Statefulset_V2.yaml file and main pointers are
securityContext: runAsUser: 2000will run Elasticsearch as a non-root user.command:["/bin/bash","-c", ...]is going to execute several commands piped together when POD is started- is going to assign keystore and truststore passwords
- set bootstrap.password
- start ElasticSearch
- you can also use shell script
- Environment variable
- name: PASSWORDis created which is used in commands. I have specified value in yaml however a better option is to mount this from secret e.genv[].valueFrom.secretKeyRef - Added
- name: sample-elasticsearch-elasticsearchsecretvolume and mountingelastic-stack-ca.p12,elastic-certificates.p12andElasticsearch.xmlfrom secret.
apiVersion: apps/v1kind: StatefulSetmetadata: name: sample-elasticsearch labels: service: sample-elasticsearchspec: serviceName: sample-elasticsearch # Number of PODS replicas: 1 selector: matchLabels: service: sample-elasticsearch template: metadata: labels: service: sample-elasticsearch spec: terminationGracePeriodSeconds: 300 initContainers: # https://www.elastic.co/guide/en/elasticsearch/reference/current/vm-max-map-count.html - name: increase-the-vm-max-map-count image: busybox command: - sysctl - -w - vm.max_map_count=262144 securityContext: privileged: true containers: - name: sample-elasticsearch image: docker.elastic.co/elasticsearch/elasticsearch:6.4.1 securityContext: runAsUser: 2000 resources: limits: cpu: 2000m memory: 2Gi requests: cpu: 100m memory: 1Gi ports: - containerPort: 9200 name: http - containerPort: 9300 name: tcp command: ["/bin/bash","-c", "echo $PASSWORD | /usr/share/elasticsearch/bin/elasticsearch-keystore add xpack.security.transport.ssl.keystore.secure_password -xf; \ echo $PASSWORD | /usr/share/elasticsearch/bin/elasticsearch-keystore add xpack.security.transport.ssl.truststore.secure_password -xf; \ echo $PASSWORD | /usr/share/elasticsearch/bin/elasticsearch-keystore add xpack.security.http.ssl.keystore.secure_password -xf ; \ echo $PASSWORD | /usr/share/elasticsearch/bin/elasticsearch-keystore add xpack.security.http.ssl.truststore.secure_password -xf ; \ echo $PASSWORD | /usr/share/elasticsearch/bin/elasticsearch-keystore add bootstrap.password -xf; \ /usr/share/elasticsearch/bin/elasticsearch ;"] env: - name: cluster.name value: "sample-elasticsearch-cluster" - name: "xpack.security.enabled" value: "true" - name: "TAKE_FILE_OWNERSHIP" value: “1” - name: PASSWORD value: Password1$ volumeMounts: - name: sample-elasticsearch-data-claim mountPath: /usr/share/elasticsearch/data - name: sample-elasticsearch-configmap mountPath: /usr/share/elasticsearch/config/elasticsearch.yml subPath: elasticsearch.yml - name: sample-elasticsearch-configmap mountPath: /usr/share/elasticsearch/config/role_mapping.yml subPath: role_mapping.yml - name: sample-elasticsearch-elasticsearchsecret mountPath: /usr/share/elasticsearch/config/elastic-stack-ca.p12 subPath: elastic-stack-ca.p12 - name: sample-elasticsearch-elasticsearchsecret mountPath: /usr/share/elasticsearch/config/elastic-certificates.p12 subPath: elastic-certificates.p12 - name: sample-elasticsearch-elasticsearchsecret mountPath: /usr/share/elasticsearch/config/Elasticsearch.xml subPath: Elasticsearch.xml volumes: - name: sample-elasticsearch-data-claim persistentVolumeClaim: claimName: sample-elasticsearch-data-claim - name: sample-elasticsearch-configmap configMap: name: sample-elasticsearch-configmap - name: sample-elasticsearch-elasticsearchsecret secret: secretName: elasticsearchsecret
Copy instance.crt,instance.key andelastic-stack-ca.pem to Kibana folder. The complete yaml files needed to deploy Kibana to AKS can be downloaded from GitHub.
Kibana Dockerfile copies instance.crt and instance.key needed to enable TLS for Kibana along with elastic-stack-ca.pem so that Elasticsearch can trust Kibana.
FROM docker.elastic.co/kibana/kibana:6.4.1COPY instance.crt /usr/share/kibana/config/COPY instance.key /usr/share/kibana/config/COPY elastic-stack-ca.pem /usr/share/kibana/config/
Since in second option no custom docker files are needed, I am going to create secret for certificates needed for Kibana. I will update the Deployment.yaml to mount these files from secret. The command to create a secret from multiple files is
kubectl create secret generic kibanasecret --from-file=./Kibana/elastic-stack-ca.pem --from-file=./Kibana/instance.crt --from-file=./Kibana/instance.key
The main pointers about changes needed to this resource as compared to first part of this series are
- Elasticsearch is TLS enabled
elasticsearch.url: https://sample-elasticsearch:9200 elasticsearch.ssl.certificateAuthoritiesis set to path ofelastic-stack-ca.pem- SSL is enabled
server.ssl.enabled: true server.ssl.keyis set to path ofinstance.keyserver.ssl.certificateis set to path ofinstance.crtxpack.monitoring.elasticsearch.ssl.verificationModeis set tocertificateelasticsearch.ssl.verificationModeis set tocertificatexpack.security.authProvidersis set to[saml, basic]. The order is important here as Kibana will use saml realm unless basic authorization header is passed in the request and in that case it will give precedence to native realm.xpack.security.publicis specified so that if Kibana instance is behind a proxy, it will tell Kibana how to form its public URL
apiVersion: v1kind: ConfigMapmetadata: name: sample-kibana-configmap namespace: defaultdata: kibana.yml: | server.name: sample-kibana server.host: "0.0.0.0" elasticsearch.url: https://sample-elasticsearch:9200 xpack.monitoring.ui.container.elasticsearch.enabled: true elasticsearch.username: kibana elasticsearch.password: Password1$ xpack.security.encryptionKey: "something_at_least_32_characters" elasticsearch.ssl.certificateAuthorities: "/usr/share/kibana/config/elastic-stack-ca.pem" server.ssl.enabled: true server.ssl.key: "/usr/share/kibana/config/instance.key" server.ssl.certificate: "/usr/share/kibana/config/instance.crt" xpack.monitoring.elasticsearch.ssl.verificationMode: certificate elasticsearch.ssl.verificationMode: certificate xpack.security.authProviders: [saml, basic] server.xsrf.whitelist: [/api/security/v1/saml] xpack.security.public: protocol: https hostname: KIBANA_URL
Update Kibana_Deployment.yaml file to point to Docker image image: YOUR_KIBANA_IMAGE
I have created Kibana_Deployment_V2.yaml file and main pointers are
- Added
- name: sample-kibana-kibanasecretvolume and mountinginstance.crt,instance.keyandelastic-stack-ca.pemfiles from secret.
apiVersion: apps/v1beta1kind: Deploymentmetadata: name: sample-kibana labels: component: sample-kibanaspec: replicas: 1 selector: matchLabels: component: sample-kibana template: metadata: labels: component: sample-kibana spec: containers: - name: sample-kibana image: docker.elastic.co/kibana/kibana:6.4.1 resources: limits: cpu: 1000m requests: cpu: 100m ports: - containerPort: 5601 name: http volumeMounts: - name: sample-kibana-configmap mountPath: /usr/share/kibana/config/kibana.yml subPath: kibana.yml - name: sample-kibana-kibanasecret mountPath: /usr/share/kibana/config/elastic-stack-ca.pem subPath: elastic-stack-ca.pem - name: sample-kibana-kibanasecret mountPath: /usr/share/kibana/config/instance.crt subPath: instance.crt - name: sample-kibana-kibanasecret mountPath: /usr/share/kibana/config/instance.key subPath: instance.key resources: {} terminationMessagePath: "/dev/termination-log" terminationMessagePolicy: File imagePullPolicy: Always securityContext: privileged: false volumes: - name: sample-kibana-configmap configMap: name: sample-kibana-configmap - name: sample-kibana-kibanasecret secret: secretName: kibanasecret restartPolicy: Always terminationGracePeriodSeconds: 5 dnsPolicy: ClusterFirst securityContext: privileged: true schedulerName: default-scheduler
Update Kibana_Service.yml file to use 5601 port since we have specified 5601 port for Kibana during SAML configuration and Elasticsearch.yml.
apiVersion: v1kind: Servicemetadata: name: sample-kibana labels: component: sample-kibanaspec: type: LoadBalancer selector: component: sample-kibana ports: - name: http port: 5601 targetPort: http
Copy elastic-stack-ca.pem to Elasticsearch folder. The yaml files needed to deploy Logstash to AKS can be downloaded from GitHub.
Logstash DockerFile copies certs needed to enable Logstash to communicate with Elasticsearch.
FROM docker.elastic.co/logstash/logstash:6.4.1COPY elastic-stack-ca.pem /usr/share/logstash/config/
Since in second option, no custom docker files are needed, I am going to create secret for certificates needed for Logstash. The command to create a secret from file is
kubectl create secret generic logstashsecret --from-file=./Logstash/elastic-stack-ca.pem
The main pointers about changes needed to this resource as compared to first part of this series are
- Elasticsearch is TLS enabled
xpack.monitoring.elasticsearch.url: https://sample-elasticsearch:9200 xpack.monitoring.elasticsearch.ssl.cais set to point toelastic-stack-ca.pem- Pipeline config for
azureeventhubs.cfgis updated to- Enable ssl
ssl => true - Set
cacertto point toelastic-stack-ca.pem
- Enable ssl
apiVersion: v1kind: ConfigMapmetadata: name: sample-logstash-configmap namespace: defaultdata: logstash.yml: | xpack.monitoring.elasticsearch.url: https://sample-elasticsearch:9200 dead_letter_queue.enable: true xpack.monitoring.enabled: true xpack.monitoring.elasticsearch.username: logstash_system xpack.monitoring.elasticsearch.password: Password1$ xpack.monitoring.elasticsearch.ssl.ca: "/usr/share/logstash/config/elastic-stack-ca.pem" pipelines.yml: | - pipeline.id: azureeventhubs path.config: "/usr/share/logstash/azureeventhubs.cfg" azureeventhubs.cfg: | input { azure_event_hubs { event_hub_connections => ["{AZURE_EVENT_HUB_CONNECTION_STRING};EntityPath=logstash"] threads => 2 decorate_events => true consumer_group => "$Default" storage_connection => "{STORAGE_ACCOUNT_CONNECTION_STRING}" storage_container => "logstash" } } filter { } output { elasticsearch { hosts => ["sample-elasticsearch:9200" ] user => "elastic" password => "Password1$" index => "azureeventhub-%{+YYYY.MM.dd}" ssl => true cacert => "/usr/share/logstash/config/elastic-stack-ca.pem" } } logstash.conf: |
Update Logstash_Deployment.yaml file to point to Docker image image: YOUR_LOGSTASH_IMAGE
I have created Logstash_Deployment_V2.yaml file and main pointers are
- Added
- name: sample-logstash-logstashsecretvolume and mountingelastic-stack-ca.pemfrom secret.
apiVersion: apps/v1beta1kind: Deploymentmetadata: name: sample-logstash labels: component: sample-logstashspec: replicas: 1 selector: matchLabels: component: sample-logstash template: metadata: labels: component: sample-logstash spec: containers: - name: sample-logstash image: YOUR_LOGSTASH_IMAGE volumeMounts: - name: sample-logstash-configmap mountPath: /usr/share/logstash/config/logstash.yml subPath: logstash.yml - name: sample-logstash-configmap mountPath: /usr/share/logstash/pipeline/logstash.conf subPath: logstash.conf - name: sample-logstash-configmap mountPath: /usr/share/logstash/azureeventhubs.cfg subPath: azureeventhubs.cfg - name: sample-logstash-configmap mountPath: /usr/share/logstash/azureredis.cfg subPath: azureredis.cfg - name: sample-logstash-configmap mountPath: /usr/share/logstash/config/pipelines.yml subPath: pipelines.yml resources: limits: cpu: 1000m requests: cpu: 100m ports: - containerPort: 5601 name: http volumes: - name: sample-logstash-configmap configMap: name: sample-logstash-configmap
Deploy Elasticsearch, Logstash and Kibana resources to AKS. Once external endpoint is created for Kibana service which takes a while proceed to next step to update UP with DNS name of Kibana.
The IP address of the Kibana Service external endpoint is updated with DNS name using commands displayed below. You need to update IP and DNSNAME before running these commands based on your values.
bash-3.2$ IP="KIBANA_SERVICE_EXTERNAL_ENDPOINT_IP" bash-3.2$ DNSNAME="KIBANA_URL" bash-3.2$ PUBLICIPID=$(az network public-ip list --query "[?ipAddress!=null]|[?contains(ipAddress, '$IP')].[id]" --output tsv) bash-3.2$ az network public-ip update --ids $PUBLICIPID --dns-name $DNSNAME
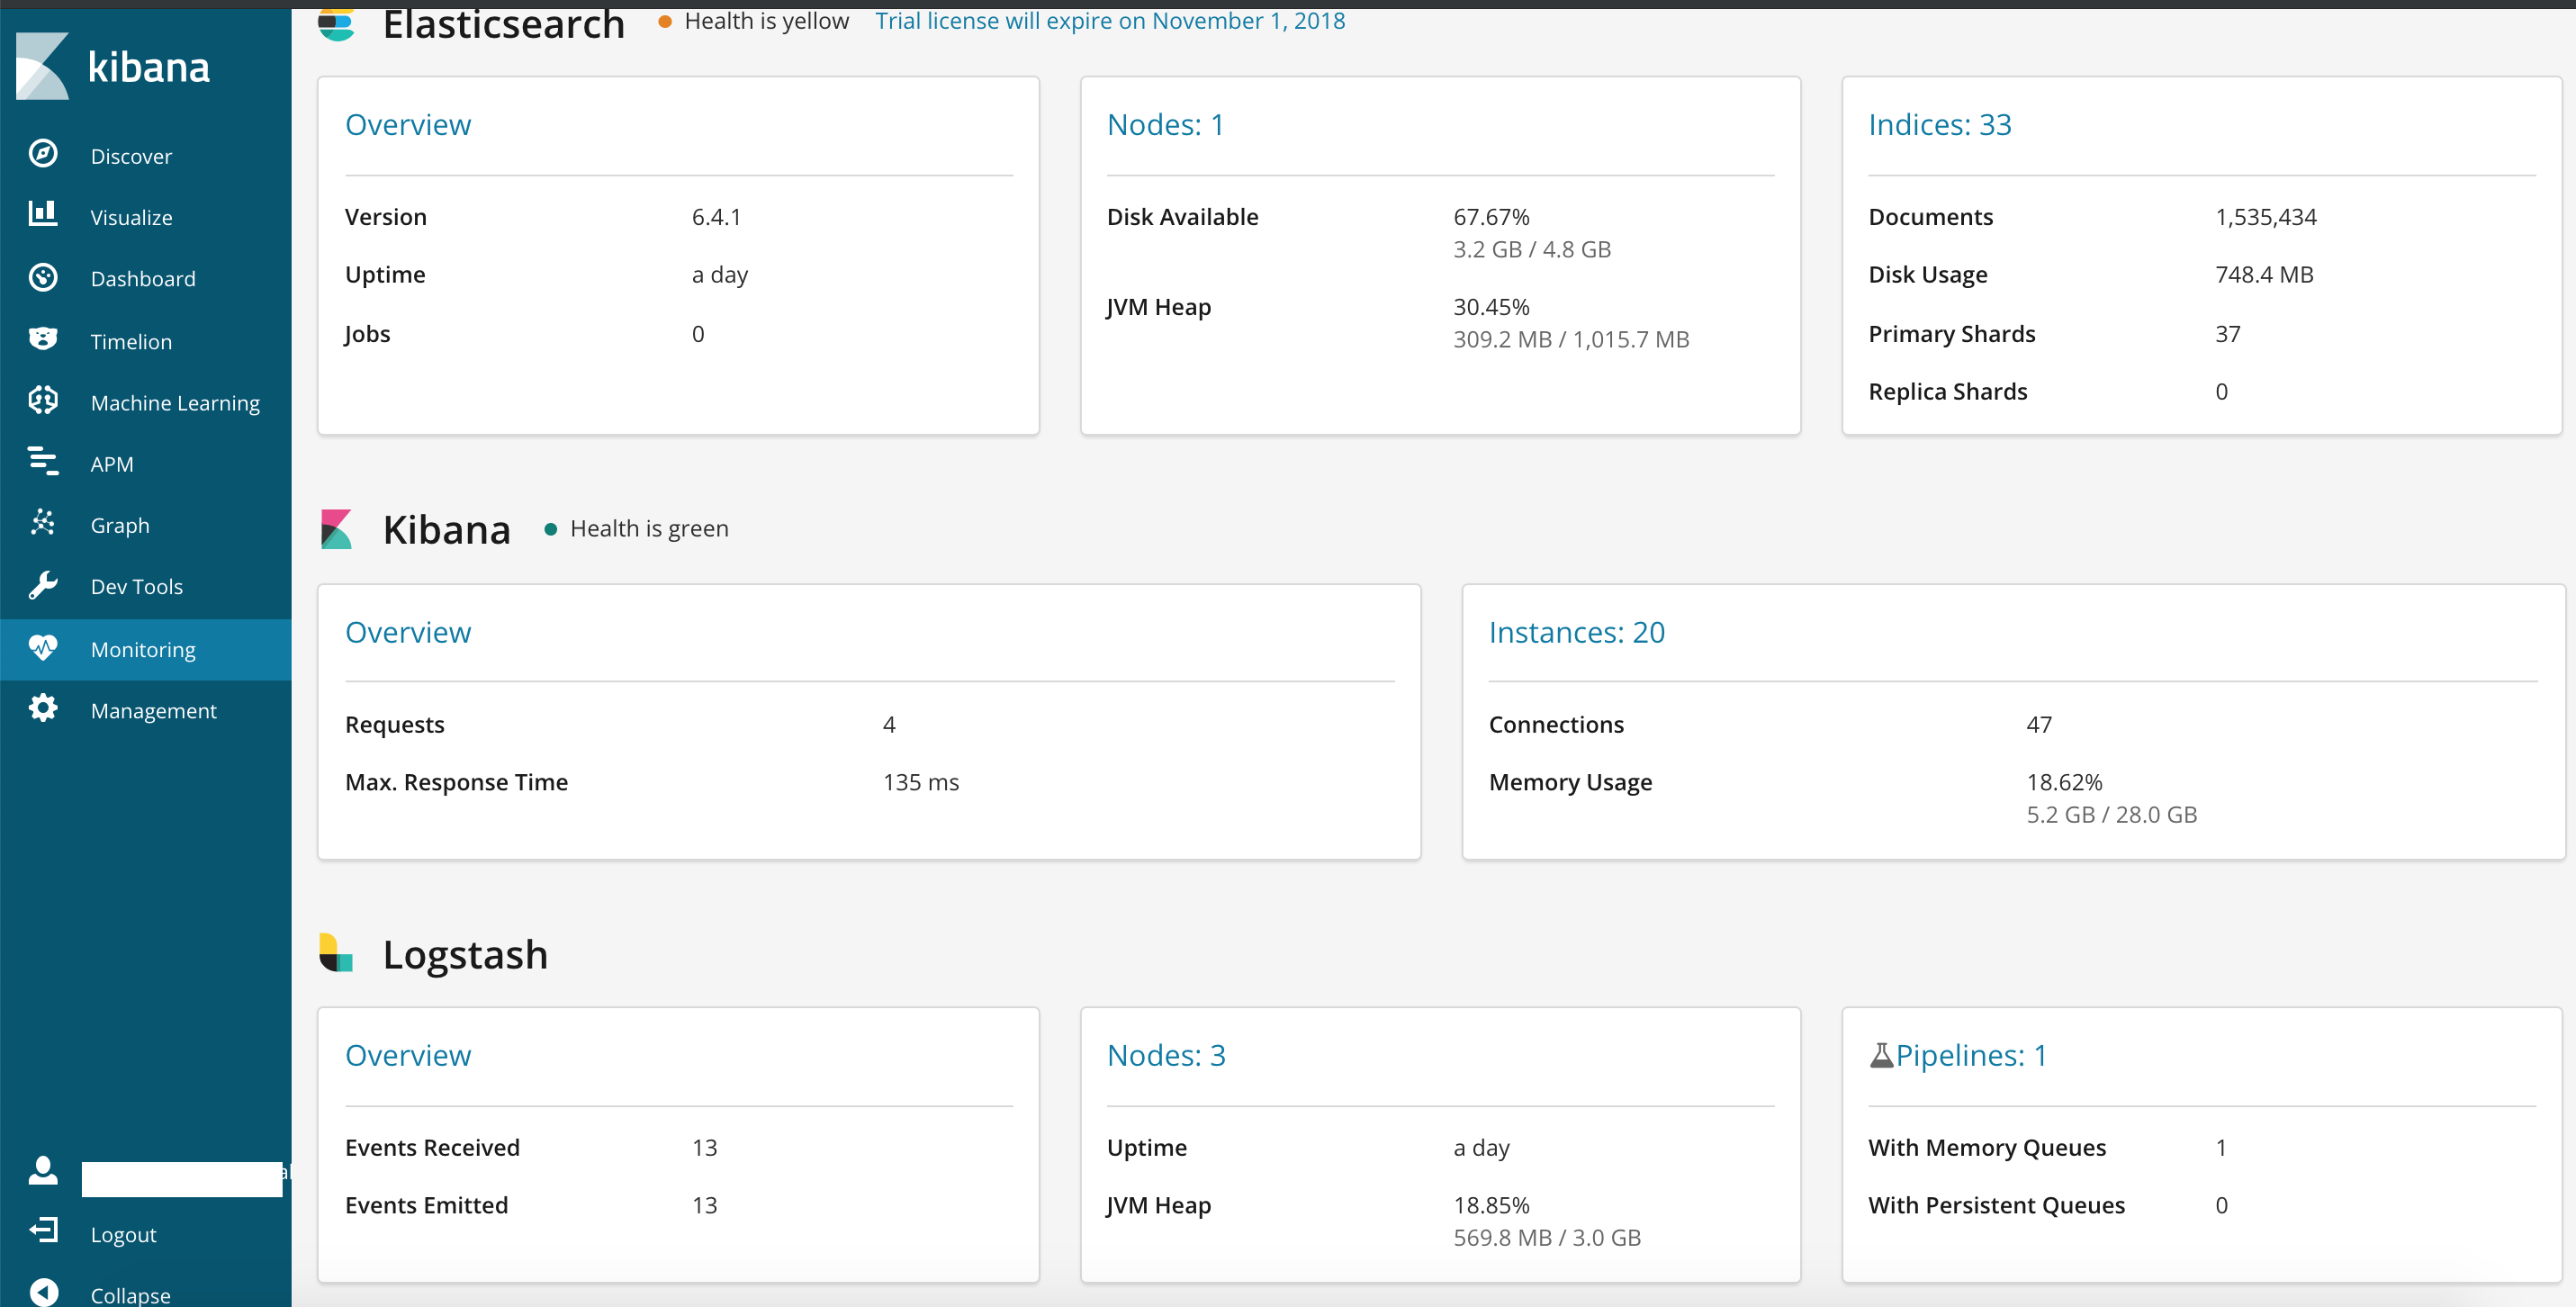
Elasticsearch's role_mapping API is used to map user roles to Elasticsearch roles. Mapping between groups and role user claim along with mapping between principal and name user claim was defined in Elasticsearch.yml
attributes.principal: "https://schemas.xmlsoap.org/ws/2005/05/identity/claims/name"attributes.groups:"https://schemas.microsoft.com/ws/2008/06/identity/claims/role"
A few examples of using role_mapping API to map Roles are
- This maps all the users of saml1 realm to kibana_user Elasticsearch role
PUT /_xpack/security/role_mapping/aad-saml-allusers { "roles": [ "kibana_user" ], "enabled": true, "rules": { "field": { "realm.name": "saml1" } } } - This maps users of saml1 realm having groups field value as superuser to map to superuser Elasticsearch role
PUT /_xpack/security/role_mapping/aad-saml-superuser { "roles": [ "superuser" ], "enabled": true, "rules": { "all": [ { "field": { "realm.name": "saml1" } }, { "field": { "groups": "superuser" } } ] } } - This maps users of saml1 realm having groups field value as kibanauser to map to kibana_user Elasticsearch role
PUT /_xpack/security/role_mapping/aad-saml-kibanauser { "roles": [ "kibana_user" ], "enabled": true, "rules": { "all": [ { "field": { "realm.name": "saml1" } }, { "field": { "groups": "kibanauser" } } ] } }
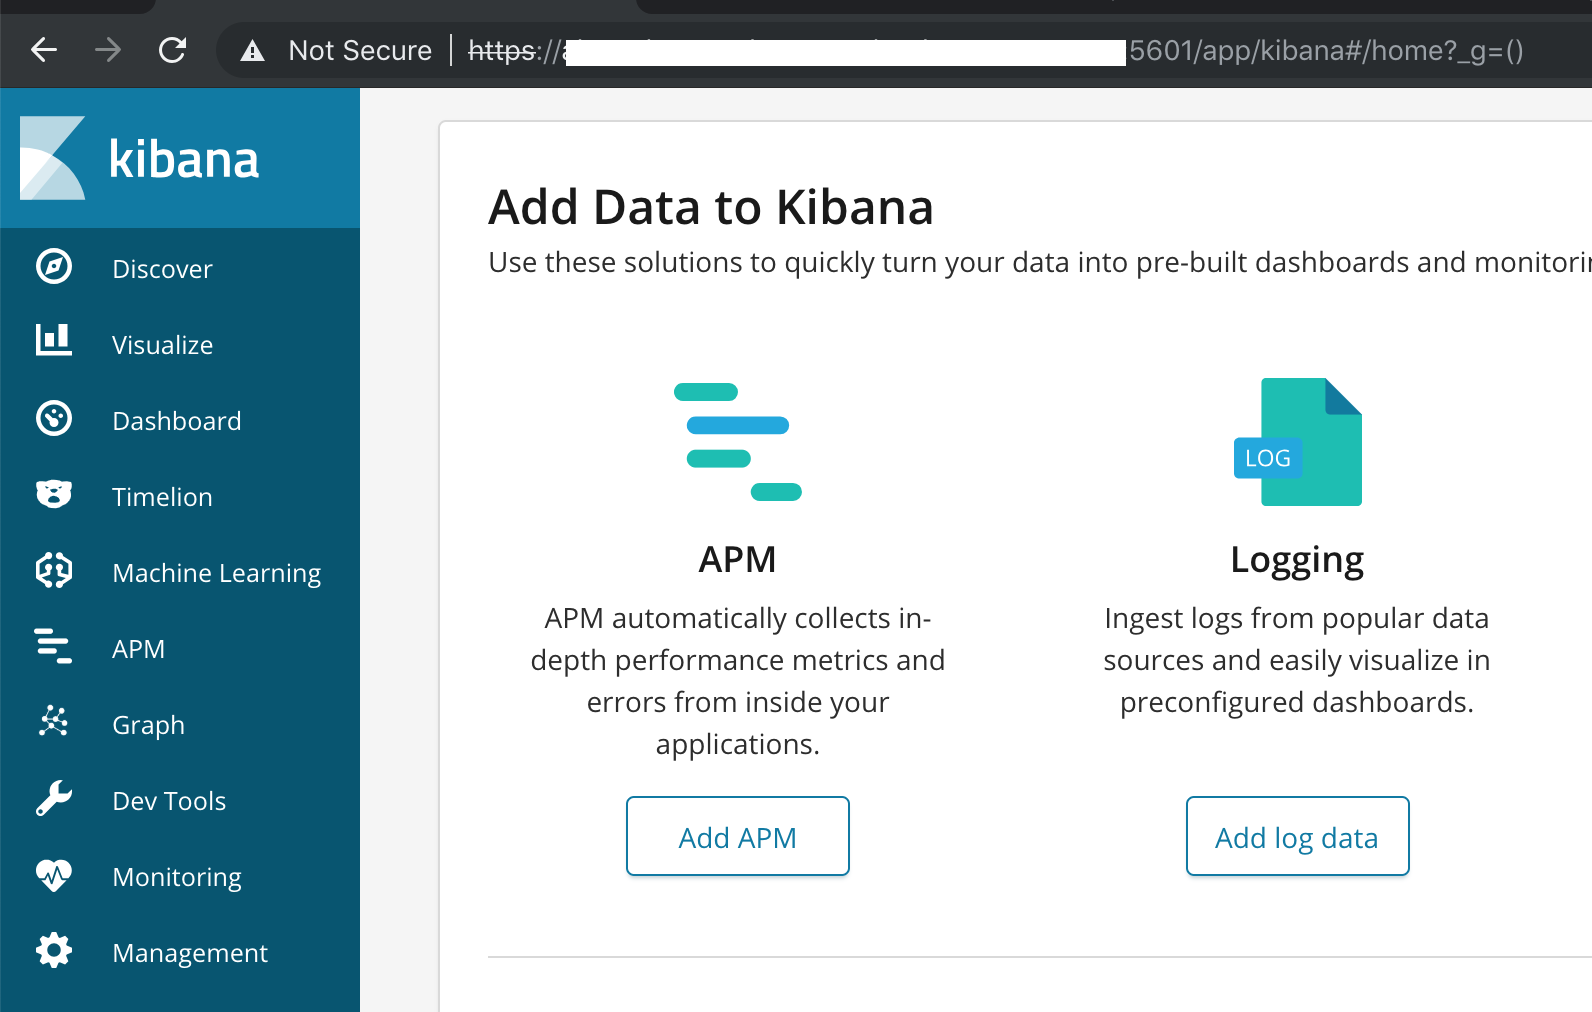
This completes all the changes needed to enabled SAML based SSO and securing communications in ELK. Browse to https://KIBANA_URL:5601 and Elasticsearch will redirect to Azure AD and after successful login you will be redirected back to Kibana. Browsers will warn since self signed certs are used and after granting access, Kibana Dashboard will launch
Browse to https://KIBANA_URL:5601/api/security/v1/me after authentication it will display mapped Elasticsearch roles and saml claims of the user.
On sending messages to Azure Event Hub using the utility I had shared in first part, messages are going to get ingested into Elasticsearch through Logstash pipeline. The source code of this utility can be downloaded from GitHub.
You can download source code for this article from GitHub repository