Introduction to Docker - Deploy a multi-container application
In the previous post we have learned how to build a multi-container application. On top of the website we have built in the second post of the series, we have added a Web API, which is leveraged by the web application to display the list of posts published on this blog. The two applications have been deployed in two different containers but, thanks to the bridge network offered by the Docker, we've been able to put them in communication.
In this post we're going to see two additional steps:
- We're going to add a new service to the solution. In all the previous posts we have built custom images, since we needed to run inside a container an application we have built. This time, instead, we're going to use a service as it is: Redis.
- We're going to see how we can easily deploy our multi-container application. The approach we've seen in the previous post (using the docker run command on each container) isn't very practical in the real world, where all the containers must be deployed simultaneously and you may have hundreds of them.
Let's start!
Adding a Redis cache to our application
Redis is one of the most popular caching solutions on the market. At its core, it's a document-oriented database which can store key-value pairs. It's used to improve performances and reliability of applications, thanks to its main features:
- It's an in-memory database, which makes all the writing and reading operations much faster compared to a traditional database which persists the data into the disk.
- It supports replication.
- It supports clustering.
We're going to use it in our Web API to store the content of the RSS feed. This time, if the RSS feed has already been downloaded, we won't download it again but we will retrieve it from the Redis cache.
As first step, we need to host Redis inside a container. The main difference compared to what we have done in the previous posts is that Redis is a service, not a framework or a platform. Our web application will use it as it is, we don't need to build an application on top of it like we did with the .NET Core image. This means that we don't need to build a custom image, but we can just use the official one provided by the Redis team.
We can use the standard docker run command to initialize our container:
docker run --rm --network my-net --name rediscache -d redis
As usual, the first time we execute this command Docker will pull the image from Docker Hub. Notice how, also in this case (like we did for the WebAPI in the previous post, we aren't exposing the service on the host machine through a port. The reason is that the Redis cache will be leveraged only by the Web API, so we need it to be accessible only from the other containers.
We have also set the name of the container (rediscache) and we have connected it to the bridge called my-net, which we have created in the previous post.
Feel free to run the docker ps command to check that everything is up & running:
 PS C:\Users\mpagani\Source\Samples\NetCoreApi\WebSample> docker ps
CONTAINER ID        IMAGE               COMMAND                  CREATED             STATUS              PORTS               NAMES
1475ccd3ec0a        redis               "docker-entrypoint.s…"   4 seconds ago       Up 2 seconds        6379/tcp            rediscache
Now we can start tweaking our WebAPI to use the Redis cache. Open with Visual Studio Code the Web API project we have previously built and move to the NewsController.cs file.
The easiest way to leverage a Redis cache in a .NET Core application is using a NuGet package called StackExchange.Redis. To add it to your project open the terminal and run:
dotnet add package StackExchange.Redis
Once the package has been installed, we can start changing the code of the GetAsync() method declared in the NewsController class in the following way:
[HttpGet]
public async Task<ActionResult<IEnumerable<string>>> Get()
{
ConnectionMultiplexer connection = await ConnectionMultiplexer.ConnectAsync("rediscache");
var db = connection.GetDatabase();
List<string> news = new List<string>();
string rss = string.Empty;
rss = await db.StringGetAsync("feedRss");
if (string.IsNullOrEmpty(rss))
{
HttpClient client = new HttpClient();
rss = await client.GetStringAsync("https://blogs.msdn.microsoft.com/appconsult/feed/");
await db.StringSetAsync("feedRss", rss);
}
else
{
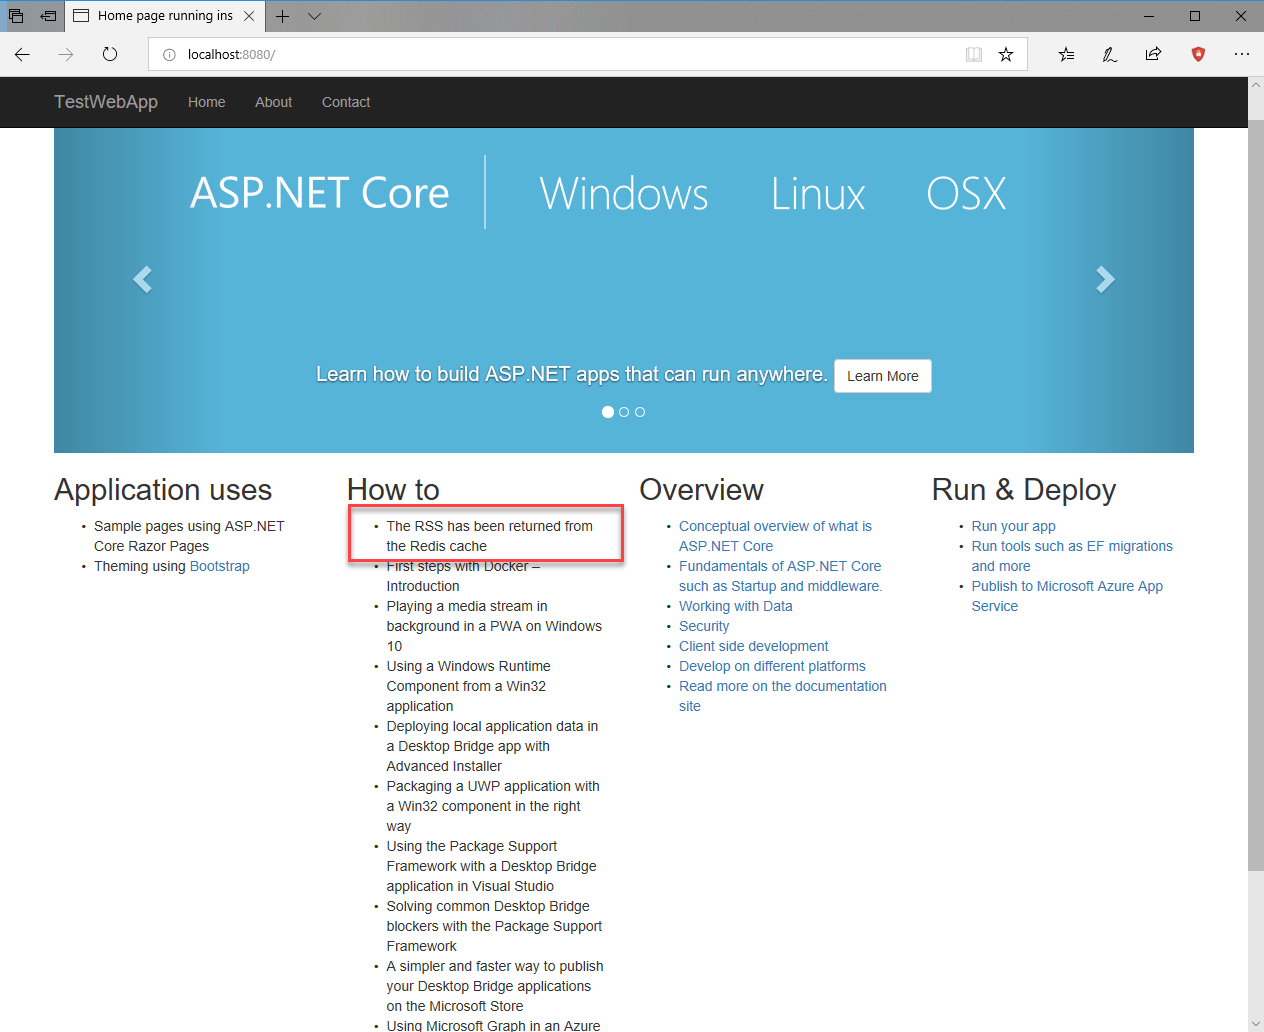
news.Add("The RSS has been returned from the Redis cache");
}
using (var xmlReader = XmlReader.Create(new StringReader(rss), new XmlReaderSettings { Async = true }))
{
RssFeedReader feedReader = new RssFeedReader(xmlReader);
while (await feedReader.Read())
{
if (feedReader.ElementType == Microsoft.SyndicationFeed.SyndicationElementType.Item)
{
var item = await feedReader.ReadItem();
news.Add(item.Title);
}
}
}
return news;
}
In order to let this code compile, you will need to add the following namespace at the top of the class:
using StackExchange.Redis;
In the first line we're using the ConnectionMultiplexer class to connect to the instance of the Redis cache we have created. Since we have connected the container to a custom network, we can reference it using its name rediscache, which will be resolved by the internal DNS, as we have learned in the previous post.
Then we get a reference to the database calling the GetDatabase() method. Once we have a database, using it is really simple since it offers a set of get and set methods for the various data types supported by Redis.
In our scenario we need to store the RSS feed, which is a string, so we use the StringGetAsync() and StringSetAsync() methods.
At first, we try to retrieve from the cache a value identified by the key feedRss. If it's null, it means that the cache is empty, so we need to download the RSS first. Once we have downloaded it, we store it in the cache with the same key.
Just for testing purposes, in case the RSS is coming from the cache and not from the web, we add an extra item in the returned list. This way, it will be easier for us to determine if our caching implementation is working.
Now that we have finished our work, we can build an updated image as usual, by right clicking on the Dockerfile in Visual Studio Code and choosing Build Image or by running the following command:
docker build -t qmatteoq/testwebapi .
We don't need, instead, to change the code of the web application. The Redis cache will be completely transparent to it. We are ready to run again our containers. Also in this case, we're going to connect them to same bridge of the Redis cache and we're going to assign a fixed name:
 docker run --rm -p 8080:80 --name webapp --network my-net -d qmatteoq/testwebapp

docker run --rm --name newsfeed --network my-net -d qmatteoq/testwebapi
The first command launches the container with the website (thus, the 80 port is exposed to the 8080 port on machine), while the second one launches the Web API (which doesn't need to be exposed to the host, since it will be consumed only by the web application).
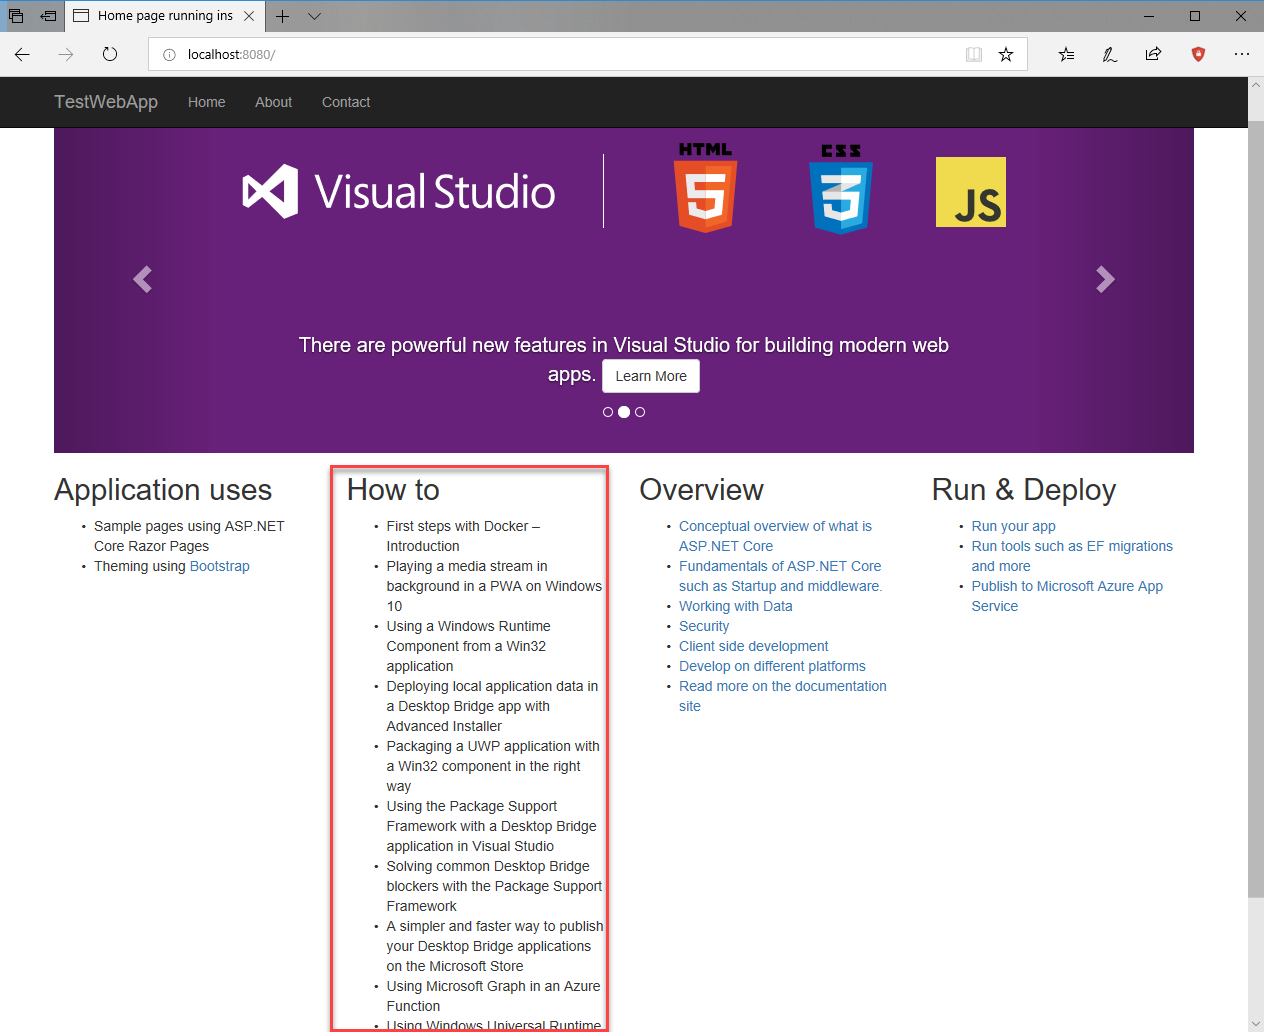
Now open your browser and point it to https://localhost:8080 . The first time it should take a few second to start, because we're performing the request against the online RSS feed. You should see, in the main page, just the list of posts from this blog:
Now refresh the page. This time the operation should be much faster and, as first post of the list, you should see the test item we have added in code when the feed is retrieved from the Redis cache:
Congratulations! You have added a new service to your multi-container application!
Deploy your application
If you think about using Docker containers in production or with a really complex application, you can easily understand all the limitations of the approach we have used so far. When you deploy an application, you need all the containers to start as soon as possible. Manually launching docker run for each of them isn't a practical solution.
Let's introduce Docker Compose! It's another command line tool, included in Docker for Windows, which can be used to compose multi-container applications. Thanks to a YAML file, you can describe the various services you need to run to boot your application. Then, using a simple command, Docker is able to automatically run or stop all the required containers.
In this second part of the blog we're going to use Docker Compose to automatically start all the containers required by our application: the web app, the Web API and the Redis cache. The first step is to create a new file called docker-compose.yml inside a folder. It doesn't have to be a folder which contains a specific project, but it can be any folder since Docker Compose works with existing images that you should have already built.
Let's see the content of our YAML file:
 version: '3'
services:
  web:
    image: qmatteoq/testwebapp
    ports:
      - "8080:80"
    container_name: webapp
  newsfeed:
    image: qmatteoq/webapitest
    container_name: newsfeed
  redis:
    image: redis
    container_name: rediscache
As you can see, the various commands are pretty easy to understand. version is used to set the Docker Compose file versioning we want to use. In this case, we're using the latest one.
Then we create a section called services, which specifies each service we need to run for our multi-container application. For each service, we can specify different parameters, based on the configuration we want to achieve.
The relevant ones we use are:
- image, to define which is the image we want to use for this container
- ports, to define which ports we want to expose to the host. It's the equivalent of the -p parameter of the docker run command
- container_name, to define which name we want to assign to the container. It's the equivalent of the --name parameter of the docker run command.
Once we have built our Docker Compose file, we can run it by opening a terminal on the same folder and launching the following command:
 PS C:\Users\mpagani\Source\Samples\NetCoreApi> docker-compose -f "docker-compose.yml" up -d --build
Creating network "netcoreapi_default" with the default driver
Creating newsfeed   ... done
Creating webapp     ... done
Creating rediscache ... done
Did you see what just happened? Docker Compose has automatically created a new network bridge called netcoreapi_default for us and it has attached all the containers to it. If, in fact, you execute the docker network ls command, you will find this new bridge in the list:
 PS C:\Users\mpagani\Source\Samples\NetCoreApi> docker network ls
NETWORK ID          NAME                 DRIVER              SCOPE
26af69c1e2af        bridge               bridge              local
5ff0f06fc974        host                 host                local
3f963109a48a        my-net               bridge              local
7d245b95b7c4        netcoreapi_default   bridge              local
a29b7408ba22        none                 null                local
Thanks to this approach, we didn't have to do anything special to create a custom network and assign all the containers to it, like instead we did in the previous post. If you remember, we had to manually create a new network and then, with the docker run command, add some additional parameters to make sure that the containers were connected to it instead of the default Docker bridge.
This way, we don't have to worry about the DNS. As long as the container names we have specified inside the Docker Compose file are the same we use in our applications, we're good to go!
Docker Compose, under the hood, uses the standard Docker commands. As such, if you run docker ps, you will simply see the 3 containers described in the YAML file up & running:
 PS C:\Users\mpagani\Source\Samples\NetCoreApi> docker ps
CONTAINER ID        IMAGE                 COMMAND                  CREATED             STATUS              PORTS                  NAMES
ce786b5fc5f9        qmatteoq/testwebapp   "dotnet TestWebApp.d…"   11 minutes ago      Up 11 minutes       0.0.0.0:8080->80/tcp   webapp
2ae1e86f8ca4        redis                 "docker-entrypoint.s…"   11 minutes ago      Up 11 minutes       6379/tcp               rediscache
2e2f08219f68        qmatteoq/webapitest   "dotnet TestWebApi.d…"   11 minutes ago      Up 11 minutes       80/tcp                 newsfeed
We can notice how the configuration we have specified has been respected. All the containers have the expected names and only the one which hosts the web application is exposing the 80 port on the host.
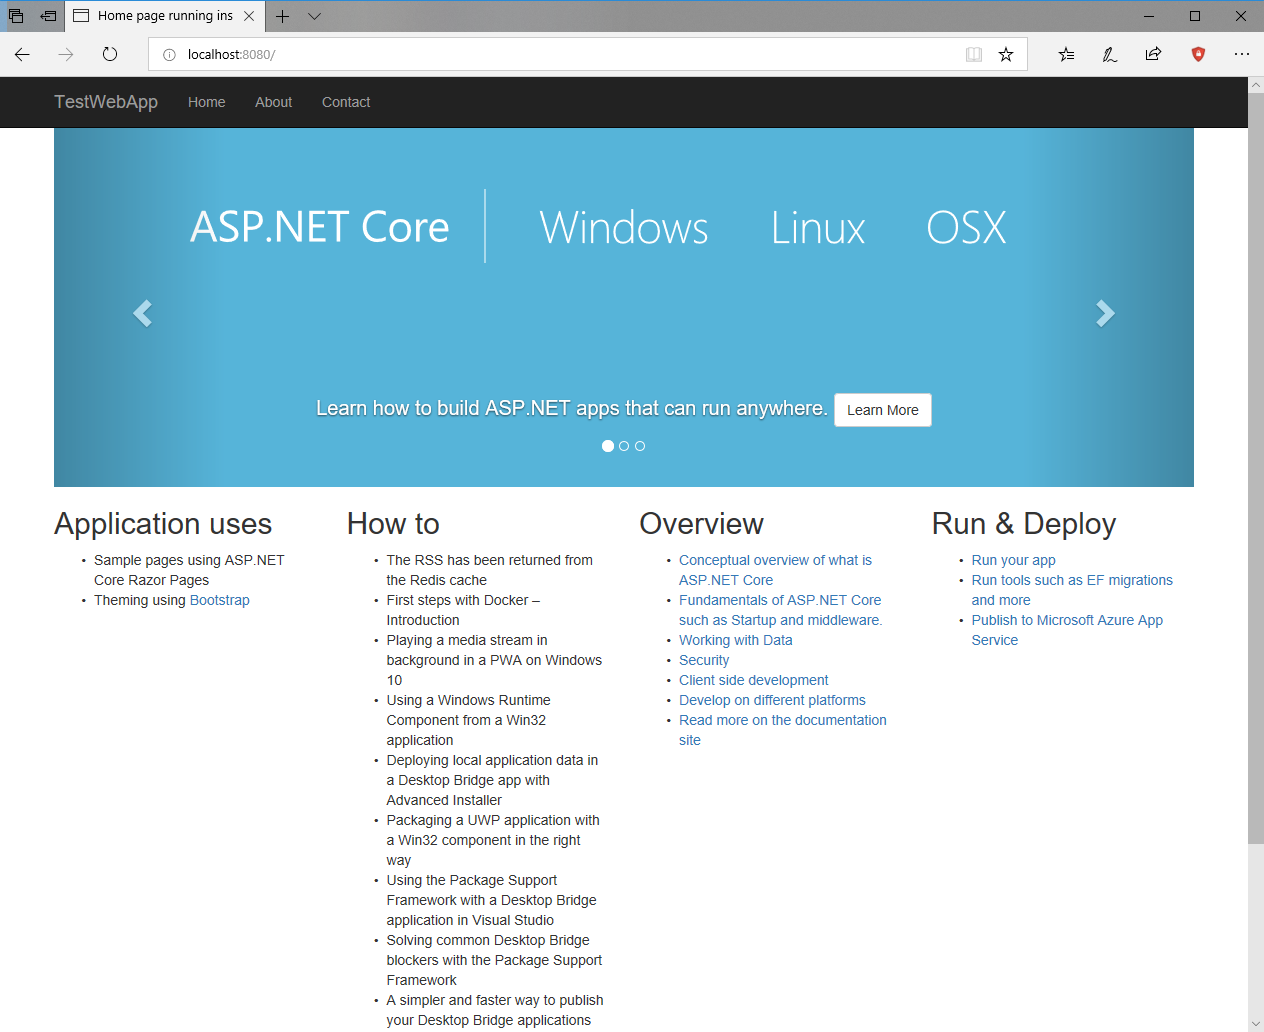
Now just open the browser again and point it to https://localhost:8080 to see the usual website:
If you want to stop your multi-container application, you can just use the docker-compose down command, instead of having to stop all the containers one by one:
 PS C:\Users\mpagani\Source\Samples\NetCoreApi> docker-compose down
Stopping webapp     ... done
Stopping rediscache ... done
Stopping newsfeed   ... done
Removing webapp     ... done
Removing rediscache ... done
Removing newsfeed   ... done
Removing network netcoreapi_default
As you can see, Docker Compose leaves the Docker ecosystem in a clean state. Other than stopping the containers, it also takes care of removing them and to remove the network bridge. If you run, in fact, the docker network ls command again, you won't find anymore the one called netcoreapi_default:
 PS C:\Users\mpagani\Source\Samples\NetCoreApi> docker network ls
NETWORK ID          NAME                DRIVER              SCOPE
26af69c1e2af        bridge              bridge              local
5ff0f06fc974        host                host                local
3f963109a48a        my-net              bridge              local
a29b7408ba22        none                null                local
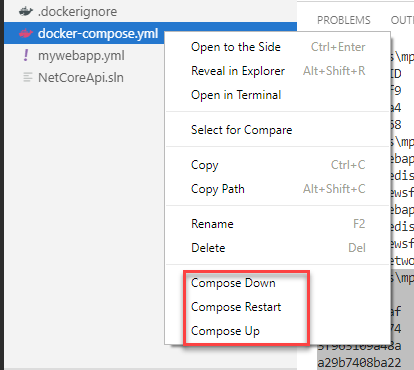
In a similar way we have seen with Dockerfile and bulding images, also in this case Visual Studio Code makes easier to work with Docker Compose files. Other than providing IntelliSense and real-time documentation, we can right click on the docker-compose.yml file in the File Explorer and have direct access to the basic commands:
Wrapping up
In this post we have concluded the development of our multi-container application. We have added a new layer, a Redis cache, so that we have learned how to consume an existing image as it is. Then we have learned how, thanks to Docker Compose, it's easy to deploy a multi-container application and make sure that all the services are instantiated with the right configuration.
You can find the complete sample project used during the various posts on GitHub.
Happy coding!