First steps with Docker - "Dockerizing" your first application
In the previous post we have learned what Docker is and which are the benefits of using it to modernizing your services or web applications. However, most of the content was theoretical. We started to use the technology, but just to see some basic scenario, like running an application or a web server inside a container.
In this post we're going to get our hands dirty and we'll learn how to take an application we have developed and to store it inside a container.
Let's start with a web application
As first step, we're going to host a web application inside our container. We're going to use .NET Core as a framework, since it fits perfectly into the container world: it's fast, it's cross-platform and it can scale very well.
Let's move out again from our comfort zone and, instead of using Visual Studio, let's use Visual Studio Code and the .NET Core CLI to create our web application.
The main advantages of using this approach are that:
- Both the CLI and Visual Studio Code are cross-platform. You can follow this tutorial no matter which is the operating system you're using.
- Visual Studio Code offers a really good Docker extension, which adds Intellisense and a user interface to control your Docker containers and images
After you have downloaded and installed Visual Studio Code from the official website, make sure to install the following extensions from the Marketplace: C#, in order to get C# editing and debugging support, and Docker.
The last piece of the puzzle you need is the .NET Core SDK. You might have it already installed if you have enabled web development in Visual Studio 2017. Otherwise, you can get it from the official website.
Now create a new folder on your PC, which will going to contain our web application. Then open Visual Studio, choose File -> Open Folder and select the folder you have just created. The editor will be opened using your folder as a project. However, for the moment we don't have anything to work with, since the folder is empty.
Let's create a web application. We're going to use the default template available in the .NET Core SDK, which is based on Razor, a programming syntax to build dynamic web applications based on ASP.NET.
To create the base project we're going to use the CLI. The easiest way to access it is to choose Terminal -> New Terminal in Visual Studio Code. A new PowerShell prompt will be opened directly inside the editor, already pointing to the folder you have just created. To create the project just execute the following command:
dotnet new razor
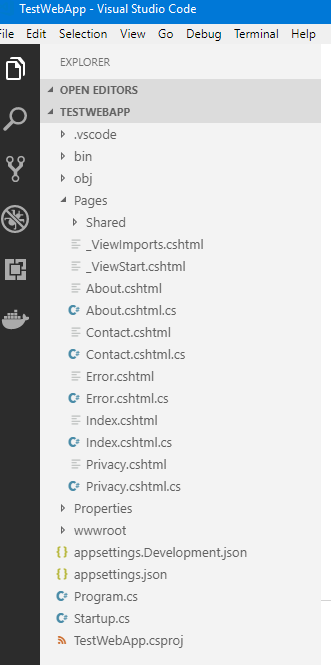
After a few seconds, you will see in the folder appearing all the files which compose the web application.
If you want to test the website, you can just return to the PowerShell prompt and type the following command:
dotnet run
You will see an output like the following one:
 PS C:\Users\mpagani\Source\Samples\NetCoreApi\TestWebApp> dotnet run
Using launch settings from C:\Users\mpagani\Source\Samples\NetCoreApi\TestWebApp\Properties\launchSettings.json...
info: Microsoft.AspNetCore.DataProtection.KeyManagement.XmlKeyManager[0]
      User profile is available. Using 'C:\Users\mpagani\AppData\Local\ASP.NET\DataProtection-Keys' as key repository and Windows DPAPI to encrypt keys at rest.
Hosting environment: Development
Content root path: C:\Users\mpagani\Source\Samples\NetCoreApi\TestWebApp
Now listening on: https://localhost:5001
Now listening on: https://localhost:5000
Application started. Press Ctrl+C to shut down.
Application is shutting down...
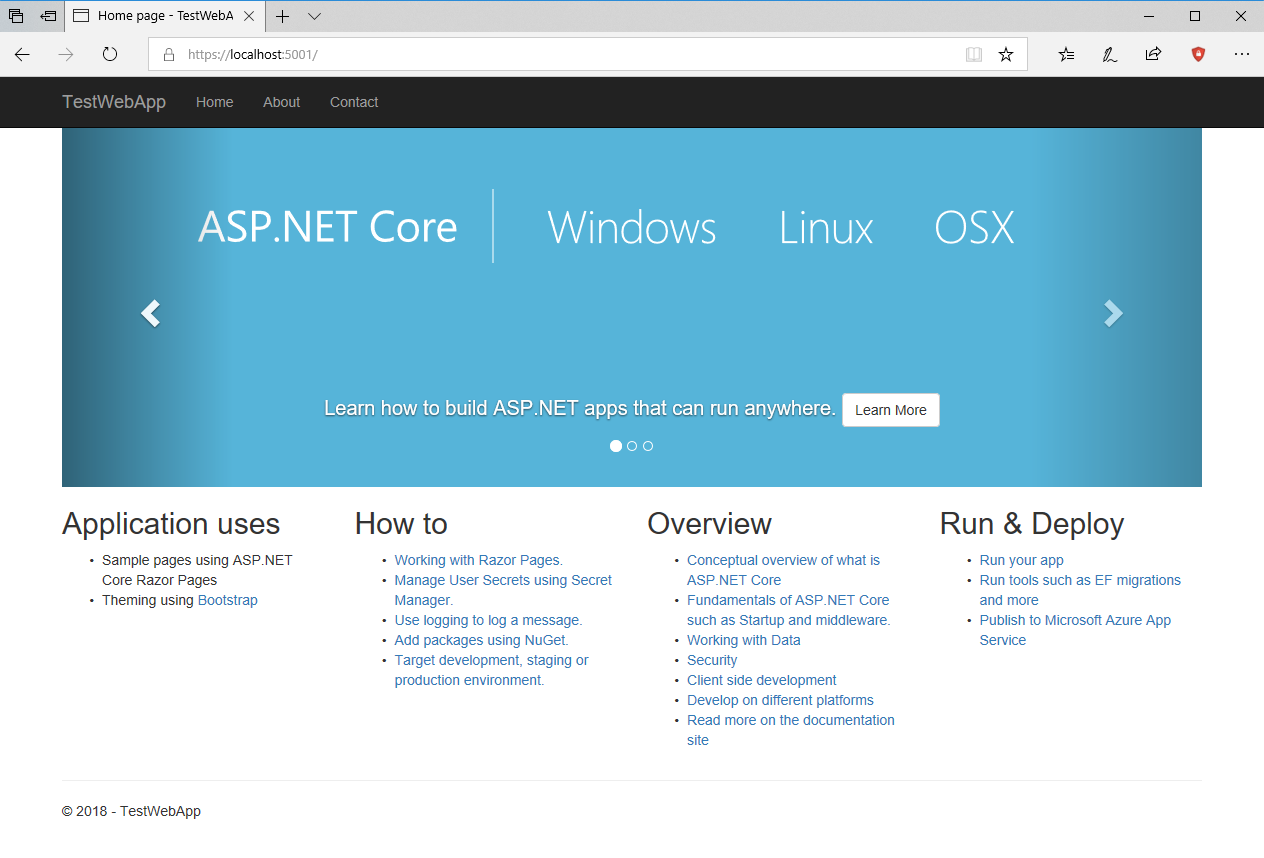
The web server which hosts your web application has started. As you can see, it's listening on port 5000 on your local machine. As such, it's enough to open your browser and point it to https://localhost:5000 to see the website running:
If you need a full debugging experience, it's enough in Visual Studio Code to click on the Debug symbol and, in the dropdown menu at the top, press the Play button:
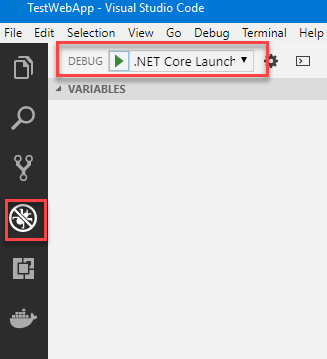
The web server will be started and a new instance of your favorite browser will be automatically opened. This way, you can experience a full debugging session like in Visual Studio 2017: you can place breakpoints; add watches; etc.
Creating our first image
Now that we have a website, we want to move it inside a container, which will host both the web server and our application. The way to do this is to build an image, which we can use to create on or more containers.
When you create an image, you hardly start from scratch. Usually an image is built starting from an existing one, which provides the framework / platform we need to host our application.
In our case, since it's a .NET Core application, we need to build an image which, other than hosting our website, it must include also the .NET Core runtime.
Images are defined by a text file called Dockerfile, which describes all the features that the image must incorporate: which ports to expose; which commands to execute; which is the entry point to launch when the container starts; etc.
There are many commands that you can include in a Dockerfile. You can find the full reference in the official documentation.
A Dockerfile is simply a text file. As such, just click in Visual Studio Code on the icon to add a new file (you'll find it near the name of your project) and name it Dockerfile (without extension). Let's see how our file looks like, then we're going to explain it:
 FROM microsoft/dotnet:2.1-sdk AS build-env
WORKDIR /app

# Copy csproj and restore as distinct layers
COPY *.csproj ./
RUN dotnet restore

# Copy everything else and build
COPY . ./
RUN dotnet publish -c Release -o out

# Build runtime image
FROM microsoft/dotnet:2.1-aspnetcore-runtime
WORKDIR /app
COPY --from=build-env /app/out .
ENTRYPOINT ["dotnet", "WebSample.dll"]
EXPOSE 80
You can notice some uppercase keywords, like FROM, COPY, etc. These are the commands that Docker sends to the service to build the image.
In this specific case, this dockerfile builds the image in two separate steps:
- The first one takes the whole project and compiles it.
- The second one takes the output of compilation and runs it.
When you use this approach Docker generates intermediate containers, which are then deleted at the end of the process.
Let's start from the first block:
- FROM is the command used to define which image we want to use as a starting point for our own image. As I said, in the first step we are going to build our web application from the source. As such, we need to download the official .NET Core image with the full SDK, since it contains the compilation tool chain. After the FROM statement, we specify the full name of the image (microsoft/dotnet), followed by the tag 2.1-sdk. We're going to use, as a starting point, a Linux image with the .NET Core 2.1 SDK. By using the AS command, we assign an alias to the container, so that we can reference it later.
- WORKDIR is the command used to define which is the starting folder where we want to operate
- COPY is the command used to copy some files from one location to another. When you create an image, you need to pass a build context, which are all the files on your machine that are required to build your app. In our case, we will pass the full content of the folder containing our web project.
- RUN is used to execute commands inside the container. By running the command dotnet restore, we force the restore of all the dependencies (like the NuGet packages) required to build the web application.
- We use the COPY command again to copy every additional file that might have been downloaded during the restore process.
- We use again the RUN command, this time to build our web application. We execute the dotnet publish command, specifying Release as compilation mode (with the -c parameter) and out as folder (inside the container) where to store the build output.
At the end of this process, we have a container which includes the full compiled version of our web application. Now we're ready to generate the final image, which is created in the second part of the file:
- We use again the FROM command to define the starting image. In this case, we don't need any more to compile the application, but just to run it. As such, we can grab the runtime image, which is lighter and smaller. We use again the microsoft/dotnet image as a starting point, but this time we specify the tag 2.1-aspnetcore-runtime.
- We set again the base dire using the WORKDIR command
- If you remember, in the previous step we have assigned the alias build-env to the first container. Thanks to the --from parameter, we can reference it and access to the build output, which is stored in the /app/out folder. By using the COPY command, we copy the content of this folder to the root of the image.
- We can see now a new command, called ENTRYPOINT. It's used to specify which is the default command to execute when the container is started. In this case, we lunch the dotnet command followed by the name of the DLL which hosts our website.
Pay attention! Make sure that the name of the DLL exactly matches the one created during the build process, including uppercase and lowercase. We are going to run our image inside a Linux container, which is a case sentive operating system. As such, websample.dll and WebSample.dll are considered two different files.
- The last command, called EXPOSE, is used to specify which port will be used to listen to incoming communication inside the container. This is a very important concept to understand. If you want to forward the internal port to the host machine, you will still need to run the container using the -p parameter, like we did in the previous post when we have started a web server using a NGINX container.
Now that we have a proper Dockerfile, we can generate the image using the docker build command. Open again the terminal inside Visual Studio code on the folder which contains your project and run the following command:
 PS C:\Users\mpagani\Source\Samples\NetCoreApi\WebSample> docker build -t qmatteoq/websample:latest .
Sending build context to Docker daemon  4.474MB
Step 1/11 : FROM microsoft/dotnet:2.1-sdk AS build-env
 ---> 7e0402debc11
Step 2/11 : WORKDIR /app
 ---> Using cache
 ---> 5d1059fee5f7
Step 3/11 : COPY *.csproj ./
 ---> Using cache
 ---> fa5b2af8e3b7
Step 4/11 : RUN dotnet restore
 ---> Using cache
 ---> 2df0c6cae62d
Step 5/11 : COPY . ./
 ---> Using cache
 ---> f26c6108e9a5
Step 6/11 : RUN dotnet publish -c Release -o out
 ---> Using cache
 ---> bab372a643da
Step 7/11 : FROM microsoft/dotnet:2.1-aspnetcore-runtime
 ---> a6cd65b10ab6
Step 8/11 : WORKDIR /app
 ---> Using cache
 ---> 17d4a4528792
Step 9/11 : COPY --from=build-env /app/out .
 ---> Using cache
 ---> adceeed37516
Step 10/11 : ENTRYPOINT ["dotnet", "WebSample.dll"]
 ---> Using cache
 ---> 1900eef5e657
Step 11/11 : EXPOSE 80
 ---> Using cache
 ---> 51b6cb719f13
Successfully built 51b6cb719f13
Successfully tagged qmatteoq/websample:latest
The docker build command requires, at minimum, two parameters:
- The name of the image you want to create, which is specified using the -t parameter. Notice how I have followed the naming convention username/name of the image:tag.
- The build context, which is the set of files and folders that are required to build the image. In this case, since we are running the build operation from the same folder that contains our web application, we pass . (dot) as context.
As you can notice, each row of the Dockerfile is treated as a different step, which output is stored locally. This way, if you need to build the image again, the steps that didn't change will be retrieved from the local cache instead of being executed again. You can easily this by running the docker build command again. This time the image will be generated in less than a second, because nothing has changed.
If you've done everything properly, you should be able to see your image listed among the others by running the docker image list command:
 PS C:\Users\mpagani\Source\Samples\NetCoreApi\WebSample> docker image list
REPOSITORY                 TAG                      IMAGE ID            CREATED             SIZE
qmatteoq/websample         latest                   51b6cb719f13        About an hour ago   258MB
Now that we have an image, we can easily test it by running a container based on it. We have already seen, in the previous post, how to run a container which must stay active in background, so we can reuse the same knowledge:
docker run -p 8080:80 --rm -d qmatteoq/websample:latest
You can run docker ps to check that the container is indeed up & running:
 PS C:\Users\mpagani\Source\Samples\NetCoreApi\TestWebApp> docker ps
CONTAINER ID        IMAGE                 COMMAND                  CREATED             STATUS              PORTS
   NAMES
884e99c66b4c        qmatteoq/testwebapp   "dotnet TestWebApp.d…"   5 seconds ago       Up 3 seconds        0.0.0.0:8080->80/tcp   youthful_lumiere
We can test it by opening the browser and pointing it to the URL https://localhost:8080 (since we have forwarded the 80 port inside the container to the 8080 port on our host machine).
If you did everything correctly, you should see the same website we have seen before when we have launched it directly from our machine.
Using Visual Studio Code and the Docker extension to make your life easier
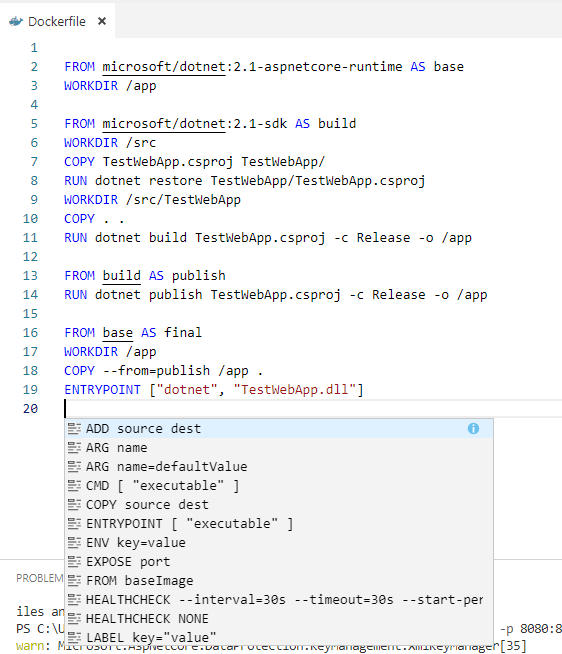
Thanks to the Docker extension we have installed at the beginning of the post, building images is a much easier experience. First, because we have support for Intellisense. Go to the Dockerfile you have just created, place the cursor on a new line and press CTRL-SPACE. Visual Studio Code will suggest you all the available commands:
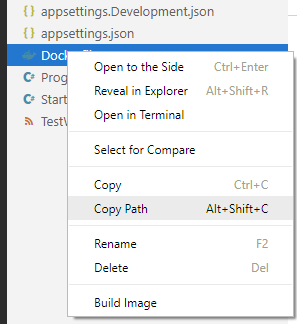
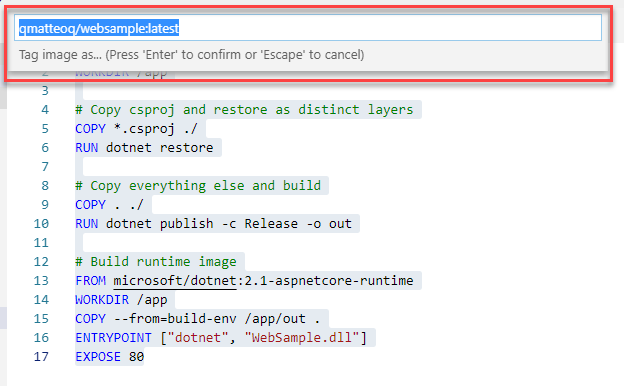
Additionally, if you place the cursor near a command, you will see the documentation popping out, showing the supported syntax. And if you want to create the image starting from the Dockerfile, you don't have to manually run the docker build command, but you can just right click on the file in the Explorer and choose Build Image:
Visual Studio Code will ask you first to specify the name of the image and then, automatically, it will open up a terminal and execute the docker build command with the right parameters.
The Docker extension can even do more than this. Starting from the structure of your project, it's able automatically to generate a Dockerfile for you.
First press CTRL-ALT-P to bring up the list of commands availble and look for one called Docker: Add files to your workspace.
You will be asked a few questions:
- The Application Platform. Choose .NET Core Console and not ASP.NET Core. I'll explain in a bit why.
- The Operating System. Choose Linux.
- The port your app listen on. Leave the default value, which is 80.
The tool will automatically generate two files for you in the folder. One is the Dockerfile, which we already know. The other one is called .dockerignore and it works in a similar way as the .gitignore one used by Git. It contains a lists of files and folder which should be ignored during the build process and not copied over the container, like the Dockerfile itself, log files, Git files, etc.
Here is a sample of the Dockerfile generated by Visual Studio Code:
 FROM microsoft/dotnet:2.0-runtime AS base
WORKDIR /app

FROM microsoft/dotnet:2.0-sdk AS build
WORKDIR /src
COPY TestWebApp.csproj TestWebApp/
RUN dotnet restore TestWebApp/TestWebApp.csproj
WORKDIR /src/TestWebApp
COPY . .
RUN dotnet build TestWebApp.csproj -c Release -o /app

FROM build AS publish
RUN dotnet publish TestWebApp.csproj -c Release -o /app

FROM base AS final
WORKDIR /app
COPY --from=publish /app .
ENTRYPOINT ["dotnet", "TestWebApp.dll"]
Unfortunately the Docker extension isn't really up to date and it isn't leveraging the latest images published by Microsoft. This is the reason why I told you to choose .NET Core Console as application platform, even if we have built an ASP.NET Core website. The ASP.NET Core Dockerfile, in fact, points to an old image that doesn't exist anymore, called aspnetcore. Since a while, in fact, Microsoft has unified all the .NET Core images under the same name (dotnet) and it uses tags to differentate among the various workloads.
However, the generated Dockerfile isn't still perfect. There are a couple of changes we need to make:
- We have built an application using .NET Core 2.1, but the Dockerfile downloads the image for .NET Core 2.0. As such, we need to change 2.0 to 2.1 inside the tag.
- Since this is the Dockerfile for .NET Core console apps, the base image doesn't include all the required libraries to host a website. As such, we need to change the base image from runtime to aspnetcore-runtime.
This is how the fixed Dockerfile looks like:
 FROM microsoft/dotnet:2.1-aspnetcore-runtime AS base
WORKDIR /app

FROM microsoft/dotnet:2.1-sdk AS build
WORKDIR /src
COPY TestWebApp.csproj TestWebApp/
RUN dotnet restore TestWebApp/TestWebApp.csproj
WORKDIR /src/TestWebApp
COPY . .
RUN dotnet build TestWebApp.csproj -c Release -o /app

FROM build AS publish
RUN dotnet publish TestWebApp.csproj -c Release -o /app

FROM base AS final
WORKDIR /app
COPY --from=publish /app .
ENTRYPOINT ["dotnet", "TestWebApp.dll"]
Pushing an image on Docker Hub
Now that you have an image, you can share it with other people or your customers. The easiest way is to push it on Docker Hub. First, you will need to create an account, by registering on the website. From a billing point of view, Docker Hub works in a similar way as GitHub. With the free plan, you can create unlimited public repostories, but only 1 private repositories. Paid plans, instead, offer a greater number of private repositories. Additionally, Docker Hub supports also a build pipeline. You can point it to a repository which hosts your project's code and have it automatically generate and push a new image every time you make some changes.
Once you have registered, you need to login as first step, by invoking the command docker login. You can also login directly in the Docker for Windows application. This way, the CLI will be automatically able to leverage the same authentication token.
Now you're ready to push your image with a very simple command:
 PS C:\Users\mpagani\Source\Samples\NetCoreApi\TestWebApp> docker push qmatteoq/testwebapp
The push refers to repository [docker.io/qmatteoq/testwebapp]
bdc78d020741: Pushed
973c6d532b06: Mounted from qmatteoq/newsfeed
05dff760e6df: Mounted from qmatteoq/newsfeed
85614e3f95f6: Mounted from qmatteoq/newsfeed
9104e47cd398: Mounted from qmatteoq/newsfeed
cdb3f9544e4c: Mounted from qmatteoq/newsfeed
latest: digest: sha256:07c2b0694a1474563912f2cabc807d1927fe925ded1cedae84c0accd0e423b86 size: 1580
By default, unless you specify a different configuration, the docker push command will assume that you want to push the image on Docker Hub. At the end of the process, you'll be able to see your image in your repository on the website:
Your image is now stored in the cloud and ready to be reused. You can easily see this behavior by removing the local copy you have on your machine, by using the docker image rm command, followed by the name of the image.
 PS C:\Users\mpagani\Source\Samples\NetCoreApi\TestWebApp> docker image rm qmatteoq/testwebapp
Untagged: qmatteoq/testwebapp:latest
Untagged: qmatteoq/testwebapp@sha256:07c2b0694a1474563912f2cabc807d1927fe925ded1cedae84c0accd0e423b86
Deleted: sha256:e893220c97a69766a728855d13deafe911f25ee814a5f361f9c250c2a3c7c125
Deleted: sha256:f385d8433f2a5dd139a6e1fa189f4bccde435a3908396cd15ffd4ef2059f1872
Deleted: sha256:abfa55c74332b2322d76e89b32b789eeb853e2486e65f2278679479fa8fee917
Now try to run it again with the docker run command:
 PS C:\Users\mpagani\Source\Samples\NetCoreApi\TestWebApp> docker run -p 8080:80 --rm -d qmatteoq/testwebapp
Unable to find image 'qmatteoq/testwebapp:latest' locally
latest: Pulling from qmatteoq/testwebapp
be8881be8156: Already exists
4c13ce9875a3: Already exists
b40109ab8fda: Already exists
a7130f23f49b: Already exists
0b0b625a5a54: Already exists
7cd454006d0b: Pull complete
Digest: sha256:07c2b0694a1474563912f2cabc807d1927fe925ded1cedae84c0accd0e423b86
Status: Downloaded newer image for qmatteoq/testwebapp:latest
You can see how the image wasn't found in the local repository but, since it's now stored in cloud, Docker has been able to pull it anyway.
Updating our website
Let's say that we need to modify our web application and release an update. How we can update the running container? Well, we don't 😃 As we have seen, one of the benefits of Docker is that containers are really lightweight and fast to start. As such, when you need to update your application, you don't update the running container, but you just update the base image. Then you spin up a new container, using the updated image.
Updating the image is really easy. You just need to run the same docker build command. Since Docker will find that you already have an image with the same name and tag, it will just replace it.
Let's try this by doing a minor change in our website. Open the file Index.cshtml inside the Pages folder of your project and edit something. For example, change the title of the page in the first lines:
 @page
@model IndexModel
@{
    ViewData["Title"] = "Home page running inside Docker";
}
Now build the image again, either by right clicking on the Dockerfile and by choosing Build Image or by manually running the following command:
docker build -t qmatteoq/websample:latest .
You will notice that, this time, many steps won't be executed from scratch but they will be retrieved from the cache. For example, the dotnet restore step won't be excuted again, because the dependencies leveraged by the web application haven't changed. The COPY and dotnet build steps, instead, will be repeated, because the content of the website has changed and it must be compiled again.
Now run again the image with the following command:
docker run -p 8080:80 --rm -d qmatteoq/testwebapp:latest
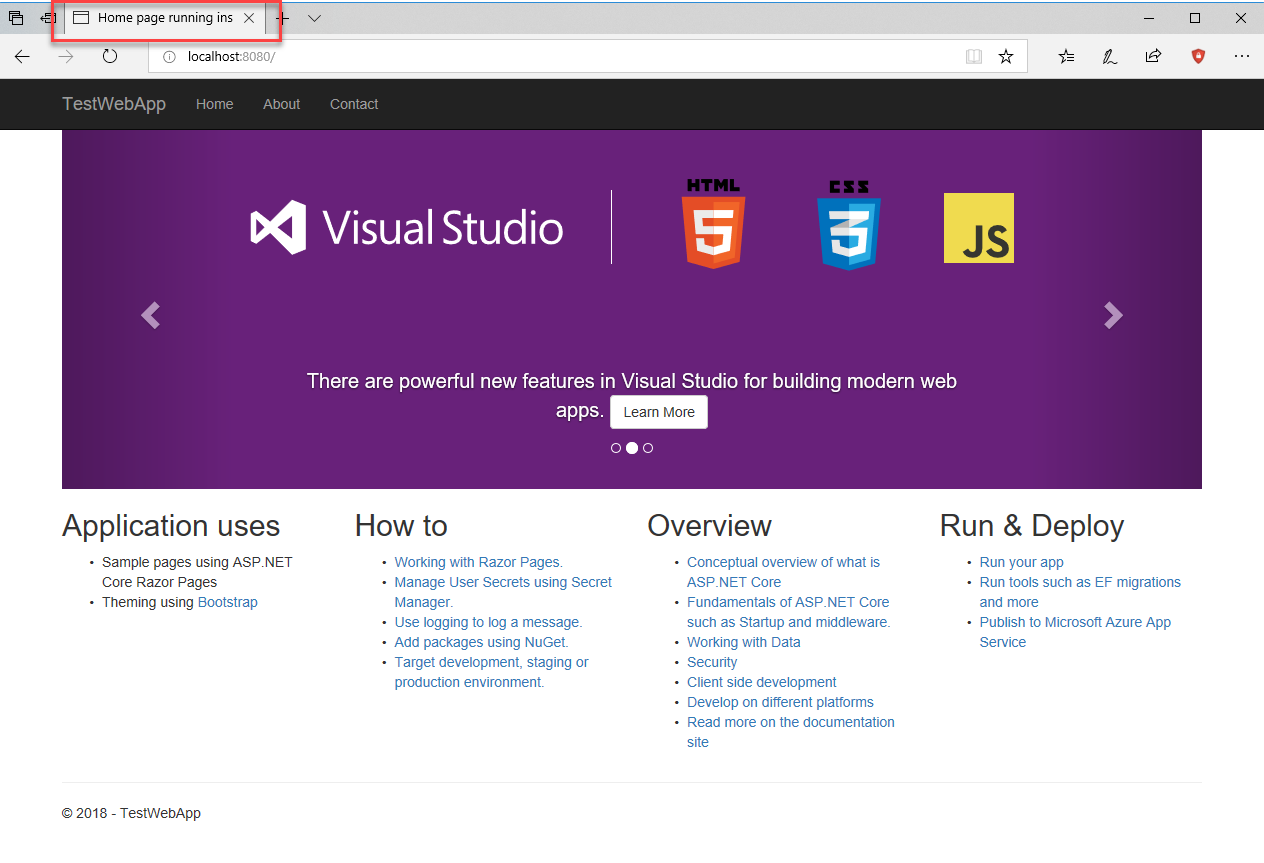
Open again your browser and point it to https://localhost:8080 . If you have done everything properly, you should see the same website but with a different title in the tab:
Managing Docker in Visual Studio Code
Once you have installed the Docker extension in Visual Studio Code, you will find a new tab with the Docker logo, which will give you access to a set of helpful visual tools. You will be able, in fact, to explore all the images, running containers and registries on our machine:
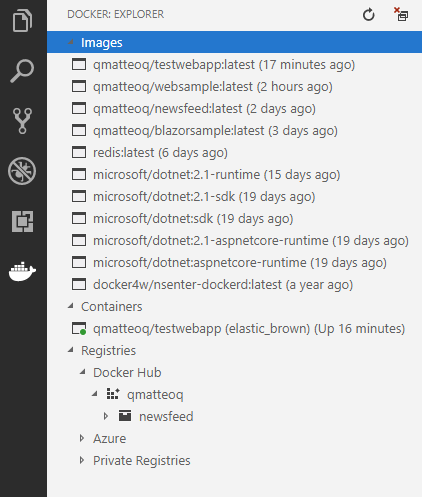
You have access to three sections. Images will display all the images you currently have on your local machine. By right clicking on one of them, you'll be able to push it on Docker Hub, run it, delete it, etc. Personally, even if it's very convenient, I rarely use the run command, because it lacks the opportunity to customize the various parameter. For example, you can't specify the port you want to use to expose the service on the host, but it will automatically use the default one exposed inside the container. This means that if you're running a web server on port 80, it will mirror it on port 80 also on your host machine. Sometimes this can be inconvenient, because the port used inside the container can be already occupied on the host.
Containers will display all the running containers. By right clicking on one of them, you'll be able to restart the container, stop it, or completely remove it. Two useful options are Show logs, which will display the last output on the console, and Attach Shell, which will connect to the container using a terminal so that you can perform commands.
For example, if you use Show logs on the container we have previously created, you will see the output of the web server:
 PS C:\Users\mpagani\Source\Samples\NetCoreApi\TestWebApp> docker logs -f 8ecf2d283e7a3a8723a6d09222b2aa92829373c81709c51bbac16e06c49ee157
warn: Microsoft.AspNetCore.DataProtection.KeyManagement.XmlKeyManager[35]
      No XML encryptor configured. Key {a595c102-eabf-4bfd-a35b-eef1b27d0de0} may be persisted to storage in unencrypted form.
Hosting environment: Production
Content root path: /app
Now listening on: https://[::]:80
Application started. Press Ctrl+C to shut down.
If you use, instead, Attach Shell, you will be connected to the Linux machine which is hosting the web server and you'll be able to perform UNIX command. For example, if you type ls, you will see all the files which compose your application:
 PS C:\Users\mpagani\Source\Samples\NetCoreApi\TestWebApp> docker exec -it 8ecf2d283e7a3a8723a6d09222b2aa92829373c81709c51bbac16e06c49ee157 /bin/sh
# ls
WebSample.Views.dll  WebSample.deps.json  WebSample.pdb                 appsettings.Development.json  web.config
WebSample.Views.pdb  WebSample.dll        WebSample.runtimeconfig.json  appsettings.json              wwwroot
#
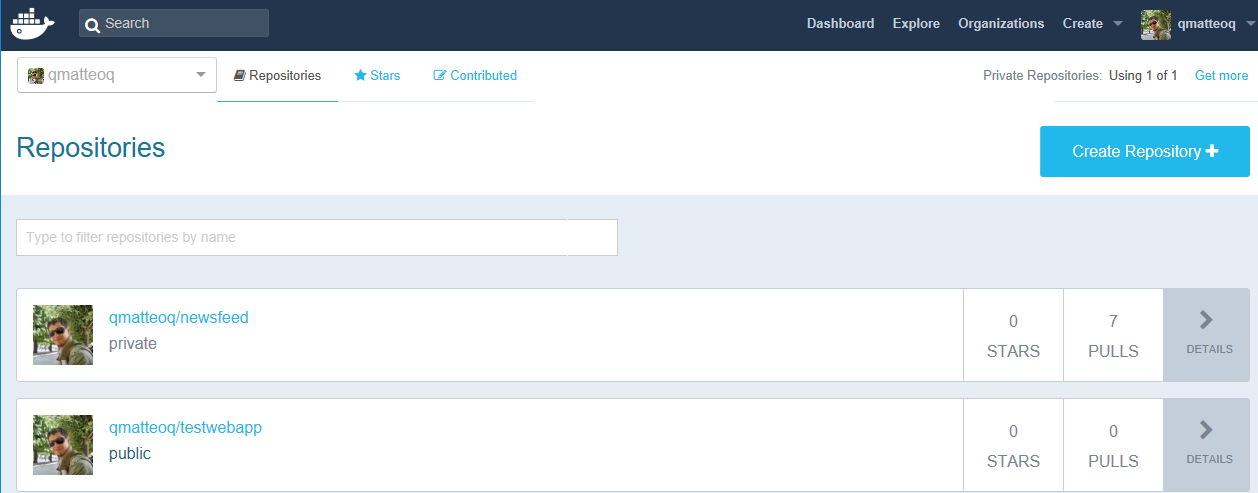
The last section is Registries, which gives you access to all your registries, either local or in the cloud. For example, in the previous image, you can see how I can explore my account on Docker Hub and see all the images I've published.
If you right click on an image you will have access also to a very useful option called Deploy Image to Azure App Service:
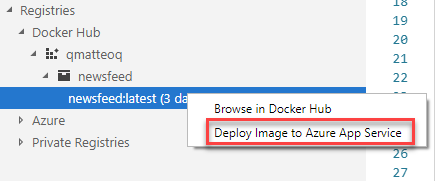
By following a very simple wizard you will be able to deploy very quickly your Docker image on an Azure App Service, so that your containerized application can be hosted on the cloud.
Wrapping up
In this post we made a step forward and we have started to build our own image, which is the basic requirement to move our applications inside a container and deploy them. For learning purpose we have used a .NET Core website and we have leveraged the default ASP.NET MVC template which is included in the SDK.
We have also learned how to update an image, how to push it on Docker Hub and how Visual Studio Code can help us in creating an image in easier way.
In the next post we're going to make things a little bit more complicated. We're going to build a REST API to support our website and we're going to put it into another container. Then we're going to see how to let the two containers communicate together.
Happy coding!