Creating a Response Group #3: Creating and configuring a queue
In the two previous posts we first created voice enterprise enabled users usable as response group agents. We then created and configured an agent group to handle easily a collection of agents.
Going forward we will add our agent group to a queue. In the response group application a queue is the entity holding the callers until an agent is available to answers it. Two interesting settings of the queue object is the capacity to react to queue overflow (maximum number of call allowed in the queue) and the queue timeout (maximum of time a caller can stay in a queue) thanks to RgsCallAction objects.
Let's start by looking at the properties of the queue object:
- Parent <RgsIdentity>: The service where the queue will be hosted.
- Name <String>: Unique name assigned to the queue.
- AgentGroupIdList <Collection>: The collection of AgentGroup (by identity) serving the queue.
- Description <String>: Description of the queue, for administrator use only (will never be displayed to callers or agents)
- OverflowAction <RgsCallAction>: Action to be taken when the overflow threshold is reached.
- OverflowCandidate <NewestCall | OldestCall>: Indicate whether the overflow action applies to the oldest call in the queue or to the newest call.
- OverflowThreshold <0-1000>: Amount of time (in seconds) before the overflow action is triggered. Keep in mind that this action will only be triggered when the AgentAlertTime cycle is over (more details about this later).
- TimeoutAction <RgsCallAction>: Action to be taken when the timeout threshold is reached.
- TimeoutThreshold <10 - 65535>: Amount of time (in seconds) before the timeout action is triggered. Keep in mind that, as for the overflow threshold) this action will only be triggered when the AgentAlertTime cycle is over.
- InMemory <SwitchParameter>: Using the InMemory flag will create an object reference without commiting the object to the database.
As for the AgentGroup there are two ways to create a new queue: via the Lync Server Control Panel or via the Lync Server Management Shell. I will, again, start with the Control Panel way. You will however notice that to you lose some granularity (to add a prompt you have to use the PowerShell Cmdlet) in your settings when using the Control Panel instead of the PowerShell cmdlets.
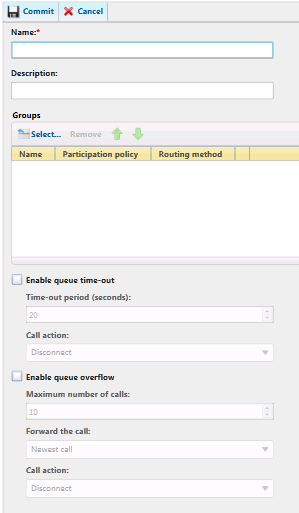
Figure 1: Creating a new queue
1. Open the Lync Server Control Panel (https://pool.fqdn.com/CSCP/)
2. Navigate to 'Response Groups' panel
3. Click on the 'Queue' tab
4. Click the New button to create a new agent group
5. Select the site that will host the new agent group
6. Enter value to configure your queue
- Enter a name
- Enter a description
- Select the agent group(s) served by the queue
- [optional]: Enable and configure the queue timeout
- [optional]: Enable and configure the queue overflow
7. Commit the changes
Now let's create and configure a queue using the Lync Server Management Shell.
1. Open the Shell or Import the Lync module to your PowerShell console.
PS C:\> Import-Module Lync
2. Get the service identity that will host your queue
PS C:\> $serviceId="service:"+(Get-CSService | ?{$_.Applications -like "*RGS*"}).ServiceId;
3. Create the new queue with some default settings
PS C:\>$q = New-CsRgsQueue -Parent $serviceId -Name "My First Queue"
4. Enter a description (optional)
PS C:\>$q.Decription = "Contain all agents group working from 1pm to 6pm"
5. Add an agent group to the queue
a. Get the agent group identity
PS C:\> $ag_id = (Get-CsRgsAgentGroup -Name "My First Agent Group ").Identity
b. Add it to the queue agent group list
PS C:\>$q.AgentGroupIDList.Add($ag_id)
6. Configure a queue overflow of 10 calls applied to the oldest call, transferring the call to a Sip Uri after playing a prompt indicating the transfer.
# Create the prompt
PS C:\> $prompt = New-CsRgsPrompt -TextToSpeechPrompt "Your call is being transferred, please hold the line"
# Create the call action
PS C:\>$ca = New-CsRgsCallAction -Action TransferToUri -Prompt $prompt -Uri "sip:ahmet@vdomain.com"
# Configure the queue
PS C:\> $q.OverflowAction = $ca
PS C:\> $q.OverflowCandidate = "OldestCall"
PS C:\> $q.OverflowThreshold = 10
7. Configure a queue timeout of 5 minutes, transferring the call to another queue after playing an informative message
# Create the prompt
PS C:\> $prompt = New-CsRgsPrompt -TextToSpeechPrompt "Your call is being transferred, please hold the line"
# Get the transfer target queue identity
PS C:\>$ttq = (Get-CsRgsQueue -Name "Timeout Transfer Queue").Identity
# Create the call action
PS C:\>$ca = New-CsRgsCallAction -Action TransferToQueue -Prompt $prompt -QueueID $ttq
# Configure the queue
PS C:\>$q.TimeoutAction = $ca
PS C:\>$q.TimeoutThreshold = (5*60)
8. Save the queue to the database
PS C:\>Set-CsRgsQueue $q
As previously stated, if you have set an agent alert time on your agent group object, the queue timeout will not happen until an agent alert time cycle is completed if agents are available. What does this mean? Let's say you have an agent group with an agent alert time of 120 seconds and a queue timeout of 60 seconds. The action for the queue timeout will only be triggered after 120 seconds if an agent is eligible for the call (aka display the incoming call toast). If no agent is eligible for the call, the timeout will be triggered after 60 seconds.
Our journey to create a response group is nearly over: we now have agents, an agent group and a queue. The last piece missing is a workflow object. Keep reading!