Creating a Response Group #2: Create and configure an agent group
In the previous post, we created Lync users that are enterprise voice enabled. Now we want to use these users and make sure they can answer to incoming call to the Response Group we will create later.
The object used to hold the collection of agents assigned to a Response Group is called an AgentGroup. Properties from this AgentGroup object are, I believe, straight forward but let's see all of them.
- Name <String>: Unique name assigned to the agent group.
- Parent <RgsIdentity>: The service were the agent group is hosted.
- AgentAlertTime <Int16>: The amount of time (in seconds) a call can remain unanswered before it is automatically routed to the next agent.
- AgentsByUri <SipAddress Collection>: The collection of agents (identified by Sip addresses) of an agent group.
- Description <String>: the description of the agent group, to provide additional information about the agent group. This will not be visible to users (only for admin use).
- DistributionGroupAddress <String>: To add members of a distribution group to an agent group.
- ParticipationPolicy <Informal | Formal>: Indicates whether the agents are required to sign in to the agent group or not.
- RoutingMethod <Longest Idle | Serial | Parallel | RoundRobin | Attendant>: Specifies the method used to route new calls to agents.
There are two ways create new AgentGroup: via the Lync Server Control Panel or via the Lync Server Management Shell (or any PowerShell console).
Let's start with Lync Server Control Panel approach first:
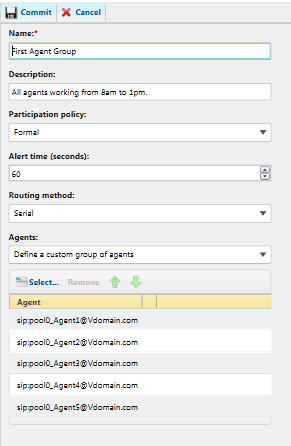
Figure 1: Creating a new group
- Open the Lync Server Control Panel (https://pool.fqdn.com/CSCP/)
- Navigate to 'Response Groups' panel
- Click on the 'Group' tab
- Click the New button to create a new agent group
- Select the site that will host the new agent group
- Enter value to configure your agent group
- Enter a Name
- Enter a Description
- Select the participation policy
- Select the agent alert time
- Select the agents that will be part of the agent group (or enter a distribution group address)
- Commit the changes
Now let's do the same but with the Lync Server Management Shell.
- Open the Shell or Import the Lync module to your PowerShell console.
PS C:\> Import-Module Lync - Get the service identity that will host your agent group
PS C:\> $serviceId="service:"+(Get-CSService | ?{$_.Applications -like "*RGS*"}).ServiceId; - Create the new agent group (if you don't use the InMemory flag, this agent group will be saved directly in the database).
PS C:\> $ag = New-CsRgsAgentGroup -Name "My first PS agent group" -Parent $serviceId; - Enter a description (optional)
PS C:\> $ag.Description = "Contain the agents working from 1pm to 6pm"; - Enter a participation policy
PS C:\> $ag.ParticipationPolicy = "Formal" - Enter the agent alert time
PS C:\> $ag.AgentAlertTime = "20" - Add the agents to the collection
PS C:\> $ag.AgentsByUri.Add("sip:pool0_agent1@vdomain.com")
PS C:\> $ag.AgentsByUri.Add("sip:pool0_agent2@vdomain.com")
PS C:\> $ag.AgentsByUri.Add("sip:pool0_agent3@vdomain.com") - Save the changes (if you do it in one line and without the 'InMemory' flag, you don't need to set the agent group a second time).
PS C:\> Set-CsRgsAgentGroup $ag
You now have your first agent group created and saved in the database! Congrats :-).
Next step will be to create a queue, which is where the callers are placed on hold until an agent from an agent group answer the call.