Azure Marketplace Part II – Single VM Solution
As we outlined in the first blog post, single VM is a natural choice for solutions that can be packaged in a single server on Windows or Linux. In this post we provide the technical detail on how to create a single virtual machine that contains your solution.
Two Azure Deployment Models
Azure supports two deployment models, Azure Resource Manager (ARM) , one that Microsoft recommends, and Azure Service Management (ASM) , the classic or old model that is still available today. Accordingly, there are two Azure portals that provide friendly user interface to manage Azure resources. The new portal is available at https://portal.azure.com/ whereas the old portal is at https://manage.windowsazure.com/ The new portal is where you should log in even though the old portal is still available for managing some services such as Azure Active Directory for the time being.
Alternatively, you can create and configure Azure resources from Windows computers using PowerShell scripts, or from Windows, OS X, or Linux computers Azure Command-Line Interface (Azure CLI). Rest APIs and tools like Visual Studio are another options available when it comes to deploy resources on Azure. With the support of what’s called solution template in JSON in the ARM deployment model, you can now define all Azure resources in the template and use PowerShell or CLI to deploy it. For more detail on the topic please review Azure Deployment Models and Deploy resources with Azure Resource Manager templates.
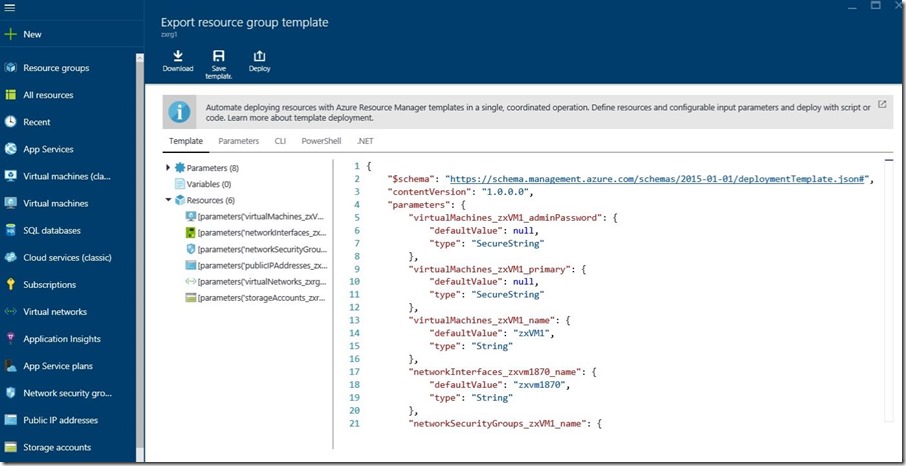
It’s worth noting that you can now use the new template export feature currently in preview to download or save the solution template, along with PowerShell or CLI scripts or .NET code, or bash deployment script. For more detail read the blog post.
Create Single Virtual Machine Image for the Azure Marketplace
You as a publisher need to install your solution on a Windows or Linux based operating system stored in a VHD file, upload your VHD file to Azure and turn it into a VM image that is sellable to your users. The article at Github outlines the key steps involved in the publishing process.
- Define Offers and SKUs
- Create an Azure-compatible VHD
- Turn your VHD into a VM image
- Obtain certification for your VM image
This blog post walks through the end to end process of creating a single VM from a custom VM image using ARM solution template and PowerShell.
Step 1: Create Azure Compatible VHD
You can create a VHD either offline or in the cloud. We take the latter option by creating a Windows VM directly from Azure catalog and a data disk using the Azure Resource Manager option, and turning the image after sysprep into our baseline VHD. We skip the step of installing and configuring the solution that you would do. This cloud option saves the effort of uploading the VHD (typically 127 GB) from a local machine to Azure. See more detail at Create a Windows virtual machine through the Azure portal.
If you are interested to see how this step works, including how to sysprep the VM, please review the references below. Though the articles are based on the classic Azure service management model, the process is essentially the same.
- Create and upload a Windows Server VHD to Azure
- Creating and Uploading a Virtual Hard Disk that Contains the Linux Operating System
Step 2: Register a VM from the VHD Files
To register a VM from the VHD files and create a custom or user image, you have a few options.
Option 1 – Using Azure Resource Explorer
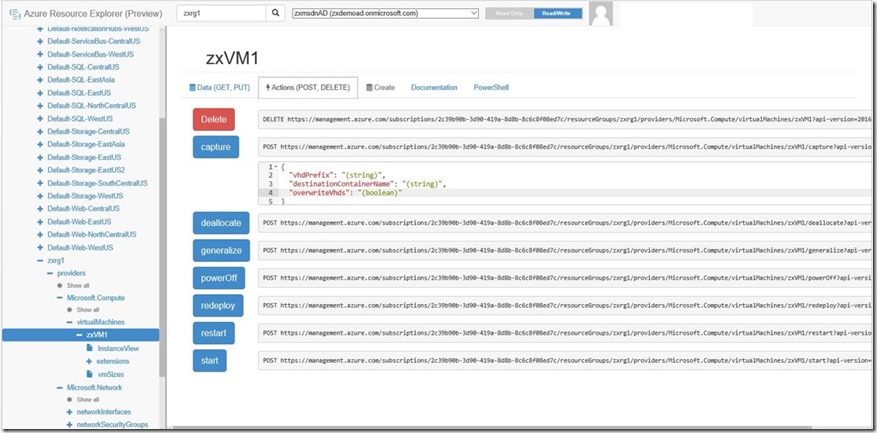
Azure Resource Explorer is a web tool introduced last year, currently in preview. While in Azure Resource Explorer, search your VM e.g. “zxVM1” or resource group e.g. “zxrg1”. Selecting the VM under your resource group, you see something similar to the screen below. By default it is in “Read Only” mode.
Click on the ReadWrite button next to the search box and then Actions (Post, Delete) tab under our VM title. Simply click on “deallocate” and “generalize”. At this point, the VM in our case “zxVM1” is no longer consuming Azure computing resources and becomes a model. To understand the difference between generalized vs. specialized VM images, check Christine Avanessians’s post.
Now you are ready to register the VHD including an OS VHD and a data disk VHD in our example as your custom image. You need to determine where you store the VHD files and whether you want to overwrite existing VHD files. In the text area next to the Capture button, specifying the three parameters, "vhdPrefix", "destinationContainerName", and "overwriteVhds", click the “capture” button. And it’s done! You now have a custom image available.
Option 2 – Using Invoke-AzureRmResourceAction
Assuming that you have a generalized VM from the option above, you can run the PowerShell script below instead of pressing the Capture button.
Login-AzureRmAccount
$ParametersObject = @{vhdPrefix = "zxtemplate"; destinationContainerName = "zxtemplates"; overwriteVhds = "true";}
Invoke-AzureRmResourceAction -ResourceGroupName zxrg1 -ResourceType Microsoft.Compute/virtualMachines -ResourceName zxVM1 -Action capture -Parameters $ParametersObject -ApiVersion 2016-03-30 –Force
Option 3 – Using Save-AzureRmVMImage
Again, assuming that you have a generalized VM. This option allows you to save a template file e.g. “zxTemplate.json” to your local computer. The template file contains info on VHD locations which you may find useful later. Stéphane Lapointe has put together a series of blog posts on the topic at codeisahighway.
Login-AzureRmAccount
# Deallocate the virtual machine
Stop-AzureRmVM -ResourceGroupName 'zxrg1' -Name 'zxVM1'
# Set the Generalized state to the virtual machine
Set-AzureRmVM -ResourceGroupName 'zxrg1' -Name 'zxVm1' -Generalized
Save-AzureRmVMImage -ResourceGroupName 'zxrg1' -VMName 'zxVM1' -DestinationContainerName 'zxtemplates' -VHDNamePrefix 'zxtemplate' -Path C:\temp\zxTemplate.json –Overwrite
[Update 5/3/2016] If you copy and paste the commands above, you may run into error due to modified single quotes. Fix the single quotes and run the commands again. See screenshot below.
You can see where the VHD files for the custom image are stored using the portal or the free, cross-platform tool Azure Storage Explorer. From the portal, you can find the VHD files in your storage account, under your “system” container.
Similarly, in Azure Storage Explorer, you can see two VHDs under the system container in your storage account.
In the template file stored on your local computer with option #3, you can see the exact location of the VHD files. We will use this file later on.
- The OS VHD is located at “https://<mystorageaccount>.blob.core.windows.net/system/Microsoft.Compute/Images/zxtemplates/zxtemplate-osDisk.4112ddd4-856b-4e1c-8df8-d7746876da42.vhd”
- The data disk VHD at “https://<mystorageaccount>.blob.core.windows.net/system/Microsoft.Compute/Images/zxtemplates/zxtemplate-dataDisk-0.4112ddd4-856b-4e1c-8df8-d7746876da42.vhd”.
Note that there are two VHD files with prefix “vmcontainer”, one for the OS and one for the data disk, listed. However, they are not visible from the portal or Azure Storage Explorer.
Note: We decide not use the sample scripts provided in the Github article mainly because they are based on the Create VM Image Rest API for classic VMs.
Step 3: Create VMs from Custom VM Image
The custom VM image with your solution is now contained in the captured VHD files. Normally you’d make the custom image available in the Azure Marketplace, from which uses can create VMs. For this exercise, however, we will work with these VHDs directly to create end user VMs.
Option 1 – Using PowerShell Scripts
The sample code is available in the README.md file at Github. Before testing the script, replace rgName with your resource group, and storageName with your storage account. You may change the VM names to something you like.
Option 2 – Using ARM Solution Template
The sample code is available at Github. There are three files, the PowerShell script file named deploy.ps1, and two json files, azuredeploy.json and azuredeploy.parameters.json. Before testing the script, replace resource group, storage account and VM names to something you like in the azuredeploy.parameters.json file.
The solution template is created from Visual Studio 2015, as shown below.
Remember the solution package (zip file) you can get by using the Export feature from the portal? We will use it now. Replace the text of each of the three files in the Visual Studio solution, Deploy-AzureResourceGroup.ps1, azuredeploy.json, and azuredeploy.parameters.json, with that from each of the corresponding files in the zip package.
- In Deploy-AzureResourceGroup.ps1, make the following changes.
[string]
$templateFilePath = "azuredeploy.json",
[string]
$parametersFilePath = "azuredeploy.parameters.json"
- In azuredeploy.json, replace the storageprofile segment with the text from the template you saved at Step 2, Option 3. The file is named “zxTemplate.json”. Also, change the VM name section directly above storageprofile.
- In azuredeploy.parameters.json, replace values with your resource group, storage account and VM name. In our example, we add a few parameters such as disk names and VHD file names. These parameters are also added in the azuredeploy.json file.
Troubleshoot your deployment scripts
It’s likely you will run into issues with the PowerShell scripts and the ARM solution template as we did. Fortunately you can now view errors from the portal using Audit Log, or use the new option, DeploymentDebugLogLevel, in the New-AzureRmResourceGroupDeployment command. You should be cautious while using the debugging option. As the warning message says, this can potentially log secrets like passwords used in resource property or listKeys operations when you retrieve the deployment operation through Get-AzureRmResourceGroupDeploymentOperation. For more information, check Troubleshooting resource group deployments with Azure Portal and Debugging ARM template deployments.
One issue, a possible bug, we have to fix in the solution template is the flag that indicates whether the network interface is a primary network card. The error message is “Resource Microsoft.Computer/virtualMachines... failed with message 'Cannot parse the request.'” The simple fix is change the type to “bool” from “SecureString” in azuredeploy.json and the value to “true” in azuredeploy.parameters.json. Without the logging info, this would be a hard to fix error.
This is a bit long post, but we hope you it useful as you work on your single VM solution and try to publish it to the Azure Marketplace.


