ASP.NET Web API and Azure Blob Storage
When you create a Web API service that needs to store large amount of unstructured data (pictures, videos, documents, etc.), one of the options you can consider is to use Windows Azure Blob Storage. It provides a fairly straightforward way of storing unstructured data in the cloud. In this post, I’ll show you how to create a simple file service using ASP.NET Web API backed by Azure Blob Storage.
Step 1: Install Azure SDK
First, you need to download and install the Azure SDK for .NET.
Next, you might want to create an Azure Storage Account (Don’t worry If you don’t have one yet. You can still try out the scenario locally using the Azure Storage Emulator that comes with the Azure SDK. Later when the app is ready to deploy, you can be easily switch it to use a real azure storage account).
Step 2: Create an ASP.NET Web API project
To start from scratch you can go to File/New/Project in Visual Studio and then select ”ASP.NET MVC 4 Web Application” with “Web API” as the project template.
* Note that you don’t need to create a “Windows Azure Cloud Service Project“ because you can deploy the ASP.NET Web API as a Web Site on Azure.
First, you need to set the connection string to connect to the Azure blobs. You can just add the following setting to your Web.config – it will use the the Azure Storage Emulator.
 <appSettings>
   <add key="CloudStorageConnectionString" value="UseDevelopmentStorage=true"/>
 </appSettings>
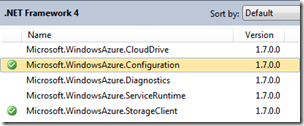
Now in order to interact with the Azure Blobs, you can use the CloudBlobClient provided by the Azure SDK. But first you need to add the reference to the following assemblies:
- Microsoft.WindowsAzure.StorageClient
- Microsoft.WindowsAzure.Configuration
Next, you can create a helper like below to read the connection string from Web.config, new up a CloudBlobClient and return a container (CloudBlobContainer). The concept of containers is very similar to that of directories in a file system. In this case, the helper is going to create a directory/container called “webapicontainer” to store all the files. Beware that the name of the container cannot contain upper case characters. See this article to learn more about container naming.
The helper below is also giving everyone read access to the blobs in “webapicontainer” so that the files can be downloaded directly using the blob URI. Of course, you can set different permissions on the container depending on your scenarios.
 using Microsoft.WindowsAzure;
 using Microsoft.WindowsAzure.StorageClient;

 namespace SampleApp.Controllers
 {
     internal static class BlobHelper
     {
         public static CloudBlobContainer GetWebApiContainer()
         {
             // Retrieve storage account from connection-string
             CloudStorageAccount storageAccount = CloudStorageAccount.Parse(
                 CloudConfigurationManager.GetSetting("CloudStorageConnectionString"));

             // Create the blob client
             CloudBlobClient blobClient = storageAccount.CreateCloudBlobClient();

             // Retrieve a reference to a container
             // Container name must use lower case
             CloudBlobContainer container = blobClient.GetContainerReference("webapicontainer");

             // Create the container if it doesn't already exist
             container.CreateIfNotExist();

             // Enable public access to blob
             var permissions = container.GetPermissions();
             if (permissions.PublicAccess == BlobContainerPublicAccessType.Off)
             {
                 permissions.PublicAccess = BlobContainerPublicAccessType.Blob;
                 container.SetPermissions(permissions);
             }

             return container;
         }
     }
 }
Now, let’s use this helper in the Web API actions. Below, I’ve created a simple FilesController that will support the following actions:
- POST: Will upload files, this will only support multipart/form-data format
- GET: Will list the files that have been uploaded
 using System.Collections.Generic;
 using System.Net;
 using System.Net.Http;
 using System.Threading.Tasks;
 using System.Web.Http;
 using Microsoft.WindowsAzure.StorageClient;

 namespace SampleApp.Controllers
 {
     public class FilesController : ApiController
     {
         public Task<List<FileDetails>> Post()
         {
             if (!Request.Content.IsMimeMultipartContent("form-data"))
             {
                 throw new HttpResponseException(HttpStatusCode.UnsupportedMediaType);
             }

             var multipartStreamProvider = new AzureBlobStorageMultipartProvider(BlobHelper.GetWebApiContainer());
             return Request.Content.ReadAsMultipartAsync<AzureBlobStorageMultipartProvider>(multipartStreamProvider).ContinueWith<List<FileDetails>>(t =>
             {
                 if (t.IsFaulted)
                 {
                     throw t.Exception;
                 }

                 AzureBlobStorageMultipartProvider provider = t.Result;
                 return provider.Files;
             });
         }

         public IEnumerable<FileDetails> Get()
         {
             CloudBlobContainer container = BlobHelper.GetWebApiContainer();
             foreach (CloudBlockBlob blob in container.ListBlobs())
             {
                 yield return new FileDetails
                 {
                     Name = blob.Name,
                     Size = blob.Properties.Length,
                     ContentType = blob.Properties.ContentType,
                     Location = blob.Uri.AbsoluteUri
                 };
             }
         }
     }

     public class FileDetails
     {
         public string Name { get; set; }
         public long Size { get; set; }
         public string ContentType { get; set; }
         public string Location { get; set; }
     }
 }
Note that I created a custom MultipartFileStreamProvider to actually upload the multipart contents to Azure blobs.
 using System.Collections.Generic;
 using System.IO;
 using System.Net.Http;
 using System.Threading.Tasks;
 using Microsoft.WindowsAzure.StorageClient;

 namespace SampleApp.Controllers
 {
     public class AzureBlobStorageMultipartProvider : MultipartFileStreamProvider
     {
         private CloudBlobContainer _container;
         public AzureBlobStorageMultipartProvider(CloudBlobContainer container)
             : base(Path.GetTempPath())
         {
             _container = container;
             Files = new List<FileDetails>();
         }

         public List<FileDetails> Files { get; set; }

         public override Task ExecutePostProcessingAsync()
         {
             // Upload the files to azure blob storage and remove them from local disk
             foreach (var fileData in this.FileData)
             {
                 string fileName = Path.GetFileName(fileData.Headers.ContentDisposition.FileName.Trim('"'));

                 // Retrieve reference to a blob
                 CloudBlob blob = _container.GetBlobReference(fileName);
                 blob.Properties.ContentType = fileData.Headers.ContentType.MediaType;
                 blob.UploadFile(fileData.LocalFileName);
                 File.Delete(fileData.LocalFileName);
                 Files.Add(new FileDetails
                 {
                     ContentType = blob.Properties.ContentType,
                     Name = blob.Name,
                     Size = blob.Properties.Length,
                     Location = blob.Uri.AbsoluteUri
                 });
             }

             return base.ExecutePostProcessingAsync();
         }
     }
 }
* Here I only implemented two actions to keep the sample clear and simple, you can implement more actions such as Delete in a similar fashion – get a blob reference from the container and call Delete on it.
Step 3: Trying it out
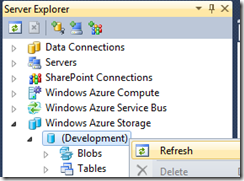
First you need to start the Azure Storage Emulator. You can do it by going to the “Server Explorer”. Under the “Windows Azure Storage”, just right click and Refresh the “(Development)” node. It will start the Azure Storage Emulator.
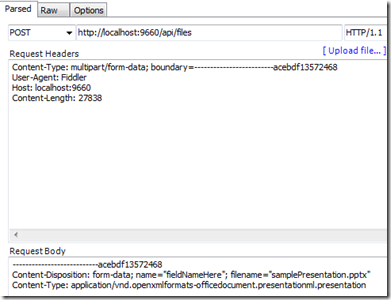
Once the Azure storage emulator and the Web API service are up and running, you can start uploading files. Here I used fiddler to do that.
After the upload is complete, we can issue a GET request to the FilesController to get a list of files that have been uploaded. From the result below we can see there’s one file uploaded so far. And the file can be downloaded at Location: https://127.0.0.1:10000/devstoreaccount1/webapicontainer/samplePresentation.pptx.
Alternatively we can look through the Server Explorer to see that the file has in fact been upload to the blob storage.
Switching to a real Azure Blob Storage
When everything is ready to be deployed, you can simply update the connection string in Web.config to use the real Azure Storage account. Here is an example of what the connection string would look like:
 <appSettings>
     <add key="CloudStorageConnectionString" value="DefaultEndpointsProtocol=http;AccountName=[your account name];AccountKey=[your account key]"/>
 </appSettings>
The DefaultEndpointsProtocol=http will tell the CloudBlobClient to use the default http endpoint which is: https://[AccountName].blob.core.windows.net/ for the blobs.
The AccountName is simply the name of the storage account.
The AccountKey can be obtained from the Azure portal – just browse to the Storage section and click on “MANAGE KEYS”.
Increasing the maxRequestLength and maxAllowedContentLength
If you’re uploading large files, consider increasing the maxRequestLength setting in ASP.NET which is kept at 4MB by default. The following setting in Web.config should do the trick to increase it to 2GB.
 <system.web>
   <httpRuntime maxRequestLength="2097152"/>
 </system.web>
If you’re on IIS, you might also want to increase the maxAllowedContentLength. Note that maxAllowedContentLength is in bytes whereas maxRequestLength is in kilobytes.
 <system.webServer>
     <security>
         <requestFiltering>
             <requestLimits maxAllowedContentLength="2147483648" />
         </requestFiltering>
     </security>
 </system.webServer>
Updates
7/3/12: The code in this post can be downloaded from: https://code.msdn.microsoft.com/Uploading-large-files-386ec0af. It is using ASP.NET Web API nightly build packages.
8/29/12: I’ve updated the sample solution to use the released version (RTM) of ASP.NET Web API. I’ve also reduced the project size by removing the packages, so please make sure you enable NuGet Package Restore (Inside VS, go to Tools -> Options... -> Package Manager -> check "Allow NuGet to download missing packages during build" option).
Hope you find this helpful,
Yao
