Including Self-Signed Certificates with your Windows Runtime based Windows Phone 8.1 apps
The concept of Universal apps lets you share common code targeting the Windows Runtime between a Windows Store app and a Windows Phone 8.1 app. However there are still some areas where there isn’t a 1:1 mapping. When using self-signed certificates with your Windows Runtime based Windows Phone 8.1 apps there is some complexity involved. This blog shows you how to reduce this complexity programmatically in your Windows Runtime based Windows Phone 8.1 project.
To give a brief background, with Windows Store apps targeting Windows 8.1, you as an app developer have the capability of including self-signed root certificates with your app so that you do not have to bypass server certificate validation errors accessing HTTPS URLs (not that I am saying that bypassing server certificates is a great idea :), and in fact you should never ignore server certificate errors).
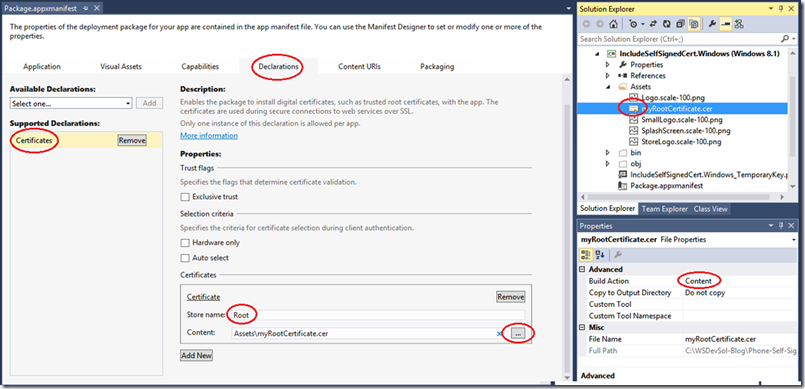
With Windows Store apps targeting Windows 8.1, all you have to do to is to include your Root certificate with your app and add the “Certificate” Declaration to your Package.appxmanifest file like the below screenshot shows and the system will automatically take care of including this certificate in your apps Trusted Root certification store (not the Current User/ Local Computer store)
However, if you open your Package.appxmanifest file for Windows Phone 8.1 app (targeting the Windows Runtime, not the Silverlight Runtime), you will notice that the Declarations section is missing the option to add/include a Certificate.
The question is: How should you include self-signed root certificates with your Windows Phone 8.1 apps targeting the Windows Runtime?
The first step to include the self-signed root certificate with your Windows Phone 8.1 app (or a Universal app for that matter) is to include your certificate with your app and set the “Build Action” to “Content” as per the first image above.
Following this, you will need to install the root certificate using the below code – written in C# (the same applies for WinJS or C++) preferably during app startup or right before sending your very first HTTPs request to your target server (that uses a certificate issued by the root certificate authority you are trying to trust). In the below code example, the certificate is added inside the OnLaunched method of App.xaml.cs.
Note: The CertificateStore class only has Add and Delete methods (no query method), so adding the certificate multiple times does not throw any errors. Adding the certificate multiple times does not mean that there will be multiple copies of the certificate installed, there is only one copy of the certificate. You can verify this by calling Add method two times and subsequently calling Delete two times. You will notice that the second Delete call will throw an exception which states: "Cannot find object or property. (Exception from HRESULT: 0x80092004)". Also, the CertificateStores.FindAllAsync() method only returns you a list of certificates from the actual certificate store, and does not include/enumerate certificates from the TrustedRootCertificationAuthorities or IntermediateCertificationAuthorities store.
 protected async override void OnLaunched(LaunchActivatedEventArgs e)
 {
     // ...
     // ... other app startup code...
     // ...

     try
     {
         // Read the contents of the Certificate file
         System.Uri certificateFile = new System.Uri("ms-appx:///Assets/myRootCertificate.cer");
         Windows.Storage.StorageFile file = await Windows.Storage.StorageFile.GetFileFromApplicationUriAsync(certificateFile);
         Windows.Storage.Streams.IBuffer certBlob = await Windows.Storage.FileIO.ReadBufferAsync(file);

         // Create an instance of the Certificate class using the retrieved certificate blob contents
         Windows.Security.Cryptography.Certificates.Certificate rootCert = new Windows.Security.Cryptography.Certificates.Certificate(certBlob);

         // Get access to the TrustedRootCertificationAuthorities for your own app (not the system one)
         Windows.Security.Cryptography.Certificates.CertificateStore trustedStore = Windows.Security.Cryptography.Certificates.CertificateStores.TrustedRootCertificationAuthorities;

         // Add the certificate to the TrustedRootCertificationAuthorities store for your app
         trustedStore.Add(rootCert);
     }
     catch (Exception oEx)
     {
         // Catch and report exceptions
         System.Diagnostics.Debug.WriteLine("Exception Adding cert: " + oEx.Message);
     }
 }
Once you install your root certificate using the above code, you can then send a HTTPs request using the Windows.Web.Http.HttpClient class and not have to worry about ignoring server certificate errors and for what its worth, you should never ignore server certificate errors.
Hopefully this blog helps you understand how to include self-signed root certificates with your Windows Phone 8.1 app targeting the Windows Runtime and use them to trust your server certificate while negotiating a secure channel (HTTPs request).
Thanks to my teammate Eric Fleck (@EricThomasFleck) for providing his ideas to build the blog content…
Don’t forget to follow the Windows Store Developer Solutions team on Twitter @wsdevsol. Comments are welcome, both below and on twitter.
- Prashant H Phadke

