Using WPF and Silverlight UserControls
UserControls promote code reuse, separation of concerns and simplify development by partitioning applications into smaller blocks of code.
In this article you'll learn why you would use a UserControl, how to create one from the Toolbox, understand when design-time code executes and how to prevent blocks of code from running at design-time.
Table of Contents
- Introduction
- Automatically Populate Toolbox Items
- Root Object and Instances of Controls at Design-time
- Running Code in a Constructor
- Comments
Introduction
The below demo application will be used in this article to illustrate important UserControl concepts. When writing WPF or Silverlight applications you have the option to partition your code into manageable blocks. This separating of concerns and responsibilities makes authoring and maintaining of the application easier and provides opportunities for code reuse. Additionally, unit and integration testing is simpler when testing smaller units of code.
The below application is very simple. It could easily be written with all the code in a single XAML file with a corresponding code-behind file. As time passes, requirements change, more fields are added, more tabs get added and before long you have a huge XAML file that gets difficult to understand and edit.
However, if we treat the below Window object as a "shell" for an application; we can then easily extend the application by adding small self-contained units of code such as UserControls.
Notice how short and simple the below XAML is. This is the XAML for the above form.
 <Grid>
    <TabControl>
        <TabItem Header="Customers">
            <Grid>
                <my:CustomersUserControl />
            </Grid>
        </TabItem>
        <TabItem Header="Sales" >
            <Grid />
        </TabItem>
    </TabControl>
</Grid>
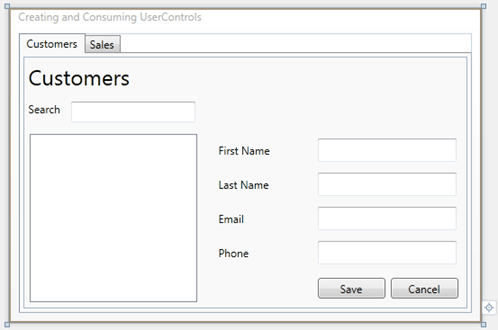
In the below image, you can see the outer Window, the CustomersUserControl that is hosted in a TabItem and the CustomerEditUserControl that is nested within the CustomersUserControl.
In terms of separation of concerns and responsibilities, the Window is responsible for application navigation. This is accomplished by hosting UserControls within TabItems. The Window does not need to know anything about customers or sales, how to search and edit them, how to connect to a database or validate data entry.
The CustomersUserControl is responsible for providing search capabilities and for setting the DataContext on the CustomerEditUserControl when a Customer is selected.
The CustomerEditUserControl is responsible for providing editing capabilities. This UsesrControl can also be reused in other maintenance forms or possibly in an application child window (dialog box) if the requirements call for this functionality.

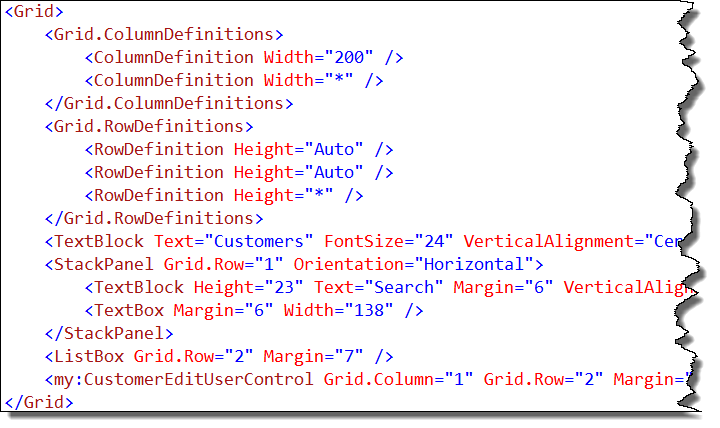
The below XAML is from the CustomersUserControl. Again, note the short and simple XAML.
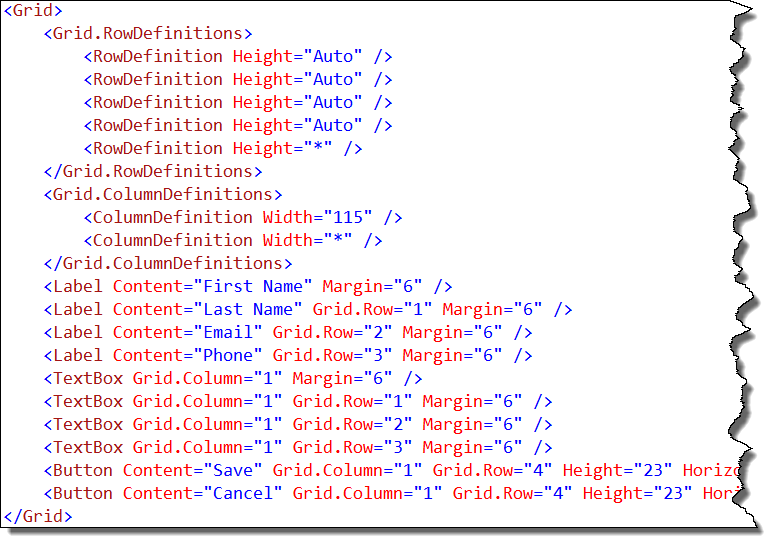
The below short and simple XAML is from the CustomerEditUserControl.
After looking over the XAML for the Window and two UserControls, you can see that we have simplified the application by breaking it into small manageable components. The separated application is easier to maintain over time and test. Another benefit of this separation of the XAML is that the accompanying code-behind will also be simpler, shorter and with fewer methods per class.
Automatically Populate Toolbox Items
By default, in Visual Studio 2010, each time you build a WPF and Silverlight project, any types that derive from FrameworkElement or higher will be automatically added to the Toolbox. The types that are added are grouped into Toolbox tab by assembly.
The purpose of this feature is to make it easy for developers to consume the UserControls and CustomControls they create on a form.
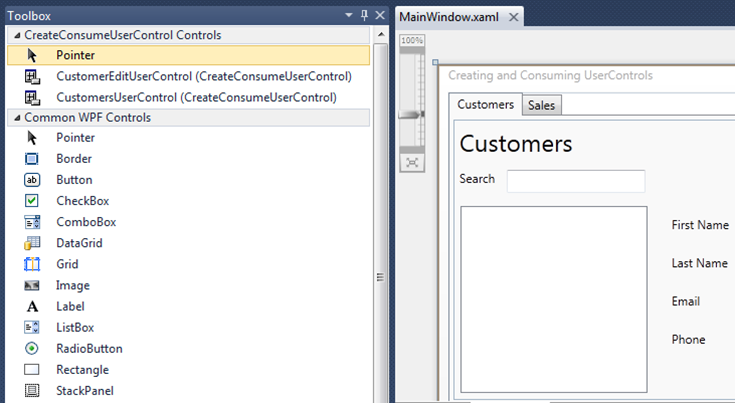
In the below image you can see two UserControls in the Toolbox in the CreateConsumeUserControl Toolbox Tab. These controls can be dragged onto the design surface just like the default WPF or Silverlight controls.
Enable or Disable Automatically Populate Feature
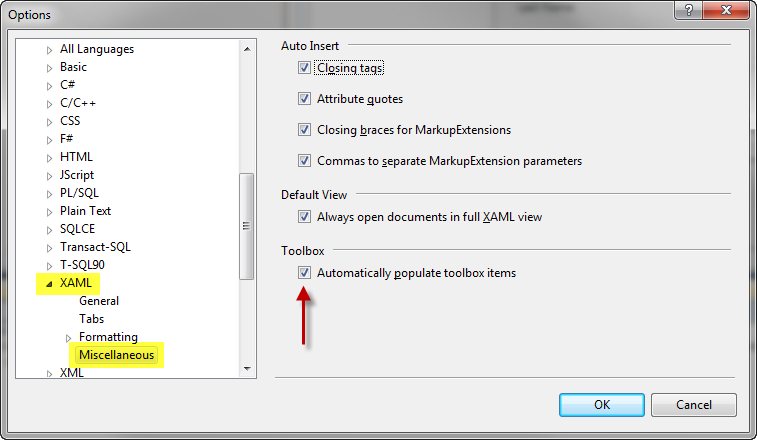
At your option you can enable or disable this feature by using the Visual Studio Options dialog.
To open this dialog:
- Click the Visual Studio Tools menu item
- Select Options…
Using the TreeView select:
- Text Editor
- XAML
- Miscellaneous
To enabled or disable the feature, check or uncheck the Automatically populate toolbox items CheckBox.
DesignTimeVisible Attribute
At your option, you can keep individual items from appearing by decorating the class with the System.ComponentModel.DesignTimeVisible attribute.
The below code demonstrates how to keep the CustomerEditUserControl from appearing in the automatically populated Toolbox items listing.
C#
 [DesignTimeVisible(false)]
public partial class CustomerEditUserControl : UserControl {
VB.NET
 <DesignTimeVisible(false)>
Public Class CustomerEditUserControl
Silverlight Page Control
While the Silverlight Page derives from UserControl and you would expect these objects to appear in the Toolbox items listing, these controls are not listed in the Toolbox items listing.
The reason these are not listed is because these are root controls that are not typically consumed in other controls, instead they are navigated to and loaded into a Frame control. Since that are not typically consumed by other controls, there is no reason to load them into the Toolbox.
Root Object and Instances of Controls at Design-time
It's very important to understand when and what user-code the WPF and Silverlight Designer runs at design-time, so that you can avoid unnecessary design-time load failures.
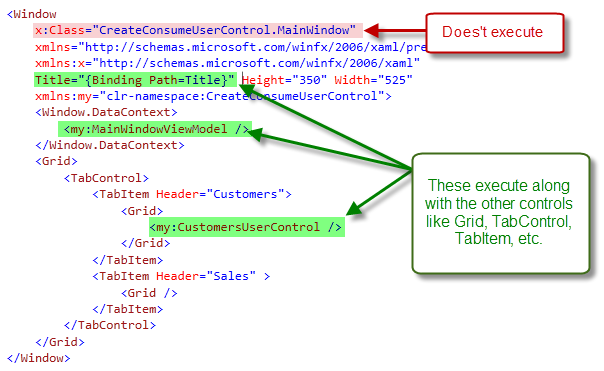
Root Object
The "root object" is the top level (or root) Window or Page or UserControl that you are actually designing. None of the code in the code-behind file for the root object is executed at design time (for example code in the constructor or Loaded event code). The MainWindow is the root object in the below image.
What Code Executes, What Code Doesn't Execute
What code executes at design-time? Everything that gets created in the XAML:
- Instances of Controls and UserControls
- ValueConverters
- DataTemplateSelectors
- Classes referenced as resources
What code does not execute at design-time? The top level object you are designing:
- Window, UserControl, Page etc. when you are designing it
- Your Application class
Important |
Never reference the Application or App class in code that gets executed at design-time because this will always be null (Nothing in VB.NET). |
Instances of Controls
The Designer will execute all constructors and Loaded event code for each instances of any child controls.
In the below image both the CustomersUserControl and CustomerEditUserControl constructors and Loaded event code will be executed at design-time.

XAML View of the Above Form
The reason this is so important to understand is, your code may make assumptions that are always true at run-time and the application works property, however those same assumptions may not be true at design-time and could cause Designer load failures.
If you have not coded defensively, your user-code can cause unhandled exceptions that will prevent the Designer from loading. A NullReferenceException at design-time is the most common cause of Designer load failure. This is also true of Converters and DataTemplateSelectors that do not make null reference checks before attempting to access a reference type.
Please read the MSDN topic, Troubleshooting WPF and Silverlight Designer Load Failures. This topic contains good information about authoring design-time friendly code and troubleshooting common load failures.
Running Code in a Constructor
Some developers choose to initiate an asynchronous method calls in their constructors. Running these method calls at design-time can cause design-time problems and load failures. For example, trying to call a web service when the web service is not running, or trying to access the database when the connection string information is in the Application object that is null at design-time; these will both cause problem and possibly keep the form from loading or unhandled exceptions thrown.
Both WPF and Silverlight developers have the ability to run a simple check that will verify if the code is currently running at design-time or not.
In the below Silverlight code, the line below InitializeComponent, System.ComponentModel.DesignerProperites.GetIsInDesignMode performs the check. If false (at run-time), then the code will execute.
C#
 public partial class ProductsView : UserControl {
    public ProductsView() {
        InitializeComponent();

        if (!DesignerProperties.GetIsInDesignMode(this)) {
            this.tbStatusBar.Text = "Getting products list...";
            ProductsServiceReference.ProductsServiceClient client =
                new ProductsServiceReference.ProductsServiceClient();
            client.DoWorkCompleted += new
                EventHandler<System.ComponentModel.AsyncCompletedEventArgs>(client_DoWorkCompleted);
            client.DoWorkAsync();
        }
    }

    void client_DoWorkCompleted(object sender, System.ComponentModel.AsyncCompletedEventArgs e) {
        if (e.Error == null) {
            this.tbStatusBar.Text = "Products loaded";
        } else {
            this.tbStatusBar.Text = e.Error.Message;
        }
    }
}
VB.NET
 Partial Public Class ProductsView
    Inherits UserControl

    Public Sub New()
        InitializeComponent()

        If Not DesignerProperties.GetIsInDesignMode(Me) Then
            Me.tbStatusBar.Text = "Getting products list..."
            Dim client As new ProductsServiceReference.ProductsServiceClient()
            AddHandler client.DoWorkCompleted, AddressOf client_DoWorkCompleted
            client.DoWorkAsync()
        End If
    End Sub

    Private Sub client_DoWorkCompleted(ByVal sender As Object,
                                       ByVal e As System.ComponentModel.AsyncCompletedEventArgs)
        If e.Error Is Nothing Then
            Me.tbStatusBar.Text = "Products loaded"
        Else
            Me.tbStatusBar.Text = e.Error.Message
        End If
    End Sub

End Class
Comments
Microsoft values your opinion about our products and documentation. In addition to your general feedback it is very helpful to understand:
- How the above feature enables your workflow
- What is missing from the above feature that would be helpful to you
Thank you for your feedback and have a great day,
Karl Shifflett
Expression Team