How to Enable Using the Binding Builder in WPF and Silverlight Applications
When the Data Sources Window is used to generate the UI, the generated XAML injects design-time information so that the Binding Builder can be used to create bindings for the UI controls.
What if your application was written in Visual Studio 2005 or 2008; or you used the XAML Editor, the Designer or Expression Blend without the Data Sources Window and you now want to take advantage of the new Binding Builder?
What if your coding style is to assign the DataContext for your forms in code and not data bind to CollectionViewSources in your XAML?
This very short walk-though will demonstrate the simple requirements to enable you to use the new Binding Builder in a variety of scenarios like the ones mentioned above.
Requirements
This walk-through assumes you have the opened the attached solution. The attached zip file contains both a VB.NET and C# version of the solution.
Table of Contents
- Why use the Binding Builder?
- What is the Problem we Trying to Solve?
- Design-Time Properties
- Let's Implement the Solution
- Binding Builder in XAML View
- Links
- Comments
Why use the Binding Builder?
The Binding Builder makes it easier to set up bindings and more importantly makes it easier to create accurate bindings so that you don't need to debug so often. This alone will save you time, limit frustration and increase your productivity.
If you add to this all the other improvements in the WPF and Silverlight Designer like the image picker, the resource picker, the brush editor, etc. I believe that we have a much-improved experience for WPF and Silverlight developers in Visual Studio 2010.
What is the Problem we Trying to Solve?
Let's first run the application to get a feel for how it works at run-time. After starting the application change the selected Customer using the ComboBox at the top. Resize the application; notice how the DataGrid allows data editing.
This application was hand coded using the XAML Editor and the DataContext is set in the Loaded event of the Window. As a result, the tooling has no way to determine the DataContext at design-time; additionally, the Binding Builder will have no way to list properties in its Path section.
A picture is worth a thousand words so…
Open MainWindow.xaml in the Designer
Select the ComboBox to the right of the Select Customer TextBlock
Using the Properties Window:
- Click on the ItemsSource property Property Marker pointed to by the red arrow
- Select Apply Data Binding… from the Context Menu
- Optionally, you can also click the gray text to the right of the Property Marker to open the Binding Builder
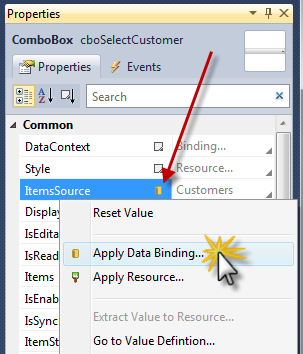
In the below image we have two problem indicators
- First, the DataContext is null. This is indicated by the text pointed to by the top red arrow; it does not display class type name that is assigned to the DataContext or what class type name the DataContext is inheriting from.
- Second, since the DataContext is null, the Path Customers pointed to by the bottom red arrow; cannot be resolved by the Binding Builder which is indicated by the dash line under the Path property name.

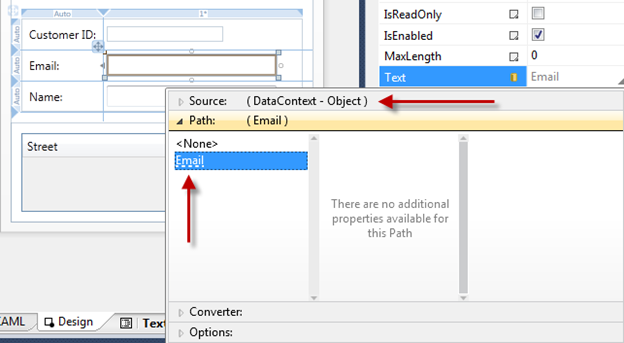
Let's look at one more example.
- Select the TextBox to the right of the Email Label
- Using the Properties Window open the Binding Builder for the Text property
- First, the DataContext is bound to Object. Object does not have properties we can use to set the binding paths.
- In this case, the TextBox is inheriting DataContext from the parent Grid control
- The parent Grid control has its DataContent bound to the SelectedItem of the ComboBox, which is why the Email TextBox has its DataContext set to Object.
- Second, the Email TextBox Text property path is set to Email but like the previous example, it has a dashed underline indicating the Binding Builder was unable to resolve the Email property path.
Design-Time Properties
The problem we need to solve is how to provide "a shape" to the Binding Builder at design-time. When I say "shape" I mean an instantiated Type that the Building Builder can reflect over and then list those properties in the Path selection tab to establish the binding.
In this walk-through we will use the d:DataContext property and d:DesignInstance MarkupExtension.
The "d:" in above property and Markup Extension is the alias to the design namespace where the all the design properties are members of. Here are links to MSDN topics that cover all the "d:" properties and Markup Extensions.
- MSDN topic Design-Time Attributes in the WPF Designer
- MSDN topic Design-Time Attributes in the Silverlight Designer
The "d:" properties and Markup Extensions cannot be created in user code or extended in user code; they can only be used in XAML.
The "d:" properties and Markup Extensions are not compiled into your application; they are only used by the Visual Studio WPF and Silverlight Designer and Expression Blend tooling.
d:DataContext Property
d:DataContext, specifies a design-time data context for a control and its children. When specifying d:DataContext, you should always provide the same "shape" to the design-time DataContext as the run-time DataContext.
If both a DataContext and d:DataContext are specified for a control, the tooling will use the d:DataContext.
d:DesignInstance Markup Extension
If MarkupExtensions are new to you, please read this MSDN topic Markup Extensions and WPF XAML.
d:DesignInstance, returns the an instantiated Type ("shape") that you want to assign as the data source for binding to controls in the designer. The type does not need to be creatable to be used for establishing "shape."
d:DesignInstance MarkupExtension Properties
|
Type |
Name of the Type that will be created. Type is the default parameter in the constructor. |
|
IsDesignTimeCreatable |
Defaults to False. Is the specified type creatable? When false, a faux type will be created instead of the "real" type. |
|
CreateList |
Defaults to False. When true, will return generic list of the specified type. |


Visual Studio Markup Extension IntelliSense
The XAML Editor in Visual Studio 2010 provides IntelliSense when editing Markup Extensions, making the entry of design-time properties and Markup Extensions easy.
Let's Implement the Solution
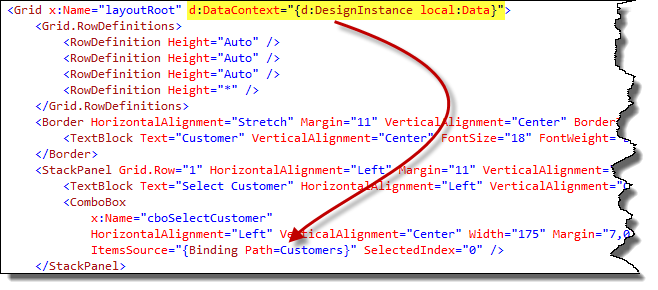
In this application's Loaded event, I assign the Data class to the Window's DataContext property. To follow this same pattern, we need to assign the Data class to a design-time DataContext or d:DataContext to either the Window or top level Grid control in the XAML file. By doing this, we are allowing the d:DataContext to be inherited down the tree of elements, just like it does when the application is at run-time.
The below red arrow indicates DataContext inheritance for the Grid control's child controls. Notice how the ComboBox ItemsSource property is bound to the Customers property on the inherited DataContext, which is the Data class.
Top ComboBox
- Change MainWindow.xaml into XAML View
- Locate the root Grid named "layoutRoot" add the following XAML as pictured below:
d:DataContext="{d:DesignInstance local:Data}"
Change MainWindow.xaml back to Design View
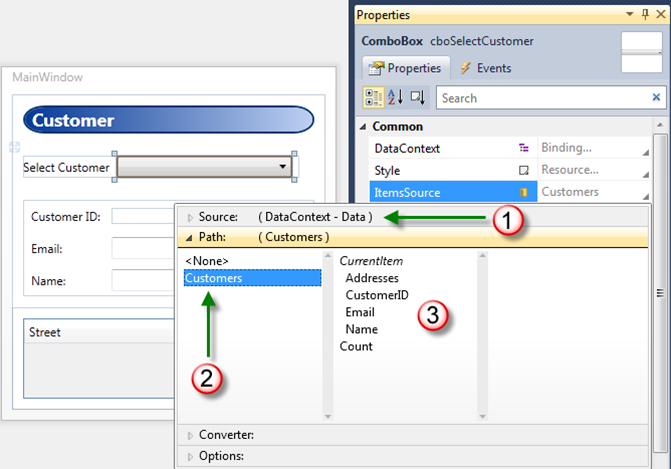
Select the ComboBox
Using the Properties Window, open the Binding Builder for the ItemsSource property:
- First, the DataContext now has a "shape," the Data class
- Second, the Customers Path property name is no longer has a dashed underline because, the Building Builder can resolve the property name on the DataContext
- Third, since Data.Customers is a collection, the individual properties of the Customer class are now listed in the Path section as part of the Current Item. These properties would be used if we were editing a DataTemplate for the ComboBox.
Middle Data Form
The below red arrow indicates d:DataContext inheritance for the child controls of the Grid; this enables property resolution for the Binding Builder tool.
- Change MainWindow.xaml into XAML View
- Locate the middle Grid that has its DataContext bound as pictured below and then add the following XAML as pictured below:
d:DataContext="{d:DesignInstance local:Customer}"
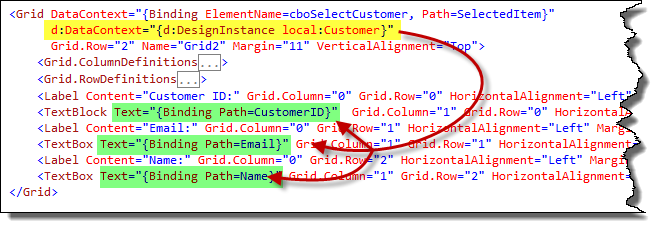
Change MainWindow.xaml back to Design View
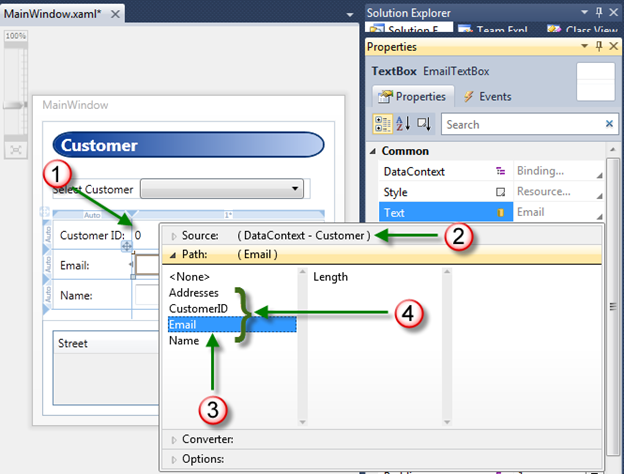
Select the Email TextBox
Using the Properties Window, open the Binding Builder for the Text property:
- First, the Customer ID TextBlock now displays a 0. This is because the design-time DataContext is now a real instance of the Customer class. The CustomerID property is an Int32 that has a value of 0
- Secord, the DataContext now has a "shape," the Customer class
- Third, the Email Path property name is no longer has a dashed underline because, the Building Builder can resolve the property name on the DataContext
- Fourth, all of the properties exposed by Customer type are available for selection in the Path section of the Binding Builder
DataGrid
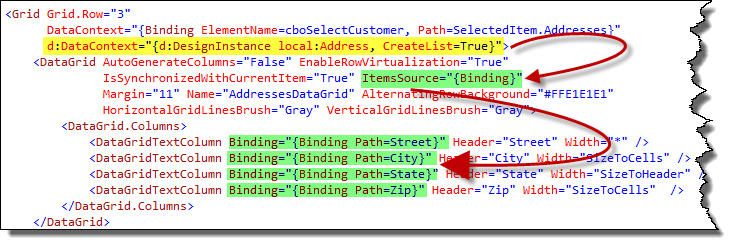
At run-time, the Grid's DataContext is a collection of Addresses that comes from the Addresses collection property on the selected Customer class.
Now we need to provide the same "shape" to the design-time DataContext of the Grid.
The below top red arrow indicates d:DataContext inheritance for the child controls of the Grid; the ItemsSource for the DataGrid is a collection of Addresses at both design-time and run-time.
The individual rows in the DataGrid will each be bound to an instance of the Customer class. The bottom red arrow indicates the relationship between the ItemsSource property and the individual properties that are bound to each DataGridRow.
- Change MainWindow.xaml into XAML View
- In the next step, we will use the d:DesignInstance Markup Extension to create a list of Address instances for the design-time DataContext
- Locate the Grid control at the bottom of the file. Add the following XAML as pictured below:
d:DataContext="{d:DesignInstance local:Address, CreateList=True}"
- Change MainWindow.xaml back to Design View
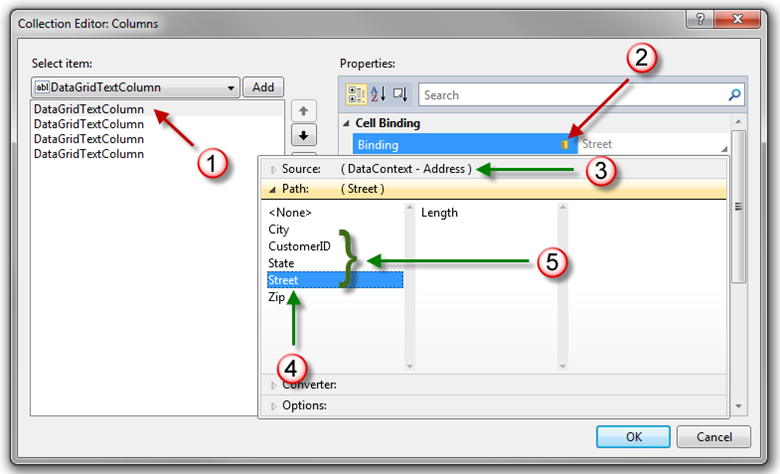
- Select the DataGrid by clicking it like the below image on the left
- Using the Properties Window, open the Columns property Collection Editor by clicking the ellipsis button as in the below image
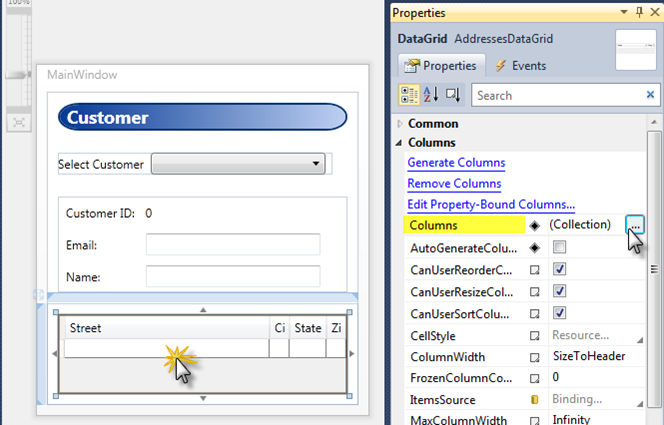
First, select the first DataGridTextColumn
Second, click the Binding property Property Marker, select Apply Data Binding… from the Context Menu:
- Third, the DataContext "shape" is the Address class
- Fourth, Street is not underlined with dashes
- Fifth, all of the properties exposed by Address type are available for selection in the Path section of the Binding Builder
Binding Builder in XAML View
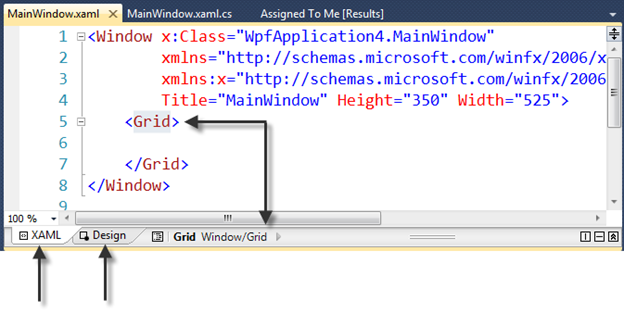
Developers working in the XAML Editor will be surprised to know that the Properties Window and its features like selection sync with the XAML Editor, Binding Builder, Resource Picker and Image Picker continue to work even if the Designer is not visible.
In order to utilize the Properties Window in the XAML Editor, the Designer must load, not necessarily be visible.
If you open a XAML View and the Properties Window does not load, momentarily switch to Design View then back to XAML View by clicking these two tabs pictured below.
Notice the Grid is selected in XAML View and is displayed in the Tag Navigator.
Links
MSDN topic Data Binding Overview (must read for all WPF and Silverlight developers)
MSDN topic Walkthrough: Using a DesignInstance to Bind to Data in the WPF Designer
MSDN topic Design-Time Attributes in the WPF Designer
MSDN topic Design-Time Attributes in the Silverlight Designer
MSDN topic Walkthrough: Using a DesignInstance to Bind to Data in the Silverlight Designer
MSDN topic Markup Extensions and WPF XAML
Comments
Microsoft values your opinion about our products and documentation. In addition to your general feedback it is very helpful to understand:
- How the above features enable your workflow
- What is missing from the above features that would be helpful to you
Thank you for your feedback and have a great day,
Karl Shifflett
Expression Team