Creating and Consuming Resource Dictionaries in WPF and Silverlight
 This article has a corresponding video that can be viewed here.
Resource Dictionaries are a powerful feature in WPF and Silverlight that enable developers to organize and consume reusable resources.
After completing this walk through you'll understand how to create and merge resource dictionaries in WPF and Silverlight; how to add, consume and modify resources in the dictionary using the tools provided by the WPF and Silverlight Designer in Visual Studio 2010.
Table of Contents
- What is a Resource?
- Where Can I Locate Resources?
- How Do I Create Resources Similar To The Example?
- Resources are Declared at Different Scopes
- Show me how a ResourceDictionary Used
- Where to Go From Here
- Links
- Comments
What is a Resource?
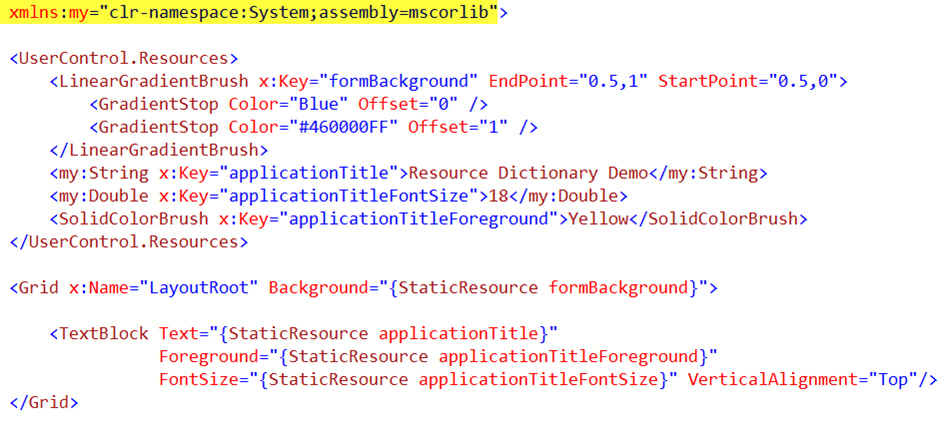
Before diving into resource dictionaries let's first understand what the term "resource" means when used in the context of a resource dictionary or in a resources section of an object in XAML.
A resource is an object declared in XAML. In the below XAML we see examples of typical resources; my: is an alias for the System namespace in mscorlib.
 <UserControl.Resources>
    <LinearGradientBrush x:Key="formBackground" EndPoint="0.5,1" StartPoint="0.5,0">
        <GradientStop Color="Blue" Offset="0" />
        <GradientStop Color="#460000FF" Offset="1" />
    </LinearGradientBrush>
    <my:String x:Key="applicationTitle">Resource Dictionary Demo</my:String>
    <my:Double x:Key="applicationTitleFontSize">18</my:Double>
    <SolidColorBrush x:Key="applicationTitleForeground">Yellow</SolidColorBrush>
</UserControl.Resources>
One reason to use resources in your applications is to promote object reuse across your application. Object reuse provides consistency across the application. Object reuse also makes it very easy to change the application; since you only need to change the resources and all consumers will pick up the change.
The below XAML consumes the above resources.
 <Grid x:Name="LayoutRoot" Background="{StaticResource formBackground}">
    <TextBlock
        Text="{StaticResource applicationTitle}"
        Foreground="{StaticResource applicationTitleForeground}"
        FontSize="{StaticResource applicationTitleFontSize}"
        VerticalAlignment="Top"/>
</Grid>
Where Can I Locate Resources?
Resources are located in resource dictionaries.
What I have referred to as a resources section is actually the Resources property (WPF Silverlight) which is of type ResourceDictionary. When you add resources to the Resources property, you are actually adding them to a ResourceDictionary exposed by the object.
The Resources property is defined on FrameworkElement and is inherited from any object that has FrameworkElement in its inheritance hierarchy. This means that resources can be located on Windows, UserControls, Grids, Buttons, TextBoxes, ListBoxes, etc.
In addition to an objects Resources property, resources can also be located in a ResourceDictionary XAML file.
How Do I Create Resources Similar To The Example?
Create a new WPF or Silverlight project and add the following XAML.
 <Grid x:Name="LayoutRoot">
    <Grid.Background>
        <LinearGradientBrush EndPoint="0.5,1" StartPoint="0.5,0">
            <GradientStop Color="Blue" Offset="0" />
            <GradientStop Color="#460000FF" Offset="1" />
        </LinearGradientBrush>
    </Grid.Background>
    <TextBlock
        Text="Resource Dictionary Demo"
        Foreground="Yellow"
        FontSize="18"
        VerticalAlignment="Top"/>
</Grid>
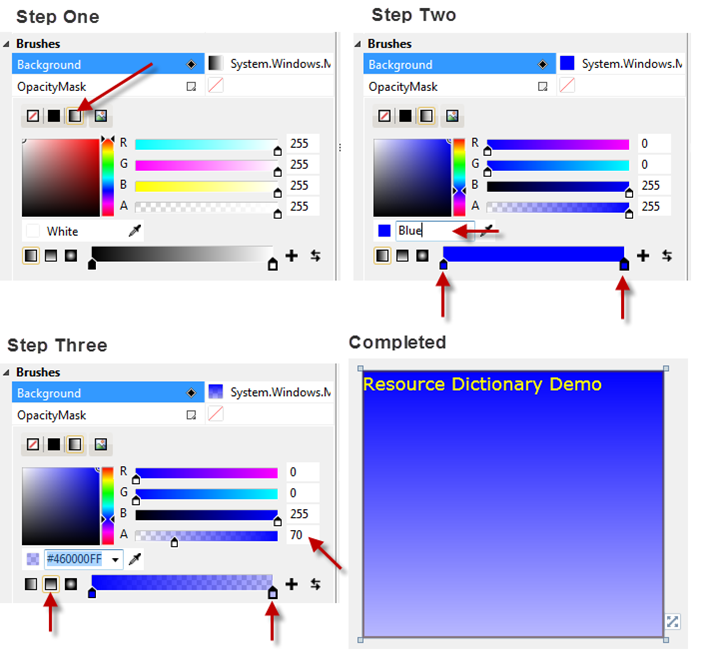
Using the Brush Editor to Create the Background
Select the Grid on the design surface
Using the Properties Window:
Step One:
- Select the Background property
- Click the Gradient Brush icon
Step Two:
- Select the left gradient stop and sets its color to Blue
- Select the right gradient stop and sets its color to Blue
Step Three:
- Click the Horizontal Gradient Brush icon
- Select the right gradient stop and set the Alpha channel 70
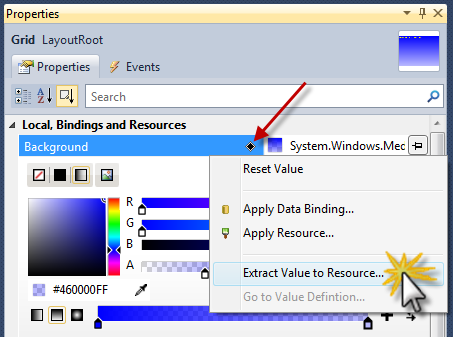
Extracting Background Property to a Resource
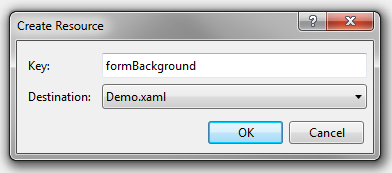
We will now use the "Extract Value to Resource…" feature of the Designer. To exact a property value to a resource, click on the Property Marker, this will open the below Context Menu. Now select, "Extract Value to Resource…"

When the Create Resource dialog opens, change the Key to "formBackground," leave the Destination value to whatever it defaulted to and click OK.
Notice that I have chosen to name the resource by its role, as opposed to what it looks like. Adopting this Key naming convention allows a resource to be changed without causing a conflict with the Key name. For example, if the Key name was BlueGradient and I assigned it to each forms Background property, then later wanted to change it to a green gradient, the name would still be BlueGradient but the color was now green. By naming the Key formBackground, I've not associated any color or type of brush with the name.
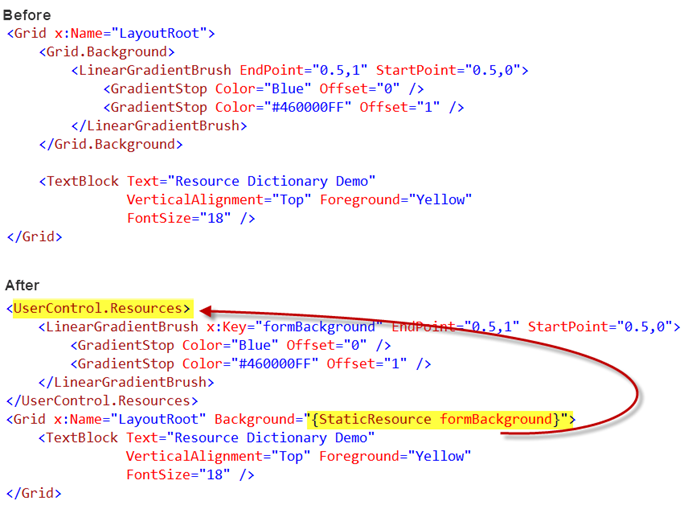
In the below image we can see what the Designer tool did for us.
- Created a Resources section in XAML for the Demo UserControl
- Moved the LinearGradientBrush to the Resources section
- Added the Key to the resource
- Set the Grid Background property to the newly created resource
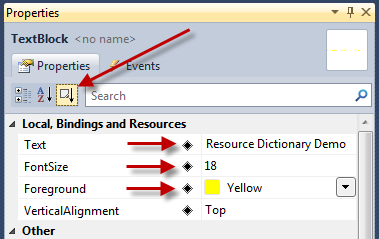
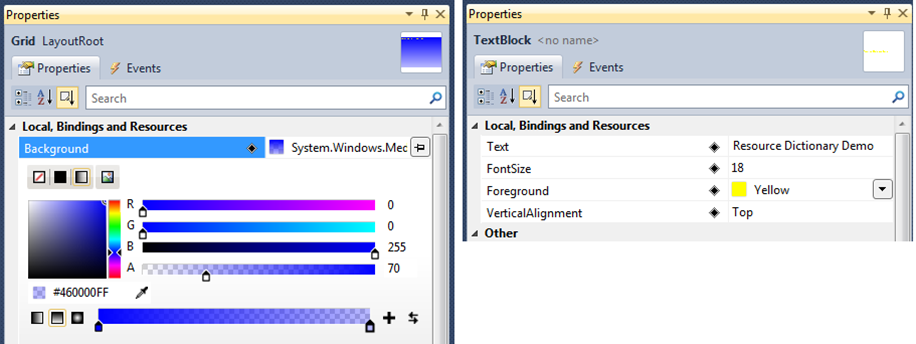
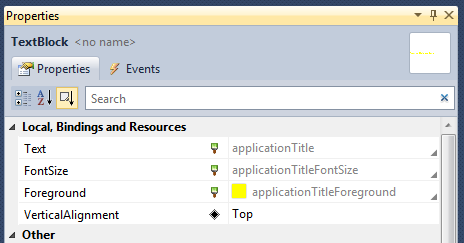
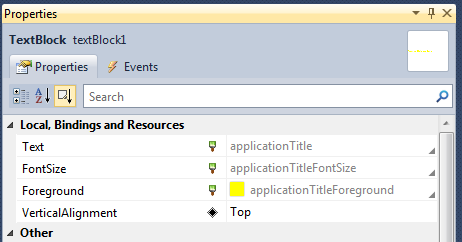
Extracting the TextBlock Properties to a Resource
To help us quickly locate the TextBlock properties that have been set, we will now use a very cool feature of the Designer's Properties Window, "Sort by property source."
Select the TextBlock on the design surface
Using the Properties Window, click the "Sort by property source" Button (top red arrow)
- This groups all properties together that have been changed from their default value by setting them locally, using a binding or a resource
Using the Extract to Resource feature, extract the properties indicated by the red arrows
- Text – applicationName
- FontSize – applicationNameFontSize
- Foreground - applicationNameForeground
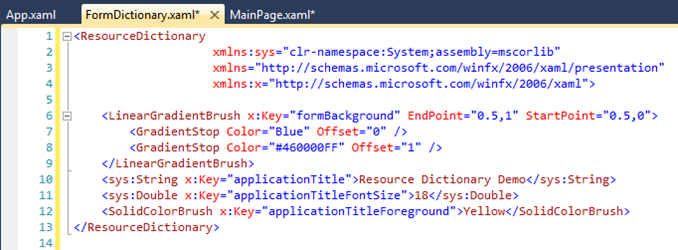
After extracting the above properties to resources, your XAML will look like the below image.
The required root Grid and application title TextBlock properties are now set for reuse.
Notice the yellow highlighted line of XAML. This alias was added by the Designer tool. When the Designer tool adds an alias, it names the first one, "my" the next alias, "my1", etc. For very small forms with a single alias this may be acceptable. However for most projects you'll want to use meaningful names for your aliases.
You have several options open to you to change these. First, if you define the alias in the XAML file before extracting to a resource, the Designer tool will reuse the alias when referencing the same namespace and assembly. You could also edit the XAML after the Designer tool creates it. After you have worked with WPF or Silverlight for a short time, you'll get an understanding of the aliases you use and can just add them to your new XAML files before you start adding other content to the XAML file.
Resources are Declared at Different Scopes
The below image is the anatomy of a simple WPF or Silverlight application that is composed of hierarchy of objects nested within each other.
Note |
Silverlight does not have system scoped resources like WPF does. |
When we say resources are scoped, we mean that resources can be defined at various levels of the application hierarchy. Resources defined at a certain scope are available to all elements in or below that scope.
For example, we previously extracted property values to the UserControl scope and the child Grid and TextBlock could access those resources.
Now, what if we wanted to consume those same resources we extracted earlier in another UserControl; how could we accomplish this?
To make the resources available, to other UserControls or Windows in the application, we need to move the resources to the Application scope.
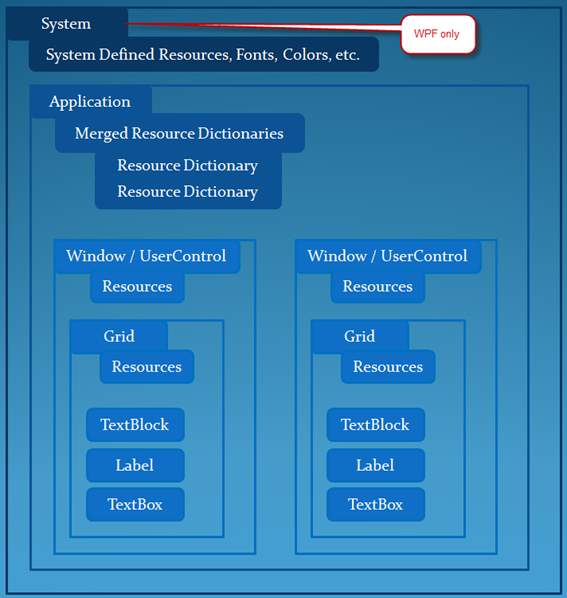
When moving resources to Application scope, you have several options available to you:
- Add the resources to the Application.xaml (VB), or App.xaml (C#) file
- Add the resources to a ResourceDictionary, then merge that ResourceDictionary at the Application scope
Moving Resources to Application Scope
For purposes of demonstration, I've cut the UserControl Resources and pasted them into the Application Resources section. Noticed I also cut and pasted the alias "my:" too.
You can also remove the UserControl.Resource from the UserControl's XAML as I have done the Demo.xaml image below.
You'll need to rebuild the application to remove the squiggles from your UserControl's XAML. The UserControl looks exactly as it did, but is now resolving its resources from the Application scope instead of the UserControl scope. We have just enabled reuse of these resources throughout the application. You can also see how Demo.xaml is smaller in size and looks cleaner now that we have moved the resources out of the local XAML file.
Application.xaml
 <Application
    xmlns="https://schemas.microsoft.com/winfx/2006/xaml/presentation"
    xmlns:x="https://schemas.microsoft.com/winfx/2006/xaml"
    x:Class="ResourceDictionaryDemo.App"
    xmlns:my="clr-namespace:System;assembly=mscorlib">
    <Application.Resources>
        <LinearGradientBrush x:Key="formBackground" EndPoint="0.5,1" StartPoint="0.5,0">
            <GradientStop Color="Blue" Offset="0" />
            <GradientStop Color="#460000FF" Offset="1" />
        </LinearGradientBrush>
        <my:String x:Key="applicationTitle">Resource Dictionary Demo</my:String>
        <my:Double x:Key="applicationTitleFontSize">18</my:Double>
        <SolidColorBrush x:Key="applicationTitleForeground">Yellow</SolidColorBrush>
    </Application.Resources>
</Application>
Demo.xaml
 <UserControl
    x:Class="ResourceDictionaryDemo.MainPage"
    xmlns="https://schemas.microsoft.com/winfx/2006/xaml/presentation"
    xmlns:x="https://schemas.microsoft.com/winfx/2006/xaml"
    xmlns:d="https://schemas.microsoft.com/expression/blend/2008"
    xmlns:mc="https://schemas.openxmlformats.org/markup-compatibility/2006"
    mc:Ignorable="d"
    d:DesignHeight="300" d:DesignWidth="400"
    xmlns:my="clr-namespace:System;assembly=mscorlib">

    <Grid x:Name="LayoutRoot" Background="{StaticResource formBackground}">
        <TextBlock
            Text="{StaticResource applicationTitle}"
            Foreground="{StaticResource applicationTitleForeground}"
            FontSize="{StaticResource applicationTitleFontSize}"
            VerticalAlignment="Top"/>
    </Grid>
</UserControl>
Show me how a ResourceDictionary Used
If your application only requires a few resources, locating them in the Application.xaml or App.xaml would be fine.
However, in most applications the number of resources grows quickly and must be managed early in the application lifecycle.
Resource dictionaries are used to group related resources, then those resource dictionaries are then merged at the Application or other required scope.
What we will do now is:
- Create a new Silverlight application
- Add a ResourceDictionary
- Merge the ResourceDictionary at Application scope
- Create the same UI as before
- Use the Designer tool to extract the resources to the ResourceDictionary instead of the UserControl or Application Resources section
- Last, we'll add another UserControl and then consume the resources in the ResourceDictionary.
Create a New Silverlight Application
- Create a new Silverlight application named, UsingResourceDictionaries
Add a ResourceDictionary
- Add a folder named Assets
- To the Assets folder, add a Silverlight Resource Dictionary named FormDictionary.xaml

Merge the ResourceDictionary at Application Scope
Open App.xaml
- Edit the XAML or copy and paste this XAML
- You have just merged the FormDictionary ResourceDictionary at Application scope
 <Application
    xmlns="https://schemas.microsoft.com/winfx/2006/xaml/presentation"
    xmlns:x="https://schemas.microsoft.com/winfx/2006/xaml"
    x:Class="UsingResourceDictionaries.App">
    <Application.Resources>
        <ResourceDictionary>
            <ResourceDictionary.MergedDictionaries>
                <ResourceDictionary Source="Assets/FormDictionary.xaml" />
            </ResourceDictionary.MergedDictionaries>
        </ResourceDictionary>
    </Application.Resources>
</Application>
Create the Same UI
Open MainPage.xaml
Select the root Grid
- Using the Properties Window, set the Background as before
Add a TextBlock to the Grid
- Right click on the TextBlock, select Reset Layout, All
- Using the Properties Window, set the four properties on the right
Extract Property Values to the Merged Resource Dictionary
Select the root Grid
Using the Properties Window:
- Click the Background property Property Marker
- Select Extract Value to Resource…
-
Using the Create Resource dialog:
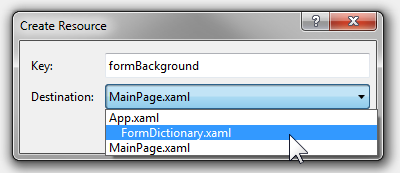
  - Change the Key name to formBackground
  -
    From the Destination Combobox, select FormDictionary.xaml


      - Notice how the ComboBox items are nested at each scope

  - Click OK to close the dialog
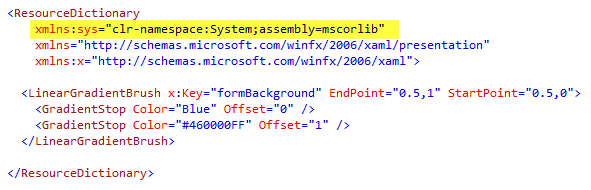
- Open FormDictionary.xaml
- You can see the formBackground LinearGradientBrush
Tip |
In the next step we will be extracting Double and String values to a resource. The Designer tool will add the "my" alias for the System namespace in mscorlib if an alias has not been added. To make your applications more readable and easier to maintain over time, you can proactively add meaningful aliases before they needed by the Designer as I have done in the yellow highlighted XAML below. |
Switch back to MainPage.xaml
Select the TextBlock
Using the Properties Window, extract the below three properties using the names indicated
- Remember to select the Destination after changing the Key name.
Your FormDictionary.xaml file should now look like the below image
Consume Resources in another UserControl
Add a new Silverlight UserControl to the project and name it, Consumer.xaml
Select the root Grid
Using the Properties Window:
- Click the Background property, Property Marker
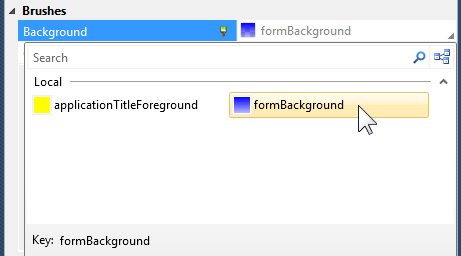
- Select Apply Resource…
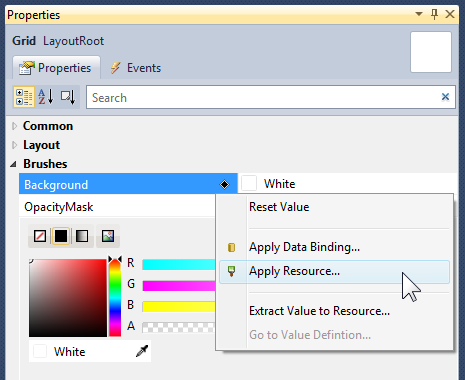
When the Apply Resource Popup opens, select the formBackground resource
Notice:
Brush resources provide a preview
The selected Key is displayed at the bottom
You can search for resources by entering search text in the Search Box
Only resources with the matching type of the property that are in scope are displayed
- If you don't see a resource you think should be here, ensure that the ResourceDictionary has been merged in correctly.
The Silverlight Apply Resource Popup does not list system values; this is only done in WPF.
Add a TextBlock to the Grid
- Right click on the TextBlock, select Reset Layout, All
Using the Properties Window, set the VerticalAlignment property to Top
Using the Properties Window, set the appropriate resource for the following properties
- Text
- Foreground
- FontSize
The TextBlock's properties should not be set like the below image
Take notice of how easy it was to have both application title TextBlock's consume the resources
Where to Go From Here
The next logical step from here is to learn how to combine individual resources values into a Style and then apply a single Style to a control.
This MSDN topic, WPF Styling and Templating provides a good starting point for understanding Styles.
Links
MSDN topic WPF Resources Overview
MSDN topic Silverlight Resource Dictionaries
Comments
Microsoft values your opinion about our products and documentation. In addition to your general feedback it is very helpful to understand:
- How the above features enable your workflow
- What is missing from the above features that would be helpful to you
Thank you for your feedback and have a great day,
Karl Shifflett
Expression Team