Animating XAML Clip Art
The Converting WMF images to XAML using Graphic Designer posting showed how you could easily convert WMF format files to XAML. The end result was the Skippy XAML file that we could view in XamlPad. In this posting, we'll explore how to create an animation effect that will put the bounce in Skippy. At the bottom of this posting, you can find an attached Zip file (Skippy.zip) that contains the following two XAML files:
Skippy.xaml
Skippy_bouncing.xaml
Step 1: Load the XAML file into XamlPad
Download the Skippy.zip file that is attached to the end of this posting. Extract the Skippy.xaml file and open it up in the Notepad application. Then, copy all the contents of the file to the clipboard. Next, open up the XamlPad application, select all the text in the XAML textbox, and paste in the new XAML content. You should see the following type of content below in XamlPad:
Step 2: Add a TransformGroup
A transform can be used with an element to create effects, such as scaling and motion. A ScaleTransform scales an element by ScaleX and ScaleY values. A TranslateTransform moves (translates) an element by X and Y values. In this case, we'll add both a ScaleTransform and a TranslateTransform to the Canvas element that contains the drawing of Skippy:
<
Canvas.RenderTransform>
<TransformGroup>
<ScaleTransform ScaleX="0.5" ScaleY="0.5"/>
<TranslateTransform x:Name="myTranslate"/>
</TransformGroup>
</Canvas.RenderTransform>
The RenderTransform property allows you to define transforms for the Canvas element. Since multiple transforms are defined, a TransformGroup is defined to contain the collection of transforms.
The ScaleTransform is used to reduce the size of Skippy by 50%. This means you do not need to modify any of the drawing elements that make up Skippy. By setting ScaleX and ScaleY to 0.5, the width and height of the canvas is halved. This transform is applied only once.
The TranslateTransform is used to provide motion to the drawing by modifying the X and Y values of the canvas. Since an animation can be associated with this type of transform, we only provide the x:Name value, so we can reference the transform in the animation definition.
Step 2: Add an EventTrigger
For an animation effect to be active, it needs to be associated with an EventTrigger, which describes what actions to take when a specified event occurs. Add the following XAML to the Canvas element:
<
Canvas.Triggers>
<EventTrigger RoutedEvent="FrameworkElement.Loaded">
<EventTrigger.Actions>
<!-- Storyboard TBD -->
</EventTrigger.Actions>
</EventTrigger>
</Canvas.Triggers>
The Trigger property allows you to define an EventTrigger for the canvas. The event that will be associated with the animation is FrameworkElement.Loaded, which is fired when the canvas has been laid out, rendered, and ready for interaction.
Step 3: Add a Storyboard
To apply an animation to an object, you first need to define a storyboard:
<
EventTrigger.Actions>
<BeginStoryboard>
<Storyboard>
<!-- Animations TBD -->
</Storyboard>
</BeginStoryboard>
</EventTrigger.Actions>
The BeginStoryboard object is a type of TriggerAction that applies and starts a Storyboard.
Step 4: Add a DoubleAnimation
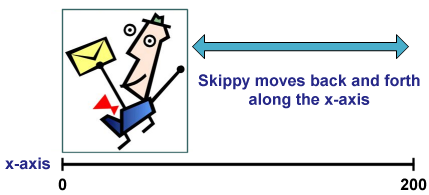
The X and Y values of the TranslateTransform are of type double. This means that an animation of type DoubleAnimation must be used to create a motion effect. We'll eventually create a series of animations to simulate Skippy bouncing around, but first we'll define a simple animation that moves Skippy along the x axis:
<
Storyboard>
<DoubleAnimation Storyboard.TargetName="myTranslate"
Storyboard.TargetProperty="X"
To="200"
Duration="0:0:10"
AutoReverse="True"
RepeatBehavior="Forever"/>
</Storyboard>
The DoubleAnimation object references the TranslateTransform that we named "myTranslate" by defining Storyboard.TargetName. Likewise, Storyboard.TargetProperty references the X value of the transform.
The To value determines how far on the x axis to move. The Duration value specifies the time length of the animation -- in this case, 10 seconds. The AutoReverse value states that the animation should reverse itself after the duration. Finally, the RepeatBehavior value states that the animation loops forever.
Step 5: Add a Key-Frame AnimationA key-frame animation allows you to define a set of values (key frames) for the animation, rather than just a starting and ending values. In addition, you can control the interpolation of values used by the animation. Interpolation refers to the intermediate frames that are automatically generated between two key frame values. We'll add a DoubleAnimationUsingKeyFrames object, that is comprised of three LinearDoubleKeyFrame objects:
<
Storyboard>
<DoubleAnimationUsingKeyFrames Duration="0:0:2"
Storyboard.TargetName="myTranslate"
Storyboard.TargetProperty="Y"
RepeatBehavior="Forever">
<LinearDoubleKeyFrame Value="-100" KeyTime="0:0:0"/>
<LinearDoubleKeyFrame Value="0" KeyTime="0:0:1.1"/>
<LinearDoubleKeyFrame Value="-100" KeyTime="0:0:1.2"/>
</DoubleAnimationUsingKeyFrames>
<
DoubleAnimation Storyboard.TargetName="myTranslate"
Storyboard.TargetProperty="X" To="200" Duration="0:0:10"
AutoReverse="True" RepeatBehavior="Forever"/>
</Storyboard>
The Duration value of the DoubleAnimationUsingKeyFrames object refers to the total length of time that the key frames represents. The object references the TranslateTransform that we named "myTranslate". Whereas the DoubleAnimation referenced the X value of the transform, this object references the Y value of the transform, causing Skippy to move along the y axis.
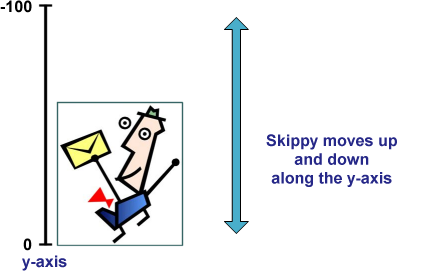
The LinearDoubleKeyFrame objects reference specific values of the Y value at specific times in the animation. The end result is that Skippy moves up and down at a constant rate of speed. So how can we get Skippy to move up and down in a more realistic way, like a true bouncing object?
Step 6: Add
Splined InterpolationThe way to add more realistic acceleration and deceleration effects to key frames is to create splined interpolation, which allows you to create a variable rate of change in a value based on a calculation. To complete the key-frame animation sequence, add two SplineDoubleKeyFrame objects, and remove the last LinearDoubleKeyFrame object:
<Storyboard>
<DoubleAnimationUsingKeyFrames Duration="0:0:2"
Storyboard.TargetName="myTranslate"
Storyboard.TargetProperty="Y"
RepeatBehavior="Forever">
<LinearDoubleKeyFrame Value="-100" KeyTime="0:0:0"/>
<SplineDoubleKeyFrame Value="0" KeyTime="0:0:1"
KeySpline="0, 0, 0.5, 0"/>
<LinearDoubleKeyFrame Value="0" KeyTime="0:0:1.1"/>
<SplineDoubleKeyFrame Value="-100" KeyTime="0:0:2"
KeySpline="0, 0, 0, 0.5"/>
</DoubleAnimationUsingKeyFrames>
<DoubleAnimation Storyboard.TargetName="myTranslate"
Storyboard.TargetProperty="X" To="200" Duration="0:0:10"
AutoReverse="True" RepeatBehavior="Forever"/>
</Storyboard>
The KeySpline values of the SplineDoubleKeyFrame objects define quadratic Bezier curves. The resulting curves specify how an animation is interpolated during a time segment; that is, the curve represents the rate of change in the animation's target attribute over the time segment.
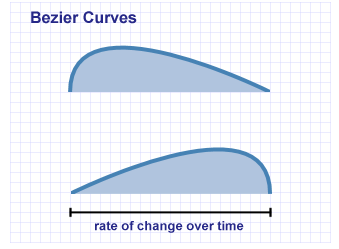
Once you have added all the key frames, notice how Skippy slows as he reaches the top of the bounce. Then, he starts falling at an increasingly faster rate on his descent. Yessss! Skippy has got that bounce!
Enjoy,
Lorin
About Us
We are the Windows Presentation Foundation SDK writers and editors.