Giving your XAML element an accessible name: Part 3 – Other interesting ways
1. Set the accessible name for an element from the accessible name of another element
Sometimes you want the accessible name of an element to always be the same as the accessible name of some other element. For example, the accessible name of a Slider bar might always want to be the accessible name of some nearby TextBlock. (By default the accessible name of a TextBlock is the same as the text shown visually on the TextBlock.) In that case, you can say that the Slider is "labeled by" the TextBlock.
In the following example, a Slider's accessible name is set from a TextBlock that lies near the Slider visually:
<Slider …
AutomationProperties.LabeledBy="{Binding ElementName=CheeseAllowance}"/>
<TextBlock …
Name="CheeseAllowance"
x:Uid="CheeseAllowanceLabel" />
Note that the LabeledBy binding only requires a Name rather than an x:Name.
I can then use Inspect to verify that the accessible name of the Slider has been set from the accessible name of the TextBlock.
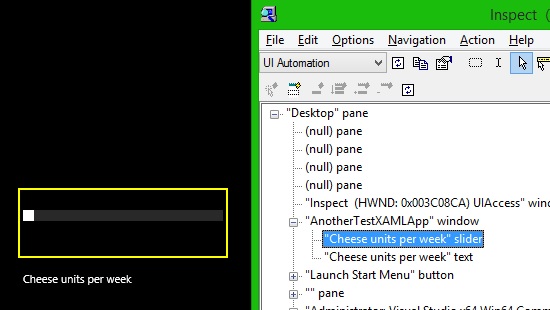
Figure 1: Inspect showing the accessible names of my Slider and TextBlock.
Note: It is not possible to set a LabeledBy property in a style such that it is bound to an element in a custom control’s style's ControlTemplate, in the manner attempted below.
<Style TargetType="customControls:CheeseButton">
…
<Setter Property="AutomationProperties.LabeledBy"
Value="{Binding ElementName=PlaceholderText}" /> <- THIS BINDING WILL NOT WORK!
<Setter Property="Template">
<Setter.Value>
<ControlTemplate TargetType="customControls:PlaceholderTextButton">
<Grid
Background="{ThemeResource ApplicationPageBackgroundThemeBrush}">
<Border ...
<Grid>
…
<TextBlock
x:Name="PlaceholderText"
Text="{TemplateBinding PlaceholderText}"
2. Set an accessible name on a list item
Depending on how you populate the data shown in your list items, you may find the accessible name of your list items is exactly the same as your C# class name used to manage the items. To expose that to your customer would make the list unusable.
The easiest way to avoid this is to return a useful accessible name for the list item by overriding the ToString() function of whatever class you've added for the list items. The following example shows the accessible name being set from a single view model property called "PlantName".
The following example shows the accessible name being set as a formatted string based on multiple view model properties:
public override string ToString()
{
return this.PlantName;
}
The following example shows the accessible name being set as a formatted string based on multiple view model properties:
public override string ToString()
{
return string.Format(
this.stringResources.PlantListItemAccessibleNameFormat,
this.Genus,
this.Name,
this.Colour);
}
3. Set an accessible name in code-behind
If for some reason it is not practical to set the accessible name on an element through XAML, then it can be done in code-behind. For example:
using Windows.UI.Xaml.Automation;
myControl.SetValue(AutomationProperties.NameProperty, <The desired localized accessible name>);
Similarly, the AutomationProperties.LabeledByProperty could be set in code-behind.
4. Use a custom AutomationPeer
A custom AutomationPeer can be used to customize an element’s accessible properties and behaviors in a way that goes beyond what’s possible through the AutomationProperties class. (I talk about XAML’s AutomationPeers at Does your XAML UI support the Patterns that your customer needs?)
It is not expected that a custom AutomationPeer is required solely to add a useful accessible name to an element. But if an element already uses a custom AutomationPeer, then that custom AutomationPeer can supply an accessible name by overriding the GetNameCore() function. The following example shows the custom AutomationPeer returning a feature-specific property called "AccessibleName" in a custom control associated with the AutomationPeer.
protected overridestring GetNameCore()
{
return this.owner.AccessibleName;
}
Other posts in this series:
Giving your XAML element an accessible name: Part 1 - Introduction
Giving your XAML element an accessible name: Part 2 – Set the AutomationProperties.Name