Custom UI Automation Providers in Depth: Part 6
In this part, we’ll add the Selection and SelectionItem Patterns to our sample custom control. Compared with all of the hard work of part 5, creating a fragment structure, this part is easy. So easy, in fact, that I’ll also use this post to talk about UI Automation Events and how to implement them on our custom control. This work completes the implementation for our custom control. The sample code for this section is here.
The Selection Pattern allows a control to express that it allows its children to be selected. We implemented Value Pattern already, which allows our control to express that is has a value. But a customer might also think of the tri-color control as having a selected item, since it looks much like a radio button selector. We can implement Selection Pattern to express that functionality. This will give our customers two different ways of interacting with this control, which is a nice way to be flexible. Selection Pattern is always paired with SelectionItem Pattern: the container implements Selection, and the selectable items implement SelectionItem.
First, we implement the ISelectionProvider interface on the TriColorProvider class. It has three methods. The first two are simple properties: Does this control support multiple selection? (no), and Does this control require a selection? (yes).
     public class TriColorProvider : BaseFragmentRootProvider, IValueProvider, ISelectionProvider
    {
        ...

        // This provider does not support multiple selection
        public bool CanSelectMultiple
        {
            get
            {
                return false;
            }
        }

        // This provider does require that there always be a selection
        public bool IsSelectionRequired
        {
            get
            {
                return true;
            }
        }
Next, we need to be able to retrieve the current selection as an array of IRawElementProviderSimple interfaces. Our selected item – there is only one – is simply the fragment that corresponds to the control’s current value:
         // Get the current selection as an array of providers
        public IRawElementProviderSimple[] GetSelection()
        {
            // Create the fragment for the current value
            TriColorFragmentProvider selectedFragment =
                new TriColorFragmentProvider(this.control, this, this.control.Value);

            // Return it as a single-element array
            return new IRawElementProviderSimple[1] { selectedFragment };
        }
Don’t forget to extend GetPatternProvider() to return a pointer to this object when asked for the Selection Pattern – simply implementing the interface is not enough.
The Selection Pattern work is done, but selectable items need to implement the SelectionItem Pattern. We’ll begin in a similar way: we implement ISelectionItemProvider on the TriColorFragmentProvider class and override GetPatternProvider to return it:
     public class TriColorFragmentProvider : BaseFragmentProvider, ISelectionItemProvider
    {
        ...

        public override object GetPatternProvider(int patternId)
        {
            if (patternId == SelectionItemPatternIdentifiers.Pattern.Id)
            {
                return this;
            }

            return base.GetPatternProvider(patternId);
        }
ISelectionItemProvider has 5 methods. The first one is Select(), which selects this item. In our sample, each fragment knows the color value that it represents, so selecting an item is equivalent to setting the fragment’s value to be the control’s value. The mirror-image property is IsSelected. In our case, a fragment is selected when its value matches the control’s value:
         // Select this item
        public void Select()
        {
            // Set the control's value to be the value of this fragment
            this.control.Value = this.value;
        }

        // Is this item selected?
        public bool IsSelected
        {
            get
            {
                // This item is selected iff the control's value is the fragment's value
                return this.control.Value == this.value;
            }
        }
The next two methods, AddToSelection() and RemoveFromSelection(), are not valid for a control that does not support multiple selection, so they just throw an exception. The last method returns the SelectionContainer – the provider that implements ISelectionProvider – which in this case is the fragment root.
         // Adding is not valid for a single-select control
        public void AddToSelection()
        {
            throw new InvalidOperationException();
        }

        // Removing is not valid for a single-select control
        public void RemoveFromSelection()
        {
            throw new InvalidOperationException();
        }

        // The selection container is simply our fragment root
        public IRawElementProviderSimple SelectionContainer
        {
            get
            {
                return this.fragmentRoot;
            }
        }
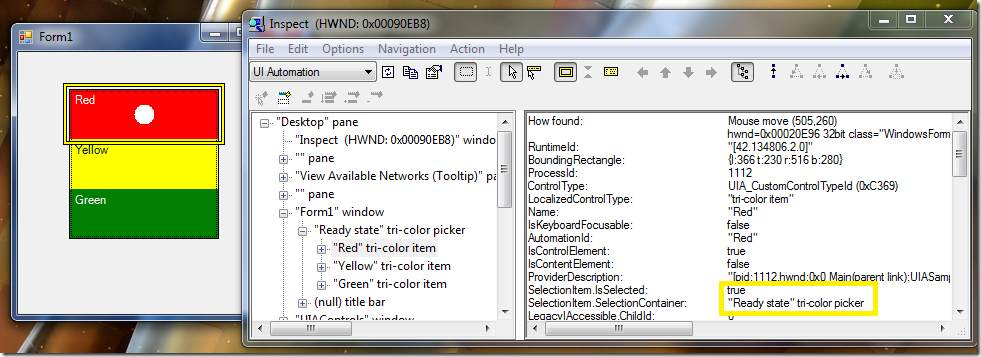
And that’s it. We’ve implemented ISelectionProvider, and with that, the whole Selection/SelectionItem pattern. If I recompile, build, and look at it with Inspect, I can see the new pattern:
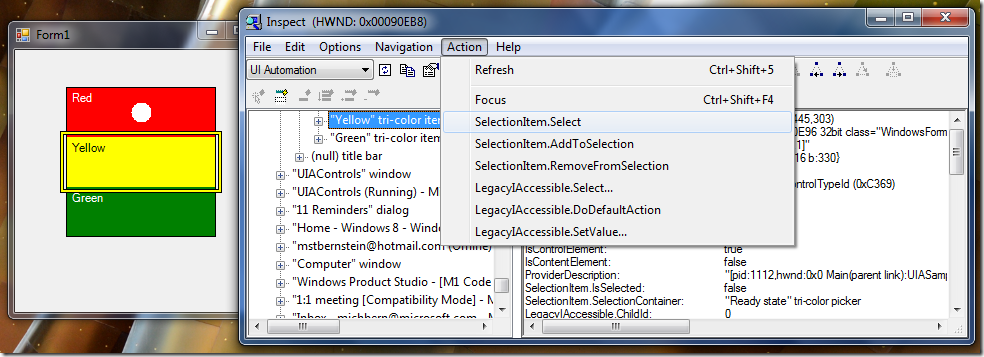
I can also use the Action menu in Inspect to try some of the methods. If I inspect the Yellow fragment, and go to the Action menu, I can see the Select() method being offered. If I choose it, the Yellow fragment will become selected.
Using the Select() method reminds me that I have one more bit of work to do before I can really be done. (Saying this guarantees that I will, of course, find more work later, but this is the last thing on my list at present.) I’ve done UIA Properties and UIA Patterns, but I haven’t done UIA Events.
UIA Events are a big topic. You might read this overview on MSDN for a high level introduction. I often think of Events as requiring two key decisions:
What events are appropriate for my control to fire?
For each UIA Pattern, there is a set of associated events that you should consider firing if appropriate. For each UIA Property, there is a property change event that you should fire if the property’s value changes. And there are structure-change events to fire if your fragment structure changes. For each provider, you should review your patterns and properties to determine what events to fire.
How do I fire the events?
This is an implementation decision. You call the methods UiaRaiseAutomationEvent, UiaRaiseAutomationPropertyChangedEvent, and UiaRaiseStructureChange events to fire the events. But you still need to decide where in your code it makes sense to fire the events; it is not always easy to know when a property has changed.
I’m not doing a comprehensive discussion of Events here, so I’ll stick to my simple questions. Our control needs to fire an ElementSelected event when an element is selected, and a PropertyChange event for Value when the value changes. For our simple control, both events are correlated to the control’s color value. The color value is changed in a single place, the Value setter, which makes it easy to fire events at the right time. I found it convenient to put the actual event firing code in TriColorProvider:
         // Raise appropriate events for the value changing
        public void RaiseEventsForNewValue(TriColorValue oldValue, TriColorValue newValue)
        {
            // Since we support Value pattern, raise a PropertyChanged(Value) event
            // Values are represented as strings.
            AutomationInteropProvider.RaiseAutomationPropertyChangedEvent(this,
                new AutomationPropertyChangedEventArgs(
                    ValuePatternIdentifiers.ValueProperty,
                    oldValue.ToString(),
                    newValue.ToString()));

            // Since we support Selection pattern, raise a SelectionChanged event.
            // Since a top-level AutomationEvent exists for this event, we raise it,
            // rather than raising PropertyChanged(Selection)
            AutomationInteropProvider.RaiseAutomationEvent(
                SelectionItemPatternIdentifiers.ElementSelectedEvent,
                this,
                new AutomationEventArgs(
                    SelectionItemPatternIdentifiers.ElementSelectedEvent));
        }
And then I just added a single line to the Value setter on the TriColorControl itself:
         public TriColorValue Value
        {
            ...


            set
            {
                if (this.value != value)
                {
                    TriColorValue oldValue = this.value;
                    this.value = value;
                    this.Invalidate();

                    this.Provider.RaiseEventsForNewValue(oldValue, value);
                }
            }
        }
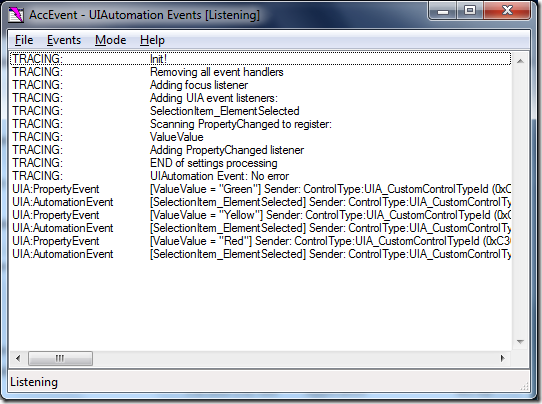
The tool for event testing is AccEvent, also included in the Windows SDK. This is not the place for an AccEvent tutorial, but if I set it up to listen to UI Automation events, select the events I implemented, start listening, and change the control’s value, here’s what I see:
For each change, there is a Value change event with the string change and an ElementSelected event for the selection change, as we expected.
And with that, we’re finished with this code. We created a provider, a fragment tree, several properties, several patterns, and a set of events. We’ve also created a set of base classes that should make our job easier if we need to create another provider.


