Creating a great tile experience (part 2)
In part 1 of this post, we learned how to design tile updates and choose the templates to match the content you want to show on your live tile. We got the app set up with a wide default tile and now we’re ready to start updating our tiles. Now, we dive straight into the code. First, we’ll see how to set up polling on our Contoso Food Trucks app tile, including what our web service code looks like. Then we add a secondary tile to the app and update it using the NotificationsExtension library provided in the Windows 8 SDK App tiles and badges sample. Let’s get right to it!
Choosing delivery method for a notification
Now that I know what I want the tiles to look like (see part 1 for a refresher) I need to figure out when to update them.
There are 4 ways that an app can update its tile (see Choosing a notification delivery method in the Dev Center). Apps can use local notifications to update their tile, which is useful if info changes while the app is running. Apps can schedule tile and toast updates to happen at precise times. Also, apps can use push or polling tile notifications to update their tiles from the cloud while they are not running. Polling is great for low-frequency broadcast content. Push is great for sending toast notifications, which need to arrive immediately, or tile updates that are targeted to individual users. In this post, I focus on polling updates and local updates.
Polling for nearby food trucks
Our app has two different kinds of info to update the tile with. The most important is the food trucks near the default lunch location of a user. Users set their default location for lunch inside the app when it runs. I use that default location info to update the tile and let the user know about food trucks near that location. The images here show the tiles for the app from part 1 of the post. Now let’s look at how to use polling to get these tiles to show up on our app’s tile.
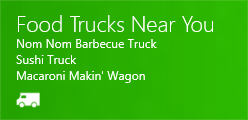

Food trucks typically stay in one place for the entire day, or at least during the lunch hours. Because the locations of the food trucks don’t change often, I don’t need to update the tile in real time. Because of this, I can rule out push notifications, which are more useful for time-sensitive notifications. But I want this data to update at least once a day, so using periodic notifications that poll my web service for changes is my best option.
Client implementation: polling for nearby food trucks
The client-side implementation to set up periodic notifications takes just a few lines of code. We call TileUpdater.startPeriodicUpdate each time a user launches the app or switches to it. This causes the URI passed to the API to be polled immediately and the tile to be updated at each app launch or switch. This is because the API call immediately reaches out to the cloud service URI and updates the tile. This behavior is very useful for debugging – we can test the polling of our cloud service without waiting for the next polling interval.
The real question is what URI to provide to the startPeriodicUpdate API. In our case, I want to tell our cloud service to update the tile with info about a specific location. To protect the user’s location info, I don’t want to send out the exact location of the user to our service. Instead, I identify locations by the zip code that user provides within the app.
To pass the zip code up to my web service, I attach a query string on the end of the polling URI to let our cloud service know which location to put on the tile:
https://www.contoso.com/foodtrucks/tile.xml?zipcode=98052
In response to an HTTP GET of this URI, our web service returns the formatted tile notification XML for the zip code provided on the URI. Here’s the code to set up the polling, with the zip code hardcoded into the URI string.
JavaScript:
 // update the tile poll URI
var notifications = Windows.UI.Notifications;
var polledUri = new Windows.Foundation.Uri("https://www.contoso.com/foodtrucks/tile.xml?zipcode=98052");
var recurrence = notifications.PeriodicUpdateRecurrence.hour;
var tileUpdater = notifications.TileUpdateManager.createTileUpdaterForApplication();
tileUpdater.startPeriodicUpdate(polledUri, recurrence);
C#:
 // update the tile poll URI
using Windows.UI.Notifications;
Uri polledUri = new Uri("https://www.contoso.com/foodtrucks/tile.xml?zipcode=98052");
PeriodicUpdateRecurrence recurrence = PeriodicUpdateRecurrence.Hour;
TileUpdateManager.CreateTileUpdaterForApplication().StartPeriodicUpdate(polledUri, recurrence);
Because a food truck can move during the day, I want to update the tile fairly frequently. In our case, I use an update interval of one hour to balance between load on our backend service and freshness of the info on the tile.
After I call the startPeriodicUpdate API once, the tile continues to update once an hour, even if our app is not running. If I ever want to change the URI to poll, I just have to call the API again with a different URI. For example, if the user changes their default location to a different zip code, I update the URI with the correct zip code by calling startPeriodicUpdate again. If the user ever clears their default location, or wants to stop tile updates, the app can stop periodic updates by calling stopPeriodicUpdate API.
For more info about how to use the startPeriodicUpdate API see Push and periodic notifications client-side sample, and How to set up periodic notifications for tiles in the Dev Center.
Server implementation: polling for nearby food trucks
We can implement the server side of our polled tile in nearly any service technology. Here I show some example PHP and ASP.NET code.
When our web service is polled, it must respond to the HTTP GET request with XML that fits the tile XML schema. You can also use HTTPS so that the web service can protect the content as it’s sent over the wire. Cookies are not supported. All info that your service needs to respond to the request must be included as part of the URI. For that reason, our app uses query strings to pass the zip code.
In the PHP code we look at next, I abstract away the access of our web service’s database. In real working code, the trucks variable returned by get_trucks_from_database() function would contain all of the info the web service needs to fill the tile template for a specified zip code. I simplified this service example code a bit, to focus on the XML the service will return. A real world web service deployment would consider performance, scalability, security, and a more maintainable architecture.
PHP:
 <?php

//
// set default query string parameters
// process query string and set parameters
//
if($_GET['zipcode']){
  $zipcode = $_GET['zipcode'];
}
else{
  $zipcode = 'default';
}

//
// get item info from our database
// - this is placeholder code that you need to replace in a real implementation
// - the return value is a multidimensional array of the long and short strings
//   to place in the tile template
//
$trucks = get_trucks_from_database($zipcode);

?>
<?php echo '<?xml version="1.0" encoding="utf-8" ?>'?>
<tile>
  <visual>
    <binding template="TileWideText01">
      <text id="1">Food Trucks Near You</text>
      <text id="2"><?php echo $trucks[0][0]?></text>
      <text id="3"><?php echo $trucks[0][1]?></text>
      <text id="4"><?php echo $trucks[0][2]?></text>
    </binding>
    <binding template="TileSquareText03">
      <text id="1">Near You</text>
      <text id="2"><?php echo $trucks[1][0]?></text>
      <text id="3"><?php echo $trucks[1][1]?></text>
    </binding>
  </visual>
</tile>
The next code example is equivalent to the PHP code we just looked at. This ASP.NET Web Pages example shows a quick implementation of a tile service. For a full featured ASP.NET service, you would probably want to use the new ASP.NET Web API. ASP.NET Web API is built specifically for HTTP services like this. For more information about ASP.NET Web API, see https://www.asp.net/web-api.
ASP.NET:
 @{
  //
  // set default query string parameters
  // process query string and set parameters
  //
  var zipcode = Request["zipcode"] ?? "default";
  //
  // get item info from our database
  // - this is placeholder code that you need to replace in a real implementation
  // - the return value is a multidimensional array of the long and short strings
  // to place in the tile template
  var trucks = get_trucks_from_database(zipcode);

}<?xml version="1.0" encoding="utf-8" ?>'?>
<tile>
  <visual>
    <binding template="TileWideText01">
      <text id="1">Food Trucks Near You</text>
      <text id="2">@trucks[0,0]</text>
      <text id="2">@trucks[0,1]</text>
    </binding>
    <binding template="TileSquareText03">
      <text id="1">Near You</text>
      <text id="2">@trucks[1,0]</text>
      <text id="2">@trucks[1,1]</text>
    </binding>
  </visual>
</tile>
Favorite food trucks
Until now we looked at the content the app shows on the main tile. But sometimes a user would want to have a tile on their Start screen to track a specific food truck. In our app, I use the app bar to allow the user to pin a specific food truck to Start. These pinned tiles are called secondary tiles. After a user pins a secondary tile, we update that tile with info about that particular food truck by sending notifications to that tile.
Pinning a food truck tile
Pinning tiles allows our app to give a user direct access to specific content in our app from the Start screen. Secondary tiles can be used to launch our app directly into the part of the app that deals with the food truck that a user pinned.
Pinned tiles can be created only from within an app. Users expect to be able to pin tiles by invoking the app bar. The app bar includes a standard a push-pin icon to indicate that users can pin the content in view.
When the user taps the pin button, a flyout appears, showing a preview of the tile about to be pinned:
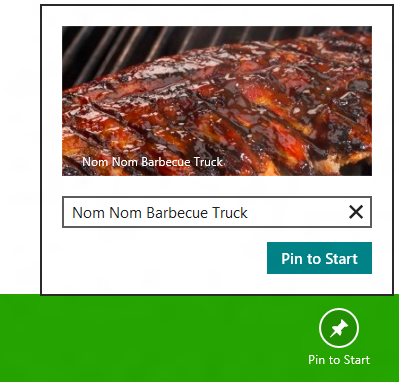
Now we need to:
- Add an app bar to the app, including the pin icon for the “Pin to Start” and “Unpin from Start” actions
- Implement an event handler to the click of the app bar pin/unpin button
- Add the app-specific logic to pin the new tile in response to the pin/unpin action
We won’t look at the first two steps for creating the app bar so we can focus on pinning the tiles themselves. You can find the details of how to implement the app bar here:
In step 3, our app creates the secondary tile by setting a few properties.
JavaScript:
 // Keep track of your secondary tiles with a unique ID
var nomNomTile = "SecondaryTile.NomNom";

// Set properties on the tile
var logo = new Windows.Foundation.Uri("ms-appx:///images/NomNomTruck-Logo.png");
var smallLogo = new Windows.Foundation.Uri("ms-appx:///images/NomNomTruck-SmallLogo.png");
var wideLogo = new Windows.Foundation.Uri("ms-appx:///images/NomNomTruck-WideLogo.png");
var TileActivationArguments = "TruckName=NomNom";

// Create the secondary tile
var tile = new Windows.UI.StartScreen.SecondaryTile(nomNomTile,
                                                    "Nom Nom",
                                                    "Nom Nom Barbecue Truck",
                                                    TileActivationArguments,
                                                    Windows.UI.StartScreen.TileOptions.sh
owNameOnWideLogo,
                                                    logo,
                                                    wideLogo);

tile.foregroundText = Windows.UI.StartScreen.ForegroundText.light;
tile.smallLogo = smallLogo;

// Request the user’s permission to create the secondary tile
// - we return the promise here, assuming that this code is embedded
//   in a larger function.
//   See the Windows 8 SDK Secondary Tiles sample for more info:
//   https://code.msdn.microsoft.com/windowsapps/Secondary-Tiles-Sample-edf2a178
return new WinJS.Promise(function (complete, error, progress) {
  tile.requestCreateAsync().then(function (isCreated) {
    if (isCreated) {
      complete(true);
    } else {
      complete(false);
    }
  });
});
C#:
 // Keep track of your secondary tiles with a unique ID
const string nomNomTile = "SecondaryTile.NomNom";

// Set properties on the tile
Uri logo = new Uri("ms-appx:///images/NomNomTruck-Logo.png");
Uri smallLogo = new Uri("ms-appx:///images/NomNomTruck-SmallLogo.png");
Uri wideLogo = new Uri("ms-appx:///images/NomNomTruck-WideLogo.png");
string tileActivationArguments = "TruckName=NomNom";

// Create the secondary tile object
SecondaryTile secondaryTile = new SecondaryTile(nomNomTile,
                                                "Nom Nom",
                                                "Nom Nom Barbecue Truck",
                                                tileActivationArguments,
                                                Windows.UI.StartScreen.TileOptions.ShowNa
meOnWideLogo,
                                                logo,
                                                wideLogo);

secondaryTile.ForegroundText = Windows.UI.StartScreen.ForegroundText.Light;
secondaryTile.SmallLogo = smallLogo;

// Request the user’s permission to create the secondary tile
// - this code assumes that this code was called within an event handler which has
//   a ‘sender’ parameter.
//   See the Windows 8 SDK Secondary Tiles sample for more info:
//   https://code.msdn.microsoft.com/windowsapps/Secondary-Tiles-Sample-edf2a178
await secondaryTile.RequestCreateForSelectionAsync(MainPage.GetElementRect((FrameworkElement)se
nder), Windows.UI.Popups.Placement.Right);
For more info on how to pin secondary tiles, see Guidelines and checklist for secondary tiles and Secondary tiles Consumer Preview sample.
Using local notifications to update the pinned tile
The pinned tile is an additional tile for our app to update on Start. Updating this tile is no different than updating the app’s main tile. In this app I use the local notification APIs to update the secondary tiles while the app is running, instead of using one of the cloud update mechanisms. I show local notifications here so that I can demonstrate how it works. You can update from the cloud in a similar way. This app could have easily implemented polling scenario too.
In the code in this section, I use the NotificationsExtensions library which is included with the Windows 8 SDK App tiles and badges sample. You can include this library in your app projects to make updating tiles locally easier. The library provides an object model on top of the Windows tile-update APIs which allows you to avoid manipulating XML from within your JavaScript, C#, and C++ apps. It also makes developing easier by providing IntelliSense.
Using the local notification APIs, I can update the tile any time the app is running. For the pinned food truck tiles, I want to update the tile with any deals the particular food truck offers, every time a user launches the app.
Enumerating secondary tiles
Because a user can unpin secondary tiles from Start while our app is not running, the first thing the app needs to do at launch is look for its currently pinned secondary tiles. Each enumerated tile contains a tileId,which uniquely identifies it. Because the app sets the tileId when it is created, we can use the ID to know how to update each tile we find. Here’s how:
JavaScript:
 // Get secondary tile ids
Windows.UI.StartScreen.SecondaryTile.findAllAsync().done(function (tiles) {
  if (tiles) {
    tiles.forEach(function (tile) {
      switch (tile.tileId) {
        case nomNomTile:
          updateNomNomTruck();
          break;
        // add cases for all the food trucks this app supports
        default:
          break;
      }
    });
  }
});
C#:
 // Get secondary tile ids
IReadOnlyList<SecondaryTile> tilelist = await
Windows.UI.StartScreen.SecondaryTile.FindAllAsync();

foreach (var tile in tilelist)
{
  switch (tile.TileId)
  {
    case nomNomTile:
      updateNomNomTruck();
      break;
    // add cases for all the food trucks this app supports
    default:
      break;
  }
}
Local updates
For each of the pinned food truck tiles, I update the tile with the current info about where that truck is for the day. If I was using local updates to update the main tile, we wouldn’t need to enumerate the secondary tiles first because the default action in the API is to update the calling app’s main tile. Just to remind you, here is what the tiles from the app we looked at in Part 1 look like.
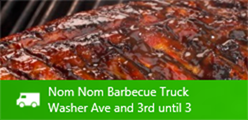
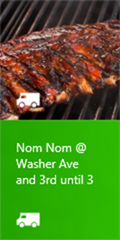
Here is the function that we called in our enumeration, which actually sends the notification to the secondary tile.
JavaScript:
 function updateNomNomTruck() {
  // Business logic for retrieving Nom Nom BBQ truck deals
  // ...
  var result = "Washer Ave and 3rd until 3";

  // We can send a notification only for a tile that is pinned.
  // Lets make sure the tile is pinned before we try to send the notification.
  if (Windows.UI.StartScreen.SecondaryTile.exists(nomNomTile)) {

    // Construct the wide template
    var wideTile =
NotificationsExtensions.TileContent.TileContentFactory.createTileWideImageAndText02();
    wideTile.image.src = "https://www.contoso.com/foodtrucks/nomnombbq.png";
    wideTile.textCaption1.text = "Nom Nom Barbecue Truck";
    wideTile.textCaption2.text = result;

    // Construct the square template
    var squareTile =
NotificationsExtensions.TileContent.TileContentFactory.createTileSquarePeekImageAndText04
();
    squareTile.image.src = "https://www.contoso.com/foodtrucks/nomnombbq.png";
    squareTile.textBodyWrap.text = "Nom Nom @ " + result;

    // Attach the square template to the notification
    wideTile.squareContent = squareTile;

    // send the notification to the secondary tile
    Windows.UI.Notifications.TileUpdateManager.createTileUpdaterForSecondaryTile(nomNomTi
le).update(wideTile.createNotification());
  }
}
C#:
 private void updateNomNomTruck()
{
  // Business logic for retrieving Nom Nom BBQ truck deals
  // ...
  string result = "Washer Ave and 3rd until 3";

  // We can send a notification only for a tile that is pinned.
  // Lets make sure the tile is pinned before we try to send the notification.
  if (Windows.UI.StartScreen.SecondaryTile.Exists(nomNomTile))
  {

    // Construct the wide template
    NotificationsExtensions.TileContent.ITileWideImageAndText02 wideTile =
NotificationsExtensions.TileContent.TileContentFactory.CreateTileWideImageAndText02();
    wideTile.Image.Src = "https://www.contoso.com/foodtrucks/nomnombbq.png";
    wideTile.TextCaption1.Text = "Nom Nom Barbecue Truck";
    wideTile.TextCaption2.Text = result;

    // Construct the square template
    NotificationsExtensions.TileContent.ITileSquarePeekImageAndText04 squareTile =
NotificationsExtensions.TileContent.TileContentFactory.CreateTileSquarePeekImageAndText04();
    squareTile.Image.Src = "https://www.contoso.com/foodtrucks/nomnombbq.png";
    squareTile.TextBodyWrap.Text = "Nom Nom @ " + result;

    // Attach the square template to the notification
    wideTile.SquareContent = squareTile;

    // Send the notification to the secondary tile
    Windows.UI.Notifications.TileUpdateManager.CreateTileUpdaterForSecondaryTile(nomNomTi
le).Update(wideTile.CreateNotification());
  }
}
Because I use the NotificationsExtensions library, I don’t have to manipulate XML in my local code. Instead, I use the object model that is provided by the NotificationsExtensions, which allows me to use IntelliSense to discover the different properties of each notification template.
The XML for the tile update looks like this:
 <?xml version="1.0" encoding="utf-8" ?>
<tile>
  <visual>
    <binding template="TileWideImageAndText02">
      <image id="1" src="https://www.contoso.com/foodtrucks/nomnombbq.png"/>
      <text id="1">Nom Nom Barbecue Truck</text>
      <text id="1">Washer Ave and 3rd until 3</text>
    </binding>
    <binding template="TileSquarePeekImageAndText04">
      <image id="1" src=" https://www.contoso.com/foodtrucks/nomnombbq-square.png"/>
      <text id="1">Nom Nom @ Washer Ave and 3rd until 3</text>
    </binding>
  </visual>
</tile>
If you use the NotificationsExtensions library, you can use IntelliSense to discover properties on the tile templates which makes developing local tile updates much faster. I hope you find the NotificationsExtensions helpful in your JavaScript, C#, and C++ projects.
Conclusion
When users see fun and interesting things on their tiles, they will be more likely to launch your app to learn more about it. I hope this post has helped to inspire you to think about how you can add a live tile and show off the best of your apps. If you are interested in learning more about notifications, see the Tile and notification overview and Choosing a notification delivery method in the Dev Center.
-- Kevin Michael Woley, Program Manager, Windows
This post was a group effort. Thanks go out to Tyler Donahue, Daniel Oliver, and Jon Galloway for their contributions.