Adding “Storage Spaces” in Windows Embedded 8 Standard - Part 2
Posted By J.T. Kimbell
Program Manager
Today, Bowei Xu brings us part two of his blog on Windows 8’s new Storage Spaces feature.
In the example below, I will show you how to create a Parity Virtual Disk out of a Storage Pool that has four physical disks, one of which is used as a “Hot Spare” disk. The hot-spare disk will come online automatically (it took about 5 to 8 minutes in my test below) in the event of a disk failure happening elsewhere in the pool. This allows for rapid recovery from disk failure, ensuring all data is protected as appropriate. “Repair-VirtualDisk” cmdlet can also be used to trigger the repair process immediately. I show both in the example below.
You can use PowerShell to build a “Hot Spare” disk on a Windows 8-based c system such as Windows Embedded 8 Standard. The UI for creating a “Hot-Spare” disk is also available on Windows Server 2012.
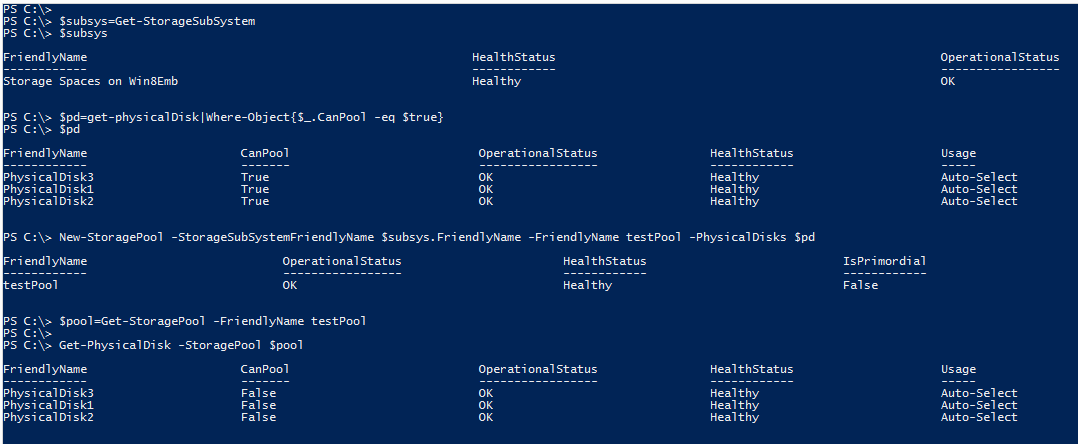
Initially, the system has three physical disks that can be used in a Storage Pool --the "CanPool" property is “True.” With these three physical disks, I created a pool named "testPool." The last cmdlet below shows the three physical disks are in the newly created pool.
Then, I added another physical disk to the system. When I queried for physical disks, you will see that "physicalDisk4" has been added and can be pooled. I added this disk as "Hot Spare" disk. Note the "Hot Spare" property for physicalDisk4 when I queried for the physical disks in the pool.
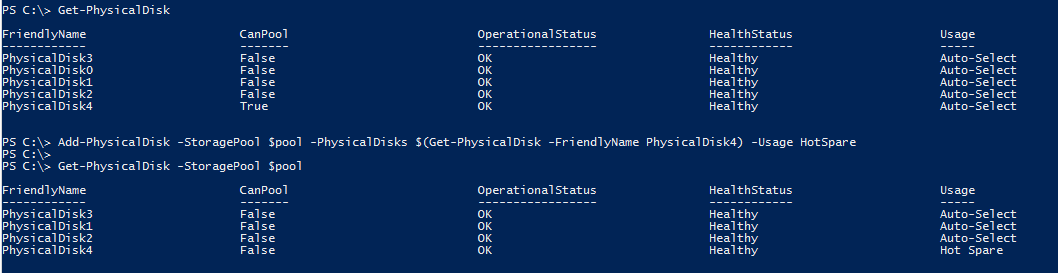
Now, the pool "testPool" consists of four physical disks; one of them is a "Hot Spare" disk.
Next, I will create a "parity" Virtual Disk (name it “testVirtualDisk”) out of this pool using the following cmdlet:

After the Virtual Disk is created, I initialize the disk that mapped to the Virtual Disk (testVirtualDisk) I just created, create a partition and format it with NTFS file system. You can do this either through PowerShell cmdlets or Disk Management tool.
Then, I copied some files to that disk.
Now I am about to remove a physical disk while the system is still running! Before I do that, I will query the physical disks consumed by the Virtual Disk:

You can see that all three disks in the pool that are not a “Hot Spare” disk have been used. The “HealthStatus” is Healthy and the “OperationalStatus” is OK.
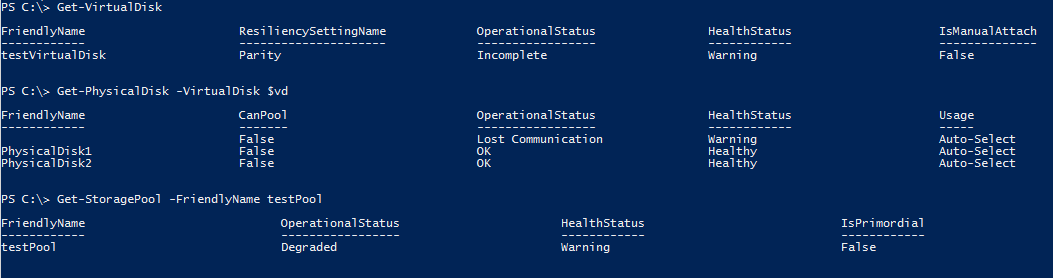
Then I removed a disk. Note: Don’t mistakenly remove the “Hot Spare” disk!
After the disk is removed, check the status of the Virtual Disk; the “OperationalStatus” changed to Incomplete (it changed to Degraded later). The “HealthStatus” changed to Warning.
Then, list the Physical Disks used by the Virtual Disk, and you will see the removed disk is marked as “Lost Communication.” The pool changed to “Degraded” state, too.
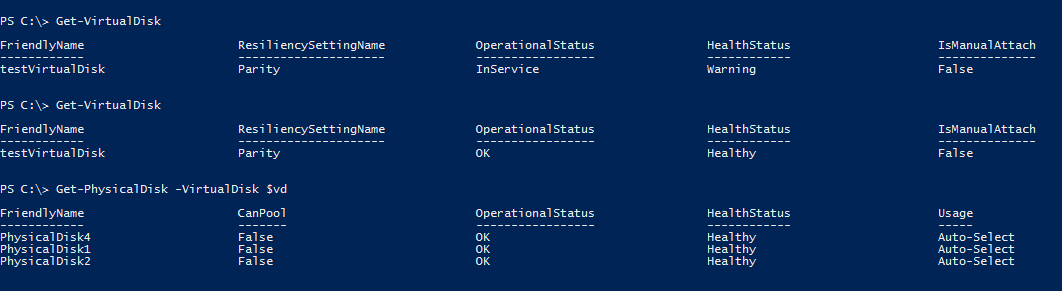
After waiting about 5--8 minutes without doing anything, I noticed the light of the hard drive is blinking. Check the Virtual Disk again, and you will see the “OperationalStatus” has changed to InService. After a while, (depending on how much of the content needs to be rebuilt), the “OperationalStatus” changes to OK again!!
Check the physical disks used by the virtual Disk; you will see the “Hot spare” disk “PhysicalDisk4” has replaced the removed disk!
If you don’t want to wait until the automatic repair kicks in, you can use “Repair-VirtualDisk” to trigger the repair process:

You can see that after I ran “Repair-VirtualDisk,” the virtual Disk’s “OperationalStatus” changed to InService--the repair is in action.
In both cases, the Virtual Disk has been repaired:
