Windows Embedded Compact Platform Builder
Posted By David Campbell
Program Manager
In a previous post, I discussed the Windows Embedded Compact 2013 announcement and a number of great new features in the OS and tools. With those posts, I received a number of questions about the tools. As you all know, Windows Embedded Platform builder (PB) is a plug in to Visual Studio. For Windows Embedded Compact 7 , our Platform Builder plug in and tools were hosted by Visual Studio 2008, while Platform Builder in Windows Embedded Compact 2013 will be hosted in Visual Studio 2012. A number of people asked whether PB from Windows Embedded Compact 7 could be hosted in Visual Studio 2012, or alternatively whether PB from Windows Embedded Compact 2013 can target Windows Embedded Compact 7. Unfortunately, the answer to that is no. There had to be significant changes to both Windows Embedded Compact 2013, including PB, as well as Visual Studio 2012 to support the latest versions of each. The hosting has changed, and more importantly, the compilers and ABI (Application Binary Interface) to the ARM chipset has changed and are incompatible with each other. Even though each version of Windows Embedded Compact 7 can target the same chipset in this case, the compilers from each cannot support the other. More information will be posted on this in a future article.
While the Windows Embedded Compact 2013 announcement is certainly exciting, we want to continue posting great information on Windows Embedded Compact 7 as well. To that end, we have another great in-depth article from Doug Boling to share.
Optimizing Platform Builder in Windows Embedded Compact 7
Microsoft Platform Builder is a tool that anyone who ports Windows Embedded Compact will live in throughout the project. (PB is also used when creating new device images from scratch. This information certainly applies to that scenario as well.) Given the time spent in this tool, it’s critical that your development machine be properly configured to maximize the performance of the tool and by implication your performance.
First, one basic issue: Unfortunately, various versions of Platform Builder can’t be installed on the same instance of Windows. So, you can’t install PB7 for Windows Embedded Compact on the same system where you’ve installed PB 6 for Windows Embedded CE 6. The second installation not only corrupts the first install, but changes things so much that the only solution is to reinstall Windows. This also applies to PB5 for Windows CE 5.0, as well as the various adaptation kits necessary for Windows Mobile and Windows Embedded Handheld development systems.
To work around the incompatibilities, developers use Virtual PC to create separate virtual machines each with its own install of Platform Builder. VPC has its own set of requirements, such as the need to install a copy of Windows and Visual Studio as well as Platform Builder. VPC also requires a large amount of RAM and huge amounts of disk space.
Tuning your PC
The first question to answer when setting up your PC for Platform Builder is to decide if you want to install the 32 bit version of Windows (Win32) or the 64 bit version (Win64). Win32 is smaller and is the only version supported by Platform Builder 6 used for Windows Embedded CE 6. However, Win32 supports a maximum of 4 GB of RAM. This is plenty of RAM for a build, but it can be constraining if you want to run more than a single medium sized Virtual machine.
Win64, while not supported for CE 6, is probably better if you plan on running a number of VMs on your PC since it supports large amounts of RAM. Each VM needs as much physical RAM free as the virtual RAM configured for that VM. So, if you want to run a VM with 1.5 GB of configured RAM, you’ll need 1.5 GB of RAM free on your PC when the VM starts.
If you want to use PB 6 on a Win64 system, the supported solution is to install it in a VM. While I have run PB 6 on a Win64 system directly, there are some incompatibilities with the tools. In addition, you can’t compile the CEPC bldr bootloader under Win64, because the build process requires a debug.exe script that won’t run on a Win64 system.
I personally run the Win64 version of Windows 7 on my PC. I have 8 GB of RAM, which allows me to run a couple of VMs at the same time while keeping enough RAM around for all my standard apps that run natively on the PC. I installed PB 7 natively on Win64 and have a number of virtual machines configured to run installs of PB 6, PB 5 and various Adaption Kits.
Build Speed
When tuning your PC for build speed, the most important consideration is disk performance. The PB build process is very “disk bound.” That is, the speed of the build is directly related to the performance of your disk. Increasing the speed of the CPU or increasing the RAM available above around 1.4 GB won’t improve the build speed that much.
Of course the easiest way to increase the speed of a disk bound task is to increase the speed of the disk. Avoid slower 5400 RPM drives. At a minimum, get a disk that spins at 7200 RPM, if not faster. If you can, either a RAID array of disks or a Solid State disk is much better. The problem with the RAID array is that it can be expensive and is has a higher failure rate than a single disk. (Yes, I know some versions of RAID have a much lower failure rate but we need speed here, not better reliability.) The simple answer is to setup a RAID array and then regularly back it up.
The cost problem can also be applied to the SSD but the SSD has the additional problem of being somewhat small. We want a large disk to allow multiple copies of the built tree on the disk. However, if you can afford a large SSD, and the prices are coming down, by all means go that route.
There are other ways to improve build speed other than simply changing your hard disk. First, the build process creates a large number of temporary files. The default location for the TEMP directory in Windows is deep within the user directory tree. This is secure, since the User tree is securely protected with ACL-based locks. However, if you are the only one who logs into your machine, there really isn’t a need for this security. Since it’s faster for Windows to access a non-locked directory than an ACL-locked directory, moving the TEMP folder to somewhere unlocked, like off the root of the C:\ drive will speed up builds.
A better solution for Win32 installs is to use a RAM disk. RAM disks were popular in days gone by to speed access to frequently accessed files. This fits the bill perfectly for files in the TEMP directory. A great (and free) RAM disk driver is the Gavotte Ramdisk with GUI which can be found here. This driver has a nice windowed interface and can be installed or the size changed without rebooting the system. For PB builds, setting the disk size to 128 MB is plenty of room for the TEMP directory. The driver installs the RAM disk as R:\. Another advantage of the RAM disk is that the contents are cleared out each time the system resets. This keeps the TEMP directory clean instead of filled with forgotten files, as so often happens.
A caveat for those using the RAM disk: For very large app installs such as Visual Studio or Microsoft Office, the 128 MB size of the RAM disk is too small. Installing one of those apps with the TEMP directory pointing to the RAM disk will cause install failures. Unfortunately, the error message returned by the installers doesn’t accurately describe the problem. I simply set my TEMP directory back to C:\TEMP before installing large applications.
Changing the Temp directory is done through the Advanced tab of the System Control Panel applet. In Windows 7, access the tab by opening the system control panel applet and click on the Advanced System Settings link on the left side of the window.In the Advanced tab, click on the Environment Variables button. Double click on the TEMP line in the User Variables list box and change the directory to either C:\TEMP or R:\ if you are using the Gavotte RAM disk.
Virus scanning software provides a crucial role in keeping your system clean. However, the scanning of disk accesses can significantly slow down Platform Builder builds. To increase the build speed, go into your virus checking software control panel and exclude the C:\WINCExxx directory tree from scanning. In addition, if the software also monitors specific applications, have it ignore the build tools
– Build.exe
– cl.exe
– link.exe
– nmake.exe
as well as any others that you may notice during the build.
Maximizing Virtual PC
These days, no discussion of Platform Builder optimization is complete without a discussion on Virtual PC. It’s almost a required tool for managing PB given the incompatibilities between PB versions. The key to using VPC is knowing how to manage the virtual disks that are the storage medium. Before that, let’s look at a basic setup.
Virtual PC comes with Windows 7 and is a free download for Windows XP. When the Virtual PC folder is selected in Windows 7 a customized Explorer window is shown listing your current Virtual PC machines. Across the top of the window is a series of buttons including one that allows you to create a new machine. Setting up the original VPC is actually quite straightforward. Set the RAM to 1.5 GB and enable network connections.
For our initial VPC, we need to create a dynamically expanding virtual hard disk (VXD). Name it something like “BaseSetupDisk” or something similar. Do not enable Undo disks as that will significantly slow down the startup shutdown process of the VM. After creating the VM, install your OS and activate it. Then turn on automatic updates and let the VM download and install all the updates to bring it current. Then, install your typical suite of personal utilities and configure the shell with your preferences. Finally, install Visual Studio 2005 needed for CE 7 or Visual Studio 2008 for WEC 7. You may want to install both versions as well. I’ll explain why in a moment. Install the service packs for Visual Studio.
Also, be sure to install the Gavotte Ramdisk in the VM. Disk speed isn’t the greatest for a virtual disk so we want to minimize disk access wherever possible. The RAM disk will significantly speed builds in the VM.
At this point, do NOT install Platform Builder. Instead, shut down (not hibernate) the Virtual Machine. Find the .vxd file for the hard disk you created and mark it as read only.
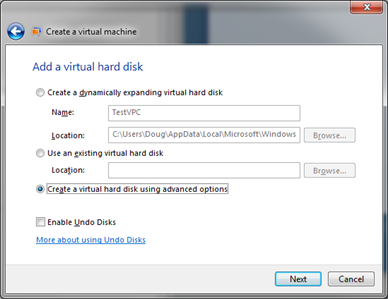
The goal at this point is to create new virtual machines based on the original without modifying the original. This is done using a “Differencing” virtual disk. You can create a Differencing hard disk when you create a new VM. Start the process to create a new virtual machine. When you get to the dialog box that asks what type of virtual disk, select “Create a virtual hard disk using advanced options” as shown in the image below.
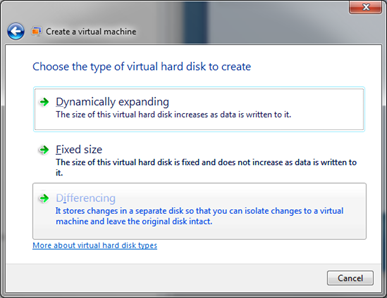
Next, select the Differencing option in the next dialog box as shown in the following image.
You will be asked the location of the .vxd file to base the new differencing disk upon. Enter the path to the base disk previously created. Complete the setup for the new VM. When you start the new VM, you should see that it is identically configured to the original base VM. You can now install Platform Builder on this differencing disk to complete the setup.
The reason for using the differencing disk is if you want to create a second VM with a different version of PB or simply to create a clean instance of PB for a different project, you can base this new VM on the original base disk and not have to go through the entire installation and setup process from the start. I personally have a number of different VMs set up for different versions of Platform Builder based on a single base VM. It’s amazing how much of a time saver using differencing disks can be.
A quick Build Tutorial
Now that I’ve talked about configuring both physical and virtual machines, it’s time to talk a bit about the build process itself. All versions of Platform Builder since the initial builds of Windows CE 1.0 have built the operating system in the same way. First, the operating system files are sysgened and compiled. Next the board support package is built. Finally, the built files from various parts of the build tree are copied into the release directory and the final image is built. The process generally takes between 10 to 30 minutes depending on the speed of the PC or VM. When a new project is created in Platform Builder, a full build of the system for the BSP must be performed for debug, checked and retail configurations of the OS.
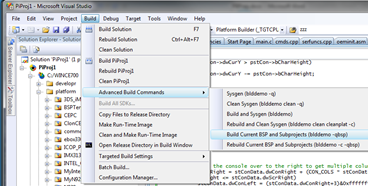
Of these four steps, it is the componentizing and building of the operating system that takes the most time, typically 7 to 20 minutes. Fortunately, after the first complete build, the only time the OS needs to be built is when you change the componentization or change code in on the public side of the tree. If you only change a driver or other code in the BSP, you only need to build the BSP. This is accomplished using the Build | Advanced Build Commands | Build Current BSP and Subprojects menu item as shown below.
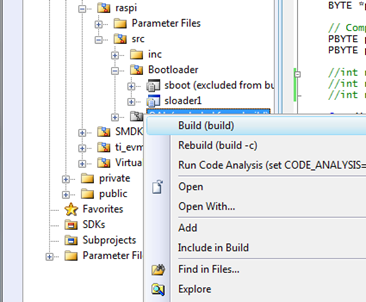
By default this will build the BSP, copy those BSP files into the release directory and rebuild the NK.BIN file. If you are only updating a single driver, you typically don’t need to rebuild the entire BSP. Instead, simply find the driver in the solution tree, right click and select Build as shown below:
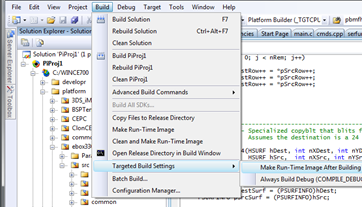
In both cases, the command will eventually result in the NK.BIN file being rebuilt unless you disable this default action by deselecting Build | Targeted Build Settings | Make Run-Time Image After Building menu item as shown below.
So, if you don’t build the final image, how does your driver get on the device? As long as your target system is connected with KITL, the driver can be defined as a “Release Directory Module.” In that case, the version of the driver in the release directory will be used by the device instead of the version in the .BIN file. You define a release directory module by selecting the Target | Release Directory Modules menu item and adding the driver name to the list in the dialog box.
By cutting out the unnecessary built steps, the compile-download-test cycle can be reduced from up to 30 minutes down to mere seconds. Quite productive. I encourage you to learn how the build system works so that you can bypass the unnecessary steps in the process. It also helps to configure your build PC to maximize build speed for those times when you really must build the entire system. Improved Platform Builder productivity will result in improved developer productivity. Always a good thing.
As always, thanks to Doug for sharing his experience and providing these great articles and associated webcasts on Windows Embedded Compact. If you have suggestions for future webcasts or articles, please let us know. You can contact me at David.Campbell@microsoft.com ; orDoug via his website at www.bolingconsulting.com . We are always interested in feedback to help ensure we cover the topics most interesting to our partners.
Thanks for taking the time to read the article. We look forward to providing ongoing detailed information on both Windows Embedded Compact 7 and Windows Embedded Compact 2013. Stay tuned.
