Azure + Bing Maps: Creating a Windows Phone Client
This is the 12th article in our "Bring the clouds together: Azure + Bing Maps"
series. You can find a preview of live demonstration on
https://sqlazurebingmap.cloudapp.net/. For a list of articles in the series,
please refer to https://blogs.msdn.com/b/windows-azure-support/archive/2010/08/11/bring-the-clouds-together-azure-bing-maps.aspx.
Introduction
In our previous post, we created a Silverlight client which accesses our
cloud service, and verified the service doesn't need to be modified to
support the new client. Actually till now, our solution is complete. But
for your reference, we decided to add a Windows Phone client (as this is
a hot topic now) to our solution. It is basically similar to the
Silverlight client, although to fit a small screen, the layout has been
redesigned.
Choose Silverlight or XNA
Windows Phone supports both Silverlight and XNA. The choice is often
very simple. XNA is used for game development. It doesn't provide any UI
elements (such as controls). It doesn't have framework like layout and
data binding. But it provides a built-in game loop. Silverlight can also
be used to develop games, although you must be aware that putting too
many UI elements on the screen (as games usually do) can be inefficient.
In addition, Silverlight only supports perspective 3D, that is, rotate a
2D plain in the 3D space. For full 3D support, you have to use XNA.
Both Silverlight and XNA can talk to SOAP/REST services, and the code is
exactly the same.
Our application is not a game. It does not require full 3D. And we have
already created a desktop Silverlight client. So we'll choose
Silverlight. As you'll find later, most code from our desktop
Silverlight application can be reused. But there're still a few
differences, as pointed out in the following sections.
Layout and page navigation for Windows Phone
A Windows Phone device's screen resolution is 800*480 or 480*800,
depending on the phone's orientation. This is significantly smaller
compared to a PC screen. So we cannot present too much information on a
single page in a Windows Phone application.
Our application needs to display a map as well as a list. So it makes
sense to use 2 pages, and provide a mechanism to navigate between the
two pages. There're several standard ways to navigate between pages.
The most commonly used solution for page navigation is to handle the
Flick gesture, check if the user flicks (moves the finger very fast)
horizontally, and navigate back/forward. You can learn about gestures
from
https://msdn.microsoft.com/en-us/library/ff967546%28VS.92%29.aspx.
Unfortunately, Bing Maps Windows Phone control already handles gestures.
If we also handle the gestures, if the user pans the map in the
horizontal direction very quickly, the result will be a page navigation
rather than a map panning.
So we have to fallback to a more traditional solution. We'll provide a
button for page navigation. But instead of using a standard Silverlight
button, let's use Windows Phone's application bar. The application bar
always stays at the bottom of the screen, so we don't have to manually
layout the button.
To put a button in the application bar, use the following markup:
<phone:PhoneApplicationPage.ApplicationBar>
<shell:ApplicationBar
IsVisible="True"
IsMenuEnabled="True">
<shell:ApplicationBarIconButton
IconUri="appbar.next.rest.png"
Text="Stops
List"
Click="ApplicationBarIconButton_Click"/>
</shell:ApplicationBar>
</phone:PhoneApplicationPage.ApplicationBar>
Note all buttons in the application bar must contain an icon, which must
be a bitmap. If you're a developer but not a designer, you can use
standard icons shipped with Windows Phone SDK (as we do in our case).
You can the standard icons under Program Files (x86)\Microsoft
SDKs\Windows Phone\v7.0\Icons.
The next step is of course handle the Click event of the button, and
perform page navigation. This can be done using
NavigationService.Navigate.
private void
ApplicationBarIconButton_Click(object sender,
EventArgs e)
{
this.NavigationService.Navigate(new
Uri("/ListPage.xaml",
UriKind.Relative));
}
When running in the emulator, the result is below:
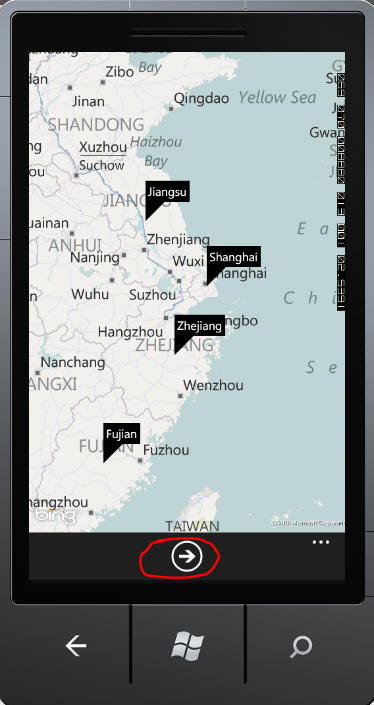
After you click the button using either mouse or finger, you'll be
redirected to the list page:
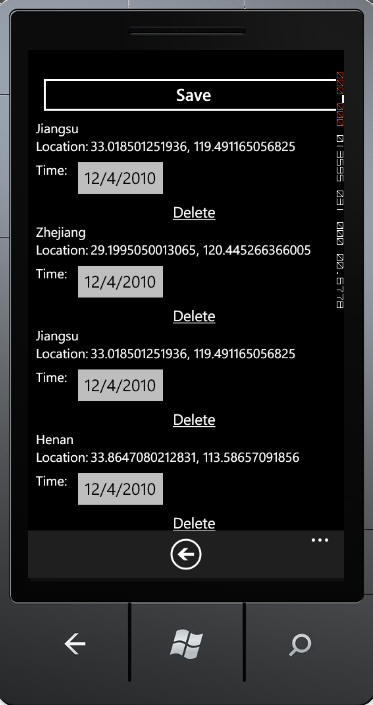
Similarly, you can define another button on the list page, and use the
same logic to navigate the user back to the map page.
Using Bing Maps Silverlight Control in Windows Phone
Using Windows Phone Bing Maps Silverlight control is similar to using
the desktop Bing maps Silverlight control, at least conceptually. But
there're several differences. We'll examine the similarity and
difference below:
First, the control is defined in different assemblies.
Desktop version:
xmlns:Microsoft_Maps_MapControl="clr-namespace:Microsoft.Maps.MapControl;assembly=Microsoft.Maps.MapControl"
xmlns:Microsoft_Maps_MapControl_Common="clr-namespace:Microsoft.Maps.MapControl;assembly=Microsoft.Maps.MapControl.Common"
Windows Phone version:
xmlns:Microsoft_Phone_Controls="clr-namespace:Microsoft.Phone.Controls.Maps;assembly=Microsoft.Phone.Controls.Maps"
xmlns:System_Device_Location="clr-namespace:System.Device.Location;assembly=System.Device"
The phone has location information support built-in, so Bing Maps does
not need to provide its own implementation of location service.
Second, displaying the map is almost the same as the desktop version.
For your reference:
Desktop version:
<Microsoft_Maps_MapControl:Map x:Name="map" Margin="8,21,36,23" Loaded="Map_Loaded" ZoomLevel="4" MouseClick="map_MouseClick" d:LayoutOverrides="GridBox" Grid.Column="1">
<Microsoft_Maps_MapControl:Map.Center>
<Microsoft_Maps_MapControl_Common:Location AltitudeReference="Ground" Altitude="0" Longitude="121" Latitude="31"/>
</Microsoft_Maps_MapControl:Map.Center>
<Microsoft_Maps_MapControl:MapItemsControl x:Name="mapItems" ItemTemplate="{StaticResource MapItemDataTemplate}"/>
</Microsoft_Maps_MapControl:Map>
Windows Phone version:
<Microsoft_Phone_Controls:Map x:Name="map" Loaded="Map_Loaded" ZoomLevel="6" Margin="0,0,-12,0" MouseLeftButtonDown="map_MouseLeftButtonDown" MouseLeftButtonUp="map_MouseLeftButtonUp">
<Microsoft_Phone_Controls:Map.Center>
<System_Device_Location:GeoCoordinate Altitude="0" Latitude="31" Longitude="121"/>
</Microsoft_Phone_Controls:Map.Center>
<Microsoft_Phone_Controls:MapItemsControl x:Name="mapItems" ItemTemplate="{StaticResource MapItemDataTemplate}"/>
</Microsoft_Phone_Controls:Map>
The noteable difference is the type Location is not a Bing Maps specific
type on Windows Phone. This type can be used in other scenarios (such as
GPS locating) as well.
Third, as shown above, displaying a list of pushpins is exactly the same
as desktop version. You create a MapItemsControl and bind it to a data
source. However, the Pushpin control has somewhat different properties.
As you can see below, on desktop, there's a Position property, while on
the phone, the property is named Location.
Desktop version:
<DataTemplate x:Key="MapItemDataTemplate">
<Microsoft_Maps_MapControl:Pushpin Cursor="Hand" Content="{Binding Place}"
Microsoft_Maps_MapControl:MapLayer.Position="{Binding Converter={StaticResource locationConverter}}" Template="{StaticResource PushpinControlTemplate}" Style="{StaticResource PushpinStyle}"/>
</DataTemplate>
Windows Phone version:
<DataTemplate x:Key="MapItemDataTemplate">
<Microsoft_Phone_Controls:Pushpin Cursor="Hand" Content="{Binding Place}" Location="{Binding Converter={StaticResource locationConverter}}" />
</DataTemplate>
4th, on the phone, there's no Map.MouseClick event. We have to fallback
to MouseLeftButtonDown/Up, as we did in the HTML client. While the
events are named after the mouse, actually on a real device, they
correspond to finger events.
5th, as for how to access Bing Maps SOAP service, it is exactly the same
as desktop Silverlight. This also shows the advantage of creating
services using standards. Client developers do not need to learn a
separate API for all devices.
Consume WCF Data Services
To consume our own WCF Data Services on Windows Phone, the code is once
again similar to desktop version. However, Windows Phone does not allow
you to generate a client proxy to a data service using Add Service
Reference. You're required to download the Windows Phone OData client
library from
https://odata.codeplex.com/releases/view/54698. Please make sure you
download
ODataClient_BinariesAndCodeGenToolForWinPhone.zip, as it contains
the DataSvcUtil tool targeting Windows Phone. You can download the
source code of the library as well.
After the client library is downloaded, you need to manually use the
command line tool
DataSvcUtil.exe to generate the client proxy. The syntax is exactly
the same as desktop version. For our sample, we use:
DataSvcUtil /out:TravelDataServiceReference.cs /uri:https://127.0.0.1:81/DataService/TravelDataService.svc
Then copy the generated proxy file to the Windows Phone project. Also
make sure to reference System.Data.Services.Client.dll in the previously
downloaded Windows Phone OData client library.
Now we can write code to consume the service. Most code is exactly the
same as desktop Silverlight. The only difference is LINQ is not
supported yet in the Windows Phone library.
So instead of:
this._dataServiceContext.Travels.BeginExecute(result
=>
We write:
this._dataServiceContext.BeginExecute<Travel>(new
Uri(this._dataServiceContext.BaseUri,
"Travels"), result =>
That is, we provide the full URI of the Travels entity set. Remember a
WCF Data Service is a REST service, and you request for an entity set
using https://ServiceBaseUri/EntitySetName.
No federated authentication on Windows Phone
One piece that we're unable to provide in our Windows Phone
implementation at this time is federated authentication. Since our
application is not running in a browser, we can't use passive federation
(as we do in the HTML and desktop Silverlight client). On a standard
alone application, you can use active federation. Unfortunately WIF is
not supported on the phone yet, and it could be quite difficult to deal
with WS-Federation manually.
While we won't provide sample code to implement federated
authentication, we'll discuss several options in this blog post. First,
ACS also supports OAuth. The OAuth protocol is much simpler than
WS-Federation. Using OAuth, you can issue an HTTP request to ACS to
obtain a token, and then put the token in the Authorization header in
future requests to our own cloud service. This approach however, doesn't
support integration with identity providers like Google, Yahoo, and
Facebook, at least not without additional efforts.
To work with identity providers, on solution is demonstrated in
Vittorio's PDC session. He also shipped a sample on
https://acs.codeplex.com/releases/view/55185. The idea is to put a
WebBrowser control in the Silverlight application. Let the browser
redirect to the identity providers, and perform authentication as usual.
After the authentication is succeeded, the browser will be redirected to
ACS. The ACS HTML page contains a script
window.external.notify, which is used to notify the hosting process
(such as our Windows Phone application) about some data. In this case,
the data is a security token wrapped in the JSON format. Then you parse
the token and use it in future requests to your own cloud services as in
the normal OAuth scenario.
Conclusion
This post described how to add a Windows Phone
client to our existing solution. Once again, the cloud service does not need to
be changed at all. Actually you can deploy the service to Windows Azure, and
when developing the Windows Phone client, you can directly access the service
from the cloud.
Hopefully this series has helped you to see how to create a typical cloud
solution which contains a cloud service and multiple clients. And last but not
least, merry Christmas. :)