Azure + Bing Maps: Federated authentication with AppFabric ACS and Windows Live Messenger Connect
This is the 10th article in our "Bring the clouds together: Azure + Bing Maps"
series. You can find a preview of live demonstration on
https://sqlazurebingmap.cloudapp.net/. For a list of articles in the series,
please refer to https://blogs.msdn.com/b/windows-azure-support/archive/2010/08/11/bring-the-clouds-together-azure-bing-maps.aspx.
Introduction
After reading our previous posts, you can now store spatial data in SQL
Azure, access the data using ADO.NET Entity Framework, expose the data
to the world using WCF Data Services, access the service from AJAX
clients, and display the data on a Bing Map as well as in a list. Yet
for such a user oriented application, one piece is missing:
authentication and user-specific data. That is what we'll cover this
time. Note the live demonstration hasn't been updated to reflect this
post yet.
Federated authentication overview
In the past, most consumer oriented applications themselves handle
authentication. Just browse the internet randomly, and you'll be sure to
find a lot of web sites that allow you to establish membership with
them. In fact, this scenario is so common that ASP.NET has built-in
membership providers.
This model has several limitations, though. The most important limitation is
user has to create a separate membership for each application. This
requires users to manage multiple sets of username/password. Some user
may choose to use a single set of username/password pair for all
applications. However, given the fact that not every application is
secured, if it happens one badly designed application leaks the user's
password, there is a risk all applications the user is using will be
hacked.
On the other hand, enterprise applications usually relies on a single
set of credentials (such as Microsoft Active Directory). The idea is:
authentication is handled by a trusted provider, not by the application
itself. So users only need to remember a single set of credential (such
as domain account), and it works across multiple applications.
Additionally, users do not submit their password to applications
directly. Only the well designed Active Directory knows the password.
Thus the user will not be at risk even if a badly designed application
is hacked.
Federation uses similar ideas as Active Directory. In a federated world,
there're one or more security token services (STS) that are well
designed and widely trusted. It is very unlikely the STS will leak user
information. Our own applications delegate authentication to the STS. So
if the user is authenticated by the STS, he will be automatically
authenticated for all applications relying on the STS.
STS offered by Microsoft
There're three major STS products offered by Microsoft:
- Active Directory Federation Server (ADFS), which allows applications out
of the domain to integrate with domain authentication. - Windows Azure AppFabric Access Control Service (ACS), which is a cloud
STS. It can authenticate users directly. But it also serves as a bridge that
integrates a bunch of third party STSes (like Google, Yahoo, and Facebook).
Those STSes are called identity providers to ACS. ACS allows you to define
rules that convert tokens issued by the identity providers to anything you
like. So users can use any STS they prefer, yet your application only needs
to deal with a single STS: ACS. Actually ACS also accepts Live ID as an
identity provider. Unfortunately, currently Live ID offers very
few information to ACS. You can't even obtain the user's Live ID. So we need
another STS. - Windows Live Messenger Connect, which allows users to login using their
Live ID.
In this post, we will not cover ADFS, since our application is consumer
oriented. We will use ACS v2 to support identity providers including
Google, Yahoo, and Facebook. We will use Windows Live Messenger Connect
to obtain the user's Live ID, if the user chooses to login using Live
ID.
Integrate ACS to your own application
Before further reading, please make sure you have an AppFabric v2
account. If you don't have already, you can register one on
https://portal.appfabriclabs.com/. At the moment, AppFabric v2 CTP
is free. If you want to test federation with Google, Yahoo, and
Facebook, please also make sure you have registered their accounts.
If you haven't used ACS v2 before, it is highly recommended to get
started from
https://acs.codeplex.com/wikipage?title=Getting%20Started&referringTitle=Documentation.
It provides a end-to-end tutorial with detailed screenshots. Our post is
based on this tutorial, and provide additional information.
Add identity providers
First go through the above tutorial until step 8. After you added
both Google and Yahoo as identity providers, repeat the above step to
add Facebook as well.
However, note when working with Facebook, you need to first create a
Facebook application from
https://www.facebook.com/developers/.
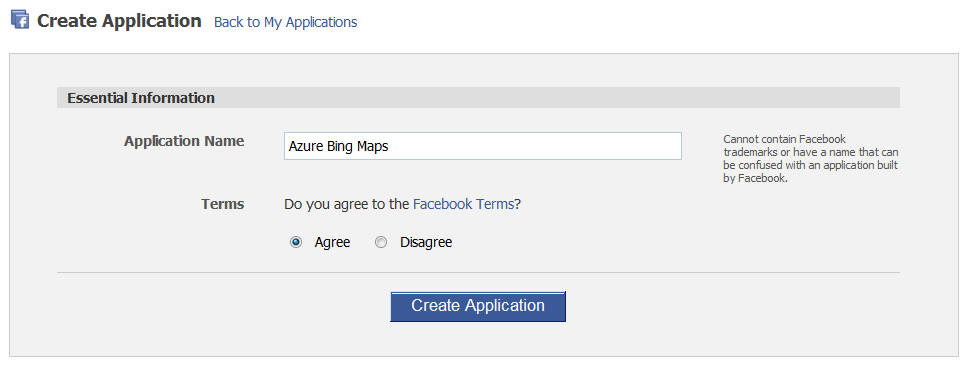
After the application is created, you will see the following page.
Please take a note of the Application ID and Application Secret fields.
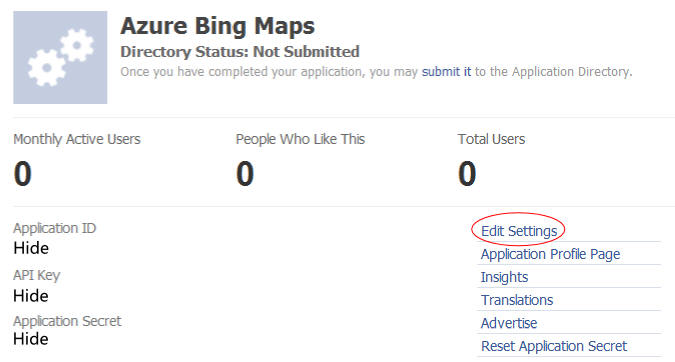
In the above page, click Edit Settings, then Web Site, and type the
following information.
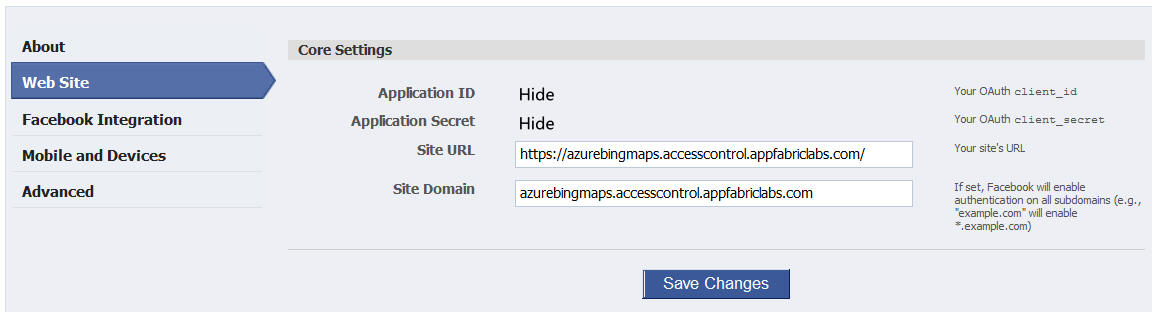
Note azurebingmaps is the name we chose for our AppFabric namespace.
Please change it to your own namespace.
Now back to ACS portal, and type your Application ID and Application
secret for the Facebook identity provider.

Setup relying party, rules, and STS reference
Please continue the walkthrough on
https://acs.codeplex.com/wikipage?title=Getting%20Started&referringTitle=Documentation
to setup relying party application, rules, and STS reference. When
setting up relying party application, please make sure to use your
Windows Azure application domain instead of localhost. While this is not
necessary for ACS, it is necessary for Windows Live Messenger Connect,
which doesn't support localhost. And if you want to test against Windows
Azure Compute Emulator (formerly named Development Fabric), please use
port 81.
For our sample, we choose azurebingmaps as our Windows Azure domain. So
we have:
Realm: https://azurebingmaps.cloudapp.net:81/
Return URL:
https://azurebingmaps.cloudapp.net:81/FederationCallbackHandler.aspx
The FederationCallbackHandler.aspx page will be created later.
In the same step, since we want to use Windows Live Messenger Connect
instead of ACS for Live ID authentication, please uncheck Windows Live
ID under the Identity Providers section. Also check Facebook (this does
not present in the linked tutorial's screenshot).
You can create rules exactly as described in the linked tutorial.
To add STS reference, follow the steps described in the linked tutorial.
But there's no need to configure ASP.NET Development Server to use port
7777. We'll use Windows Azure Compute Emulator anyway.
After the STS reference is added, do not modify web.config to deny
anonymous users. Our application allows anonymous access. But anonymous
users do not have access to user specific data.
Finally, make sure the automatically added reference
Microsoft.IdentityModel.dll has Copy Local set to true. WIF SDK is not
installed in the cloud. So you must ship the assembly together with your
application.
Configure hosts file
We're using Windows Azure domain in the above steps. As pointed out
earlier, this is actually not necessary for ACS, but is required for
Windows Live Messenger Connect. To test the application locally, you
need to perform the following steps to add a fake DNS entry:
Open the
C:\Windows\System32\drivers\etc\hosts file in a text editor (you
need to run the text editor with elevated permission since normally you
don't have write access to this file). Then add the following entry
(note, do not put port number in the entry):
127.0.0.1 azurebingmaps.cloudapp.net
Also, if you're behind a proxy, you need to configure your browser to
add azurebingmaps.cloudapp.net to proxy exception list. To do this in
IE, open Internet Options. Click the Connections tab. Then click LAN
Settings. In the popup dialog, click Advanced. Add
https://azurebingmaps.cloudapp.net to the exceptions box.
Remember to undo the above steps after you deploy the application to the
cloud.
Create a custom login page
When using ACS v2, you have several options to perform login. By
default, users will be redirected to ACS web site. But you can also
download a sample login page, put it in your own application, and modify
it whatever way you want. We want to integrate with Windows Live
Messenger Connect later, but we want to present a single login page for
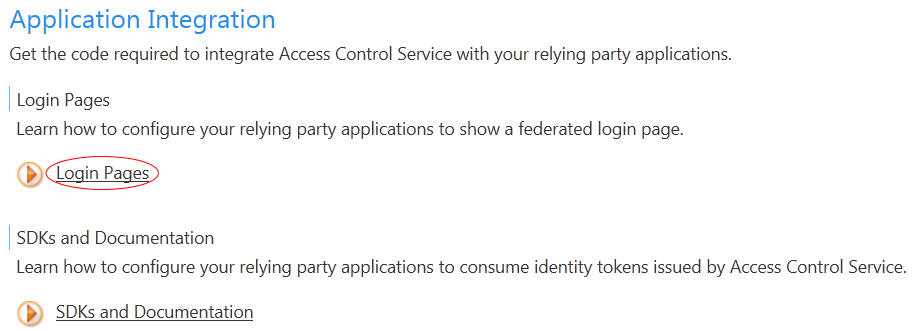
our users. So we choose the later. In the Application Integration page
on the ACS portal, click Login Pages, and then Download Example Login
Page.
After the sample login page is downloaded, you an add it to your Visual
Studio project as an existing item. But the sample page is an html page,
which doesn't support server side code. Our application requires us to
perform additional tasks on the server side, so let's create a
LoginPage.aspx page, and copy the contents from the sample html page.
Now in the HtmlClient.aspx page (the html client we created in previous
posts), add a hyperlink to LoginPage.aspx.
<asp:HyperLink
ID="LoginLink"
runat="server"
NavigateUrl="LoginPage.aspx?returnpage=HtmlClient.aspx"
Text="Login to manage
your own travel." />
In LoginPage.aspx.cs, save the query string in session, so we will know
which page to return after the user is authenticated by ACS.
protected void
Page_Load(object sender,
EventArgs e)
{
if (Request.QueryString["returnpage"]
!= null)
{
Session["ReturnPage"] =
Request.QueryString["returnpage"];
}
}
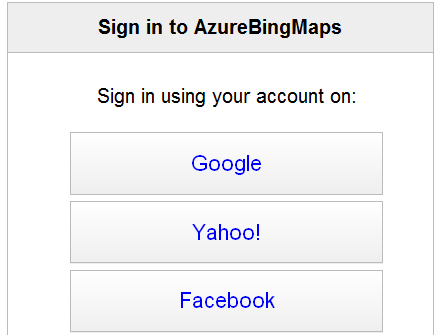
Now when you run the application and click the sign in link, you will be
presented by a page similar to the default ACS signin page, although this
page is hosted in your Web Role:
After the user clicks an identity provider link, he will be redirected
to the identity provider's signin page. Note this is a critical step.
User is signed in on the identity provider's web site, now our own Web
Role. We will be able to obtain the user's identity, such as email. But
we will never be able to get the user's password. If you tempt to
request for user's password directly, it is considered as pishing, and
users will no longer trust you if they find out. So never ask the user's
password directly. If all works fine, the
user will be finally redirected to our own
FederationCallbackHandler.aspx, which we typed on the ACS portal. If you
haven't done so already, create this page in your Web Role project. In
code behind, we redirect the user back to the return page they are
viewing before signing in.
protected void
Page_Load(object sender,
EventArgs e)
{
string returnPage =
"HtmlClient.aspx";
if (Session["ReturnPage"]
!= null)
{
returnPage = (string)Session["ReturnPage"];
}
Response.Redirect(returnPage);
}
Obtain user email and store it in session
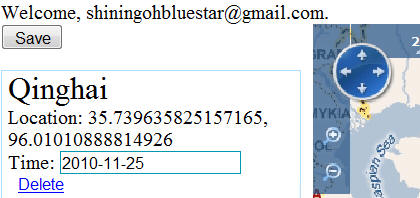
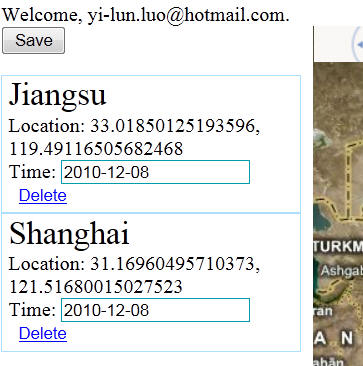
Now the login page has been created, and users can successfully sign in.
But our application hasn't obtained the user's identity. We'd like to
display a welcome information together with the user's email after the
user signs in.
To do so, first we need to modify web.config to extract the email claim.
All identity providers we are using issue a claim of type
https://schemas.xmlsoap.org/ws/2005/05/identity/claims/emailaddress,
and ACS's default generated rules pass those claims to our service. So
find the microsoft.identityModel section in web.config (this section is
generated when adding STS reference). Under applicationService =>
claimTypeRequired, configure the proper claim type.
<applicationService>
<claimTypeRequired>
<!--
We only need the user's email.
-->
<claimType
type="https://schemas.xmlsoap.org/ws/2005/05/identity/claims/emailaddress" optional="true"
/>
</claimTypeRequired>
</applicationService>
Then in FederationCallbackHandler.aspx.cs, before redirecting the user
back to the return page, we can obtain the user's email and save it in
session. When adding the STS reference, the wizard will automatically
add the WSFederationAuthenticationModule in Windows Identity Foundation
(WIF) to your web.config. This module will inspect the request sent by
ACS to your service, and setup the identities and claims. So in our own
code, we don't need to manually parse the requests. Instead, we can
simply search Thread.CurrentPrincipal's identities. If WIF works fine,
Thread.CurrentPrincipal will be an IClaimsPrincipal, which contains all
claims we defined in web.config.
var principal =
Thread.CurrentPrincipal
as
IClaimsPrincipal;
if (principal !=
null && principal.Identities.Count > 0)
{
var identity = principal.Identities[0];
var query =
from c in identity.Claims
where c.ClaimType ==
ClaimTypes.Email
select c;
var emailClaim = query.FirstOrDefault();
if (emailClaim !=
null)
{
Session["User"] = emailClaim.Value;
}
}
Response.Redirect(returnPage);
Now in HtmlClient.aspx, we can add a Label, and display the user's email
after signing in.
protected void
Page_Load(object sender,
EventArgs e)
{
if (Session["User"]
!= null)
{
this.LoginLink.Visible =
false;
this.UserNameLabel.Visible =
true;
this.UserNameLabel.Text =
"Welcome, " + (string)Session["User"]
+ ".";
}
else
{
this.LoginLink.Visible =
true;
this.UserNameLabel.Visible =
false;
}
}
Now run the application to verify the email is displayed.
Integrate identity with WCF Data Services
We're able to obtain the user's identity now. The next step is to use
this information in our WCF Data Services. As pointed out in our earlier
post, we choose user's identity as SQL Azure's partition key. After the
user logs in, our service should return user specific data. So let's
modify the TravelDataContext class. We'll filter all queries to return
user specific data only.
public IQueryable<Travel>
Travels
{
get
{
string partitionKey =
this.SetPartitionKey();
return this._entityFrameworkContext.Travels.Where(e
=> e.PartitionKey == partitionKey);
}
}
private string
SetPartitionKey()
{
// If the user hasn't singed in, using default
partition.
// Otherwise the partition key is the user's
email address.
string partitionKey =
"defaultuser@live.com";
string
user = HttpContext.Current.Session["User"]
as string;
if (user != null)
{
partitionKey = user;
}
return partitionKey;
}
Similarly, when inserting a new entity, we need to set the partition key
to the user's identity.
public void
SetValue(object targetResource,
string propertyName,
object propertyValue)
{
try
{
var property =
targetResource.GetType().GetProperty(propertyName);
if (property ==
null)
{
throw new
InvalidOperationException("Invalid
property: " + propertyName);
}
if (property.Name ==
"PartitionKey")
{
string partitionKey =
this.SetPartitionKey();
property.SetValue(targetResource, partitionKey,
null);
}
else
{
property.SetValue(targetResource, propertyValue,
null);
}
}
catch (Exception
ex)
{
throw new
InvalidOperationException("Failed
to set value. See the inner exception for more details.", ex);
}
}
Note we're integrating identity on the service side. Some people may
wonder since we're creating AJAX clients, why not do that on the client
side. Please be aware our AJAX client is just one of the many clients
that can be built against our service. Any developer can build their own
client, and if identity integration is done on the client side, a hacker
can easily send false identities. Thus identity integration has to be done
on the service side.
Special consideration for Windows Azure
By default, WIF uses DPAPI for encryption/decryption. However, DPAPI is
not supported in Windows Azure. So we have to find an alternative. The
WIF team recommends to use a certificate to encrypt/decrypt.
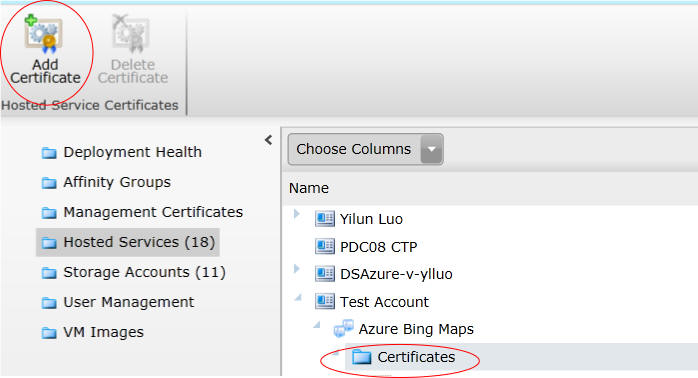
First, you need to upload a certificate to the portal. On the new
Windows Azure portal, select the Certificates node under your hosted
service. Then you'll see a "Add Certificate" command on the ribbon.
Then in web.config, under microsoft.identityModel => service, add the
certificate:
<serviceCertificate>
<certificateReference
x509FindType="FindByThumbprint" findValue="[your
thumbprint]" />
</serviceCertificate>
Finally in Global.asax, handle the
FederatedAuthentication.ServiceConfigurationCreated event, and configure
WIF to use the certificate:
void Application_Start(object
sender, EventArgs e)
{
FederatedAuthentication.ServiceConfigurationCreated
+= OnServiceConfigurationCreated;
}
void OnServiceConfigurationCreated(object
sender, ServiceConfigurationCreatedEventArgs
e)
{
//
// Use the <serviceCertificate> to protect the
cookies that are
// sent to the client.
//
List<CookieTransform>
sessionTransforms = new
List<CookieTransform>(new
CookieTransform[]
{
new
DeflateCookieTransform(),
new
RsaEncryptionCookieTransform(e.ServiceConfiguration.ServiceCertificate),
new
RsaSignatureCookieTransform(e.ServiceConfiguration.ServiceCertificate)
});
SessionSecurityTokenHandler
sessionHandler = new
SessionSecurityTokenHandler(sessionTransforms.AsReadOnly());
e.ServiceConfiguration.SecurityTokenHandlers.AddOrReplace(sessionHandler);
}
For more information, please refer to
https://msdn.microsoft.com/en-us/wazplatformtrainingcourse_wifonwazlab2010_topic2.aspx#_Toc278373667.
Integrate Windows Live Messenger Connect to your own application
As pointed out above, while ACS accepts Windows Live ID as an identity
provider, we're unable to obtain the user's email (Live ID). So we need
to use Windows Live Messenger connect as well.
Register for Windows Live Messenger Connect
Before using Windows Live Messenger Connect, you must register an
account on
https://manage.dev.live.com/default.aspx. The registration is free.
Then you can create an application on the Messenger Connect portal. This
step is straight forward. If you have any troubles, please refer to the
screenshots on
https://msdn.microsoft.com/en-us/library/ff751474.aspx. For our
example, we'll create a Web application.
After the application is created, click the "Edit settings", and provide
the necessary information. For our sample, we use the following
settings. But you should change the settings based on your requirement.
Application name: AzureBingMaps
Return URL:
https://azurebingmaps.cloudapp.net/OAuthWrapCallback.ashx
Other settings are not important. You can choose any values you like.
Windows Live Messenger Connect also requires you to verify the ownership
of the domain. To do so, you need to download a verification file from
the portal, and put it in the root folder of your web site. To do it in
Windows Azure, create an empty Web Role, include the verification file
in the Web Role project, and deploy it to the cloud's production
deployment. Note you have to use production deployment as your staging
deployment's URL will change everytime you redeploy. Once the
verification is done, you can safely remove the temporary deployment.
Integrate Windows Live Messenger Connect to the ACS login page
Once again, you can find a tutorial to get started with Windows Live
Messenger Connect on
https://msdn.microsoft.com/en-us/library/ff748287.aspx. So our sample
will build upon the tutorial.
Please follow the tutorial until you finish the "Adding a Sign-in Page"
step. In this step, please put all code in LoginPage.aspx. Then we'll do
a few modifications for our application.
Most importantly, we want to provide a consisted user experience. So
instead of using the wl:signin control to create a separate sign in
button for Windows Live ID (whose position and style are inconsistent
with Google, Yahoo, and Facebook), we'll provide a custom button.
To do so, we can use similar code as found in the sample Login page
provided by ACS.
function CreateLiveIDButton() {
var idpList = document.getElementById("IdentityProvidersList");
var button = document.createElement("input");
button.type = "button";
button.className = "IdentityProvider";
button.onclick = liveIDSignIn;
button.value = "Windows Live ID";
idpList.appendChild(button);
}
Then find the ShowSigninPage and ShowDefaultSigninPage function, and
invoke CreateLiveIDButton.
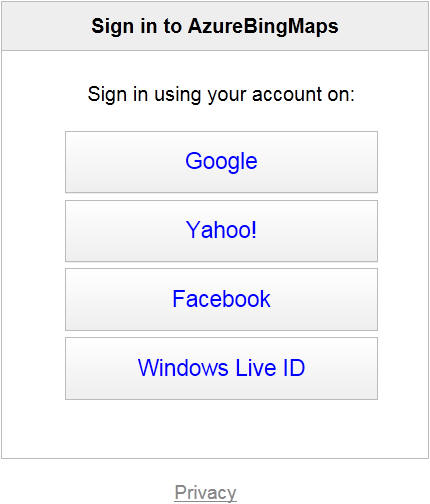
This way, we can ensure the sign in experience is consistent. As you can
see in the following screenshot, the sign in link for Windows Live ID is
naturally blended to other identity providers.
We also need to provide a function (liveIDSignIn) for the onclick event
of the newly created button. And if the user successfully signs in,
we'll redirect them to FederationCallbackHandler.aspx, just like what
we've done for ACS.
function
liveIDSignInComplete(signInCompletedEventArgs) {
if
(signInCompletedEventArgs.get_resultCode() !=
Microsoft.Live.AsyncResultCode.success) {
alert("sign-in failed: " +
signInCompletedEventArgs.get_resultCode());
return;
}
if
(signInCompletedEventArgs.get_resultCode() ==
Microsoft.Live.AsyncResultCode.success) {
document.location =
'FederationCallbackHandler.aspx';
}
}
function liveIDSignIn() {
Microsoft.Live.App.signIn(liveIDSignInComplete);
}
Obtain Live ID using Profile API
The next step is to obtain the user's Live ID. Since Windows Live
Messenger Connect is not using WIF, we cannot obtain the claim using
Thread.CurrentPrincipal. Actually right after the user signs in, your
application does not have access to the user's Live ID. To obtain Live
ID, you need to make an additional web request to the Messenger Connect
Profile API.
If you've followed the tutorial on
https://msdn.microsoft.com/en-us/library/ff748287.aspx, you should
have configured the Messenger Connect scope like below:
<wl:app
scope="WL_Profiles.View,Messenger.SignIn"
other properties…>
</wl:app>
The scope means what claims you want to obtain from Messenger Connect.
Our application requires Messenger.SignIn, so users can sign in using
their Live ID. We also need WL_Profiles.View, so we can obtain the
user's profile information. The linked tutorial also requires to view
the user's contacts, but we do not need contacts information here. The
scope information will be displayed when the user signs in, so he
understands what information is shared with our application. He can
either approve or deny your request. He can also later revoke the
request.
Since the requested scope allows us to view the user's profile, we can
go on to use the Profile API. This is also a REST API. You can simply
issue a GET request to
https://apis.live.net/V4.1/cid-[cid]/Profiles, where [cid] should be
replaced by a value extracted from the wl_internalState cookie. In
addition, the web request needs to be authorized. To do so, set the
Authorization header to another value extracted from the
wl_internalState cookie.
The wl_internalState cookie is set by Messenger Connect when the user
signs in. It contains a bunch of information, including the data noted
above. The cookie's value is also URL encoded. Below is a sample cookie
after decoding:
{
"wl_clientState":null,
"wl_scope":"WL_Profiles.View:some ID,Messenger.SignIn:some
ID",
"wl_accessToken":"a base64 encoded token",
"wl_clientId":"some ID",
"wl_cid":"some ID",
"wl_errorMessage":null,
"wl_accessTokenExpires":"17998",
"namespace":""
}
To extract the values from the cookie, let's define a utility method.
First URL decode the cookie value, and then parse the string to find the
required information.
private string
ExtractWindowsLiveInternalState(string key)
{
string result = Request.Cookies["wl_internalState"].Value;
try
{
result = HttpUtility.UrlDecode(result);
result = result.Substring(result.IndexOf(key));
result = result.Substring(key.Length + 3, result.IndexOf(',')
- key.Length - 4);
}
// wl_internalState could be invalid if LiveID
login failed. In this case, we return null.
catch
{
result = null;
}
return result;
}
Now we can extract wl_cid and wl_accessToken, and make a web request to
the Profile API. The response is an Atom feed that is similar to OData.
You can also choose JSON if you like. Unfortunately currently you can't
use Add Service Reference to generate an OData proxy to Windows Live
Messenger Connect. But the nice thing of OData is the AtomPub feed is an
open standard. Most frameworks have built-in support. So for example, we
can use
WCF Syndication API to parse the response. Add the following code to
Page_Load in FederationCallbackHandler.aspx, right before
Response.Redirect.
// wl_internalState could be null if the user
hasn't tried to login using Live ID.
if (Response.Cookies["wl_internalState"]
!= null)
{
string accessToken =
this.ExtractWindowsLiveInternalState("wl_accessToken");
string cid =
this.ExtractWindowsLiveInternalState("wl_cid");
string uri =
"https://apis.live.net/V4.1/cid-" + cid +
"/Profiles";
// wl_internalState could be invalid if LiveID
login failed.
if (!string.IsNullOrEmpty(accessToken)
&& !string.IsNullOrEmpty(cid))
{
HttpWebRequest request = (HttpWebRequest)HttpWebRequest.Create(uri);
request.Headers["Authorization"] =
accessToken;
HttpWebResponse response = (HttpWebResponse)request.GetResponse();
if (response.StatusCode ==
HttpStatusCode.OK)
{
XmlReader xmlReader = XmlReader.Create(response.GetResponseStream());
SyndicationFeed feed =
SyndicationFeed.Load(xmlReader);
var entry = feed.Items.FirstOrDefault();
if (entry != null)
{
var content = entry.Content
as
XmlSyndicationContent;
if (content !=
null)
{
var profile = content.ReadContent<WindowsLiveProfile>();
var liveID = profile.Emails.Where(m =>
m.Type == "WindowsLiveID").FirstOrDefault();
if (liveID !=
null)
{
Session["User"] = liveID.Address;
}
}
}
xmlReader.Close();
}
}
}
The WindowsLiveProfile class is a standard WCF data contract that
corresponds to the Atom entity's content:
[DataContract(Namespace
=
"https://schemas.microsoft.com/ado/2007/08/dataservices")]
public class
WindowsLiveProfile
{
[DataMember]
public List<element>
Addresses { get; set;
}
[DataMember]
public int
BirthMonth { get; set;
}
[DataMember]
public List<element>
Emails { get; set;
}
[DataMember]
public string
FirstName { get; set;
}
[DataMember]
public string
Gender { get; set;
}
[DataMember]
public string
LastName { get; set;
}
[DataMember]
public string
Location { get; set;
}
[DataMember]
public List<element>
PhoneNumbers { get; set;
}
}
[DataContract(Namespace
=
"https://schemas.microsoft.com/ado/2007/08/dataservices")]
public class
element
{
[DataMember]
public string
Address { get; set;
}
[DataMember]
public string
Type { get; set;
}
[DataMember]
public string
City { get; set;
}
[DataMember]
public string
CountryRegion { get;
set; }
}
Now after you sign in with your Live ID, you will see the user's Live ID
displayed on the web page, just like Google, Yahoo, and Facebook:
Store session data in AppFabric Cache
Now our application is integrated with many identity providers, and uses
are happily using the identity provider they prefer, instead of
remembering a new username/password for our application only. Our
application should work locally, as well as in the cloud if you only
have one instance. But there's a problem. We store some information,
such as the user's email, in ASP.NET session. By default, ASP.NET stores
session data in the memory of the current server. In a load balanced
environment, such as a Windows Azure role with multiple instances, each
instance keeps its own session. Imagine a user logs in to instance 1 and
establishes a session, and later when he tries to save the data, the
request goes to instance 2. Since the user hasn't established a session
with instance 2, our service cannot recognize who the user is.
To solve the problem, session data must be shared among all instances.
There're a bunch of solutions. The most common solution is to store the
session data in an external storage, such as Windows Azure Table Storage
or SQL Azure. Those solutions work fine, but working with a storage
service is usually slower than working with in-memory data. Since
session data does not need to be persisted (typically a session expires
after a certain time of inactive), there's really no need to store them
in a persisted storage, and remove the data when session expires.
The good news is since PDC10, there's a new member in the Windows Azure
AppFabric family: The distributed cache service. It provides you a
familiar programming model as Windows Server AppFabric distributed cache
(They're both AppFabric after all). Some people may think cache is used
for data and page output only, and has nothing to do with session. But
let's open our mind. Actually you can store all kinds of information in
cache. A cache is just a piece of data in memory, either on local server
or a remote server. This piece of information is not persisted. It will
be removed if the server goes down, or the hosting process terminates,
or if you explicitly requests to remove the data. Session fits well into
this definition. You can store session data in cache. Actually the
AppFabric SDK has a built-in session provider, which is just like a
normal ASP.NET session provider.
You can find a step by step tutorial on
https://msdn.microsoft.com/en-us/WAZPlatformTrainingCourse_BuildingAppsWithCacheService.
Actually using AppFabric cache to store session is so easy that we don't
have anything to add to the tutorial. Anyway, to make this post
complete, we will briefly go through the process.
First you need to follow the instructions and screenshots on
https://msdn.microsoft.com/en-us/wazplatformtrainingcourse_buildingappswithcacheservice_topic2#_Toc278304367#_Toc278304367
to enable distributed cache. You also need to download the AppFabric
Labs SDK from
https://www.microsoft.com/downloads/en/details.aspx?FamilyID=d89640fc-c552-446e-aead-b1e0d940f31b&displaylang=en.
You will need Microsoft.ApplicationServer.Caching.Client.dll and
Microsoft.ApplicationServer.Caching.Core.dll from the labs SDK. Note you
can also find similar assemblies in the Windows Server AppFabric SDK.
However, Windows Azure AppFabric extends Windows Server AppFabric to
provide some Azure specific features. So you need to reference the
assemblies from Windows Azure AppFabric SDK.
The next step is to configure caching in web.config. First add the
following configuration section:
<section
name="dataCacheClient" type="Microsoft.ApplicationServer.Caching.DataCacheClientSection,
Microsoft.ApplicationServer.Caching.Core"
allowLocation="true" allowDefinition="Everywhere"
/>
Then configure the dataCacheClient section. Note the difference with
Windows Server AppFabric. For example, the host is in the cloud instead
of a local machine. And you must use message security, with the
authorizationInfo set to the Authentication Token's value you find on
the AppFabric portal.
<dataCacheClient
deployment="Simple">
<hosts>
<host
name="AzureBingMaps.cache.appfabriclabs.com" cachePort="22233"
/>
</hosts>
<securityProperties
mode="Message">
<messageSecurity
authorizationInfo="[AUTHORIZATION_INFO]">
</messageSecurity>
</securityProperties>
</dataCacheClient>
Next configure ASP.NET session provider to use AppFabric cache:
<!-- Config to store
session in AppFabric cache.
-->
<sessionState
mode="Custom" customProvider="AppFabricCacheSessionStoreProvider">
<providers>
<add
name="AppFabricCacheSessionStoreProvider" type="Microsoft.Web.DistributedCache.DistributedCacheSessionStateStoreProvider,
Microsoft.Web.DistributedCache"
cacheName="default" useBlobMode="false"
/>
</providers>
</sessionState>
It's all done. Now when running the application, all session data will
be stored in AppFabric cache, and thus works for multiple instances.
A final note: If you wish to test the application locally, you must run
it from Compute Emulator. If you run it from normal IIS or some other
servers, cache will not work. And you should expect slow performance
when testing locally, since all session data needs to be
stored/retrieved from a cloud machine. But as long as the Windows Azure
service and the AppFabric cache are in the same data center, after
deploy the application to the cloud, the performance will be much
better. Within a data center, network speed is much higher compared to
disk I/O. That's why we store session in a remote machine's memory in
the same data center, instead of the disk on local machine.
Conclusion
This post described how to adopt federated authentication using AppFabric
Access Control Service and Windows Live Messenger Connect. We also briefly
introduced AppFabric Distributed Cache Service. Now we can finally say our HTML
client and the cloud service are feature complete. The next post will move on to
create a Silverlight client.