Using Free-COM DLL in Windows Store C++ Project
It is generally known that migrating Desktop App to Windows Store App is quite a headache. In .NET, some namespace cannot be used in Windows Store App, so it is very difficult to deal with when you want to migrate code related to these namespaces. In C++, native code cannot be referenced directly as DLL component to the project. It requires a Windows Runtime shell to redefine all the native custom classes.
On the other hand, how to create a common component used for both Desktop App and Windows Store App is also a headache. . NET is okay, but C++ calls for creating two different versions of the component.
This post will introduce a method about how to use Free-COM dll in Windows Store App. By this way, we can make the migrating components in the form of COM, which can directly be used in Windows Store App. Meanwhile, it succeeds in solving the problem of sharing DLLs between Desktop App and Windows Store App. However, this method is not available for .NET Windows Store app, because the NET project does not support the import of COM components.
The first part describes how to create an ATL COM Server, if you are experienced in it, you can skip it. Or directly download a COM component sample from In-process C++ COM server (CppDllCOMServer) .
First of all, run Visual Studio as an administrator. The COM by default is required to be registered at compile time. In the menu of New Project, please select ATL project template (this template is only supported by Visual Studio professional or higher version) under Visual C++ .
We name the solution CppDllCOMServer. Then in the popup wizard, please select Dynamic-Link Library (DLL), which only supports process within the COM not for process without the COM or remote COM component in Windows Store. Click Finish.
We can see Visual Studio has automatically generated two projects, CppDllComServer and CppDllComServerPS. Right-click CppDllComServer project -> Add -> class. In the pop-up list, select ATL under Visual C++, select ATL Simple Object. Click Add.
in the ATL Simple Object wizard, we only need to enter SimpleObject for Short Name, Visual Studio will automatically help to fill in for others, as shown in Figure
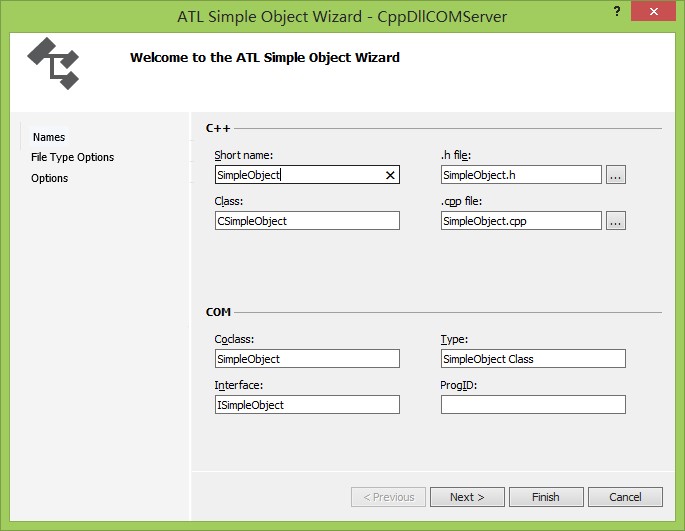
Click Next, here we do not choose, and then the next step, we can use the default, here must select Apartment for Thread model

Click Finish
Visual Studio will automatically create the required code inside the COM class.
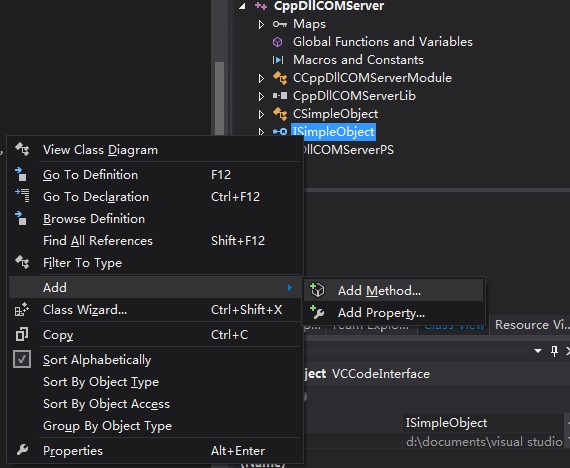
Then we go to class view, we add a method to this class.
Right-click ISimpleObject -> Add -> method
In the next wizard, we add a HelloWorld method,
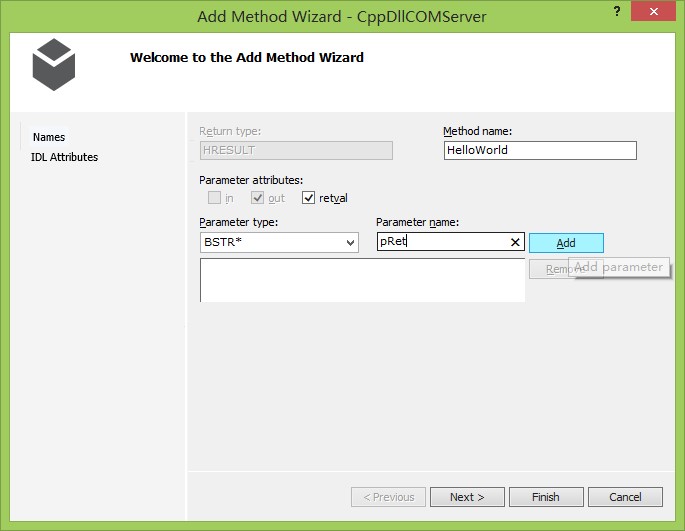
We choose retval for the parameter’s property, this property is different from out, with it we not only get the result from pointer passed into the function, but also can result from the function's return, while out only change the result by modifying the pointer passed to result. Click Add, and then click Finish.
Visual Studio will automatically generate codes, we only need to modify HelloWorld function in SimpleObject.cpp file.
We add the following code
STDMETHODIMP CSimpleObject::HelloWorld(BSTR* pRet)
{
// Allocate memory for the string.
*pRet = ::SysAllocString(L"HelloWorld");
if (pRet == NULL)
{
return E_OUTOFMEMORY;
}
return S_OK;
}
The result outputs HelloWorld
Then compile the project.
The second part, we need to generate manifest file which applies to the COM dll.
In the last section, we have successfully compiled a COM dll component, or compiled directly from the download sample. We also need to confirm a few file locations. CppDllCOMServer.dll, which is generated by the COM, the default output file of the project, it should be in solution file folder \ Debug \
CppDllCOMServer.tlb, which we need to generate manifest, by default it should be in solution folder \ CppDllCOMServer \ Debug.
After confirming these two files, we can use Developer Command Prompt command line to generate the manifest file.
Position to the project output folder, enter the following command
C:\Lab\CppDllCOMServer\C++\Debug>mt.exe -tlb:CppDllCOMServer.tlb -dll:CppDllCOMServer.dll -identity:"CppCOMServerDLL, version=1.0.0.0, processorArchitecture=x86" -out:Application.manifest
For -Tlb: CppDllCOMServer.tlb parameter, it requires tlb file’s specific location, we can copy the file to the folder in the same level of CppDllCOMServer.dll, or use
..\ CppDllCOMServer\Debug\CppDllCOMServer.tlb to specific location. If the tlb file in wrong position, it will popup error: Unable to process the .tlb file.
-Out parameter is to set the file name.
In this way, Manifest file named Application.manifest has been generated in the preset folder.
If you do not like the way of command line, we can also set the project configuration to generate the manifest .
Right-click CppDllComServer->Properties->Linker->Manifest File ->Enable User Account Control(UAC) -> No(/MANIFESTUAC:NO) disabling UAC aims to remove the UAC information inside manifest.
Manifest Tool-> General -> Assembly Identity fill in
” CppCOMServerDLL, version=1.0.0.0, processorArchitecture=x86”
Manifest Tool-> Input and Output ->Embed Manifest -> No
Manifest Tool-> Input and Output -> Output Manifest File -> fill in the name of Manifest, for example,Application.Manifest
Manifest Tool-> Isolated COM -> Type Library File -> fill in TLB file path, for example
To $ (ProjectDir) \ Debug \ CppDllCOMServer.tlb,
Manifest Tool-> Isolated COM -> Component File Name-> fill in the name of DLL CppDllCOMServer.dll
We can check the Manifest Tool-> Command Line, in which the command basically consistent with last method’s
Then compile.
The File generated from two ways above cannot use directly, we have to make a bit modify for it.
Find Application.manifest file in the project's folder. Use Notepad to open, the content are same whichever way you generate it.
<?xml version="1.0" encoding="UTF-8" standalone="yes"?>
<assembly xmlns="urn:schemas-microsoft-com:asm.v1" manifestVersion="1.0">
<assemblyIdentity name="CppCOMServerDLL" version="1.0.0.0" processorArchitecture="x86"></assemblyIdentity>
<file name="CppDllCOMServer.dll" hashalg="SHA1">
<comClass clsid="{09C969C2-969F-4029-A630-BF81E5177893}" tlbid="{EE9C4909-407C-48DC-B58A-09B68B4A79BC}"></comClass>
<typelib tlbid="{EE9C4909-407C-48DC-B58A-09B68B4A79BC}" version="1.0" helpdir="" flags="HASDISKIMAGE"></typelib>
</file>
<comInterfaceExternalProxyStub name="ISimpleObject" iid="{810356FC-23AA-4DAD-8A4C-CDF0CB768AE6}" tlbid="{EE9C4909-407C-48DC-B58A-09B68B4A79BC}" proxyStubClsid32="{00020424-0000-0000-C000-000000000046}"></comInterfaceExternalProxyStub>
</assembly>
Here is a critical step, we need to add ThreadingModel = "Apartment" attribute inside comclass node. The last code looks like:
<?xml version="1.0" encoding="UTF-8" standalone="yes"?>
<assembly xmlns="urn:schemas-microsoft-com:asm.v1" manifestVersion="1.0">
<assemblyIdentity name="CppCOMServerDLL" version="1.0.0.0" processorArchitecture="x86"></assemblyIdentity>
<file name="CppDllCOMServer.dll" hashalg="SHA1">
<comClass threadingModel="Apartment" clsid="{09C969C2-969F-4029-A630-BF81E5177893}" tlbid="{EE9C4909-407C-48DC-B58A-09B68B4A79BC}"></comClass>
<typelib tlbid="{EE9C4909-407C-48DC-B58A-09B68B4A79BC}" version="1.0" helpdir="" flags="HASDISKIMAGE"></typelib>
</file>
<comInterfaceExternalProxyStub name="ISimpleObject" iid="{810356FC-23AA-4DAD-8A4C-CDF0CB768AE6}" tlbid="{EE9C4909-407C-48DC-B58A-09B68B4A79BC}" proxyStubClsid32="{00020424-0000-0000-C000-000000000046}"></comInterfaceExternalProxyStub>
</assembly>
The third part, we reference this COM component into our Windows Store App.
First, create a C++ project (Blank App template) of Windows Store App, and then drag a TextBlock named tb1 into the MainPage.
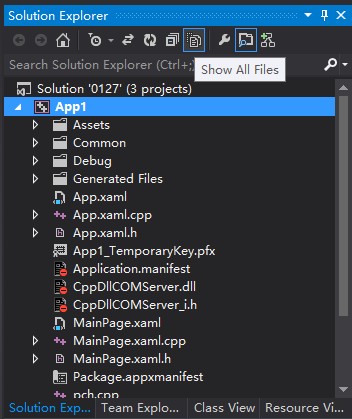
Open containing folder of the App project. Copy the following files from ATL project and then paste into the project folder
CppDllCOMServer.dll
Application.manifest
CppDllCOMServer_i.h (CppDllCOMServer_h.h If you directly use CppDllCOMServer sample, please add this header file)
SimpleObject.h
Clicking on Show All Files button in project view, we can see red icon in front of the coped files, which means they have not been compiled in this project.
We need to deploy CppDllCOMServer.dll and Application.manifest together to the installation directory of the project.
Right-click CppDllCOMServer.dll-> added to the project
Right-click again CppDllCOMServer.dll -> Properties
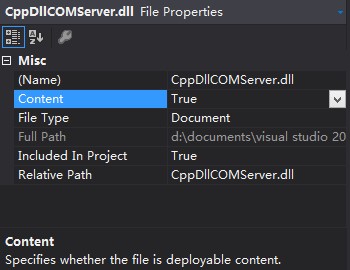
select the Content property to True, select File Type property to Document.
Application.manifest file requires the same operation. Please note that the default value of Application.manifest’s File Type property is not Document, if it were not be changed, it would participated in Visual Studio compiler and caused saying Application configuration error.
Next, we are going to call Free-COM's method in ManiPage.xaml.cpp, first of all, to reference the header file
#include "SimpleObject.h"
For this header file, we have to modify several points to note,
1 cannot exist ATL’s method or namespace.
2 all inside methods must be public, other protected or private member variables and functions can delete.
(This header file cannot use the macro and class ATL provided, user need to manually implement interface methods, for details please see next example code)
The main purpose of adding this header file is to explain the source of the classes and interfaces in Free-COM in compile time.
The class implements in the sample either downloaded or built with ATL can change to the following code, which removes the ATL template, and private or protected functions and members.
class SimpleObject : public ISimpleObject
{
public:
// IUnknown
IFACEMETHODIMP QueryInterface(REFIID riid, void **ppv);
IFACEMETHODIMP_(ULONG) AddRef();
IFACEMETHODIMP_(ULONG) Release();
// IDispatch
IFACEMETHODIMP GetTypeInfoCount(UINT *pctinfo);
IFACEMETHODIMP GetTypeInfo(UINT itinfo, LCID lcid, ITypeInfo **pptinfo);
IFACEMETHODIMP GetIDsOfNames(REFIID riid, LPOLESTR *rgszNames, UINT cNames, LCID lcid, DISPID* rgdispid);
IFACEMETHODIMP Invoke(DISPID dispidMember, REFIID riid, LCID lcid, WORD wFlags, DISPPARAMS *pdispParams, VARIANT *pvarResult, EXCEPINFO *pExcepInfo, UINT *puArgErr);
// ISimpleObject
// IFACEMETHODIMP get_FloatProperty(FLOAT *pVal);
//IFACEMETHODIMP put_FloatProperty(FLOAT newVal);
IFACEMETHODIMP HelloWorld(BSTR *pRet);
//IFACEMETHODIMP GetProcessThreadID(LONG *pdwProcessId, LONG *pdwThreadId);
SimpleObject();
};
Finally, we call this COM in OnNavigatedTo method of MainPage.xaml.cpp, and then modify content inside tb1, please add the following code. And note to check if the following CLSID and IID matches COM dll project (consistent with CppDllCOMServer.idl).
void MainPage::OnNavigatedTo(NavigationEventArgs^ e)
{
//Create an instance of the component
//Interface for ISimpleObject: {810356FC-23AA-4DAD-8A4C-CDF0CB768AE6}
//CLSID for SimpleObject is {09C969C2-969F-4029-A630-BF81E5177893}
const GUID CLSID_SimpleObj = { 0x09C969C2, 0x969F, 0x4029, {0xA6,0x30,0xBF,0x81,0xE5,0x17,0x78,0x93} };
const IID ISimpleIID = {0x810356FC,0x23AA,0x4DAD, {0x8A,0x4C,0xCD,0xF0,0xCB,0x76,0x8A,0xE6} };
HRESULT hr;
MULTI_QI arrMultiQI [1] = {&ISimpleIID, NULL, 0};
//Use the new CCI API
hr = CoCreateInstanceFromApp(CLSID_SimpleObj,NULL,CLSCTX_ALL,NULL,1,arrMultiQI);
OutputDebugString(L"Just Called CCIFromApp");
ISimpleObject *pSimpleObj = reinterpret_cast<ISimpleObject*>(arrMultiQI[0].pItf);
BSTR myBSTR = nullptr;
//Call the COM component to get a BSTR
hr = pSimpleObj->HelloWorld(&myBSTR);
OutputDebugString(L"I should have a BSTR now");
size_t nlen;
//figure out the size so we can make a local copy
nlen = (wcslen(myBSTR))+1;
wchar_t* sMyString = new wchar_t[nlen];
//Make a local copy of the string
wcscpy_s(sMyString,nlen,myBSTR);
//next call SysFreeString but oleaut32.lib
//needs added as a linker additional dependency first
//::SysFreeString(myBSTR);
OutputDebugString(L"The BSTR should be gone now and I have the string");
//create a string XAML can display
String^ s = ref new String(myBSTR,nlen);
//display the string
tb1->Text=s;
}
Finally, compile and then execute it.
The realization of COM in this doc mainly includes how to manually create a COM object, but does not cover how to create the corresponding COM factory.