How to Deploy a (Functions / Angular / Other native HTML5) App to Azure App Service from CI and CD tools.
I've had a few requests recently to talk about how to run a full Continuous Integration + Continuous Delivery service that can deploy non-asp.net sites (that can't be built and packaged in Visual Studio via MSBuild) to Azure App Service Web Apps.
If you have ever wanted to do one of the following, then please read on ...
- Ever wanted to publish a site that you do not build through MS Build and MS Deploy to an Azure Functions Site ?
- Ever looked at the myriad of possible options to do this and wondered where to start ?
- Ever wanted to do this in a way that will work from all possible deployment scenarios (e.g. Locally, From VSTS, From TeamCity etc).
So... to do this we need to be aware of a few things.
- There is a 'special' Zip RESTful API running behind the scenes as part of Azure App Service that you can use (The Kudu Zip API), read about it here, if you GET from this API, you'll get zipped content from your site - whereas if you POST at the API Kudu will extract your Zip file.
- Your deployment credentials for this API are the same as your FTP credentials to the site (just formatted differently), which are USER specific.
- All of your app service deployment credentials are available to download from the Azure Resource Manager (ARM) API via scripts, once you have authenticated to the ARM API (and these are nicely wrapped in a cmdlet for us).
- To trigger a 'pull CD' deployment we can use a webhook style connection to pull directly from source control. BUT in most professional / enterprise dev scenarios this is NOT appropriate for production environments. Ideally you want more fine-grained control of this and need to be able to have more explicit timing, hence you 'push' your code via a Deployment / Release agent after more thorough automated testing / load testing and approval. Whereas the standard webapp CD process will just shove whatever code is checked in onto your live site.
By combining 1-3 together, we can now deploy ANY kind of site up to Azure App Service (This should also work for a Tomcat WAR deployment, or deploying the root of a standard ASP.NET website (In fact this is the endpoint that is used when you deploy from visual studio using web deploy), deploying an Azure Functions site, or a bog standard HTML5 site such as a jQuery / JavaScript or AngularJS app.
1. Firstly we need to zip your source code up into a zip file.
NOTE: If you don't need a zip file (if you only have one file to upload, such as a .war tomcat package) you can skip the zip stage and can use the kudu vfs api instead.
MANUALLY: So, let's zip your deployment source up using powershell, so we have a zip file to deploy over kudu (ideally you would do this in the build stage of your CI and save it as a deployment artifact, in this case I'll use the local copy of the IIS holding page on my machine to demonstrate this).
Add-Type-ASystem.IO.Compression.FileSystem
[IO.Compression.ZipFile]::CreateFromDirectory("C:\inetpub\wwwroot","C:\build\web.zip" )
The output of this powershell script is simply a web.zip file in C:\build\, if you want to parameterize this in VSTS to build from the root of your project then use the VSTS environment variables in your script ... Like this.
Add-Type -A System.IO.Compression.FileSystem
[IO.Compression.ZipFile]::CreateFromDirectory($ENV:BUILD_REPOSITORY_LOCALPATH, $ENV:ARTIFACTSTAGINGDIRECTORY + '\wwwroot.zip')
Below is an example of running something similar in a powershell script task in VSTS where I only want to zip PART of my repo (in this case the middle tier of a multi-tier application hosted on Azure Functions).
[caption id="attachment_16" align="aligncenter" width="1024"]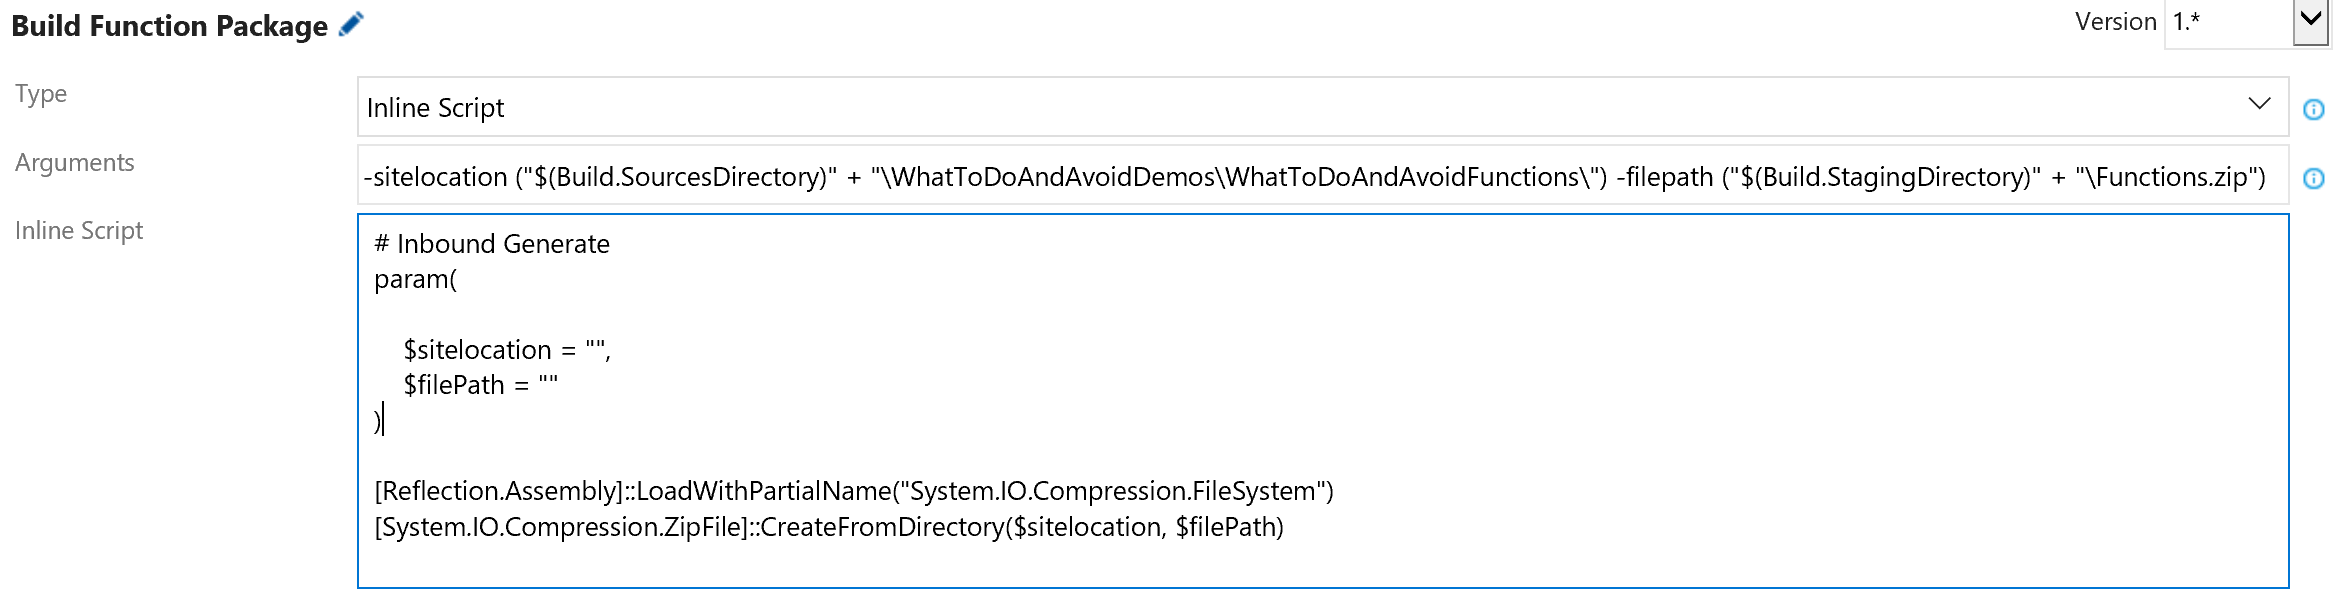 Build a function zip package[/caption]
AUTOMATED: If you are using VSTS to build then you can use the Archive files build task to complete the above steps without writing powershell.
If we are using a cloud hosted build agent (in VSTS or elsewhere), we need to capture the output of the zip file at this point to an artifact ready for deployment (in VSTS you would simply use a 'Copy and publish artifact' or 'publish artifact' build task like the below).
[caption id="attachment_65" align="aligncenter" width="300"]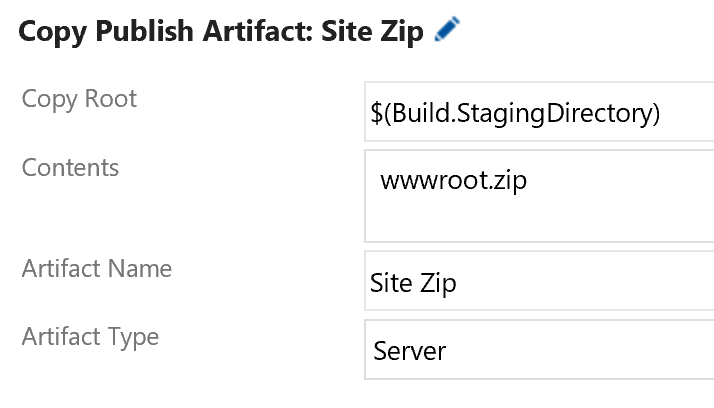 Site - Store Zip Artifact VSTS[/caption]
If you are running this locally, then you will retain the output from the build anyway on your local filesystem.
2. Next, we need to authenticate to the Azure ARM API in powershell.
AUTOMATED: If you are using VSTS to host this pipeline (and running this next script in an Azure Powershell task), then at this point you would already be authenticated to your Azure subscription via a service principal.
MANUAL: If not, then to call this locally you will need to call Add-AzureRMAccount and login your script interactively (using the ADAL libraries).
Add-AzureRmAccount
You can do the below and pipe the script some credentials in, though we do not recommend this for production service deployments.
$inputuser = 'UserName'
$inputpass = 'Password'
$Password = ConvertTo-SecureString -AsPlainText $inputpass -Force
$Credential = New-Object System.Management.Automation.PSCredential $inputuser, $Password
Login-AzureRmAccount -Credential $Credential
Note: If your organization enforces Multi Factor Authentication, then you MUST use a Service Principal to automate this login step via a service, Login-AzureRmAccount can only be used interactively in this situation and the above call will fail with this error message.
Login-AzureRmAccount : Federated service at https://stsaddress returned error: ID3242: The security token could not be authenticated or authorized.:
The remote server returned an error: (500) Internal Server Error.
At line:1 char:1
+ Login-AzureRmAccount -Credential $creds
+ ~~~~~~~~~~~~~~~~~~~~~~~~~~~~~~~~~~~~~~~
+ CategoryInfo : CloseError: (:) [Add-AzureRmAccount], AadAuthenticationFailedException
+ FullyQualifiedErrorId : Microsoft.Azure.Commands.Profile.AddAzureRMAccountCommand
David Ebbo has a neat post how to login through PowerShell with a Service Principal here and our official docs on how to create a service principal are here. Of course, VSTS also automates all of this for you nicely, which is another reason to use it.
3. Next up, we can go fetch our web deploy credentials via the AzureRM cmdlets.
MANUAL:
$temploc = "test.output.txt"
# For web deploy - Get the publishing data from the site.
$site = Get-AzureRmWebAppPublishingProfile -Name $sitename -OutputFile $temploc -ResourceGroup $resgrp -Format WebDeploy
# Reload it from the disk, parse the XML and clean up
[Xml] $resourcefile = Get-Content $temploc
Del $temploc
# Pull the user details from the first Pub profile object returned
$username = $resourcefile.publishData.publishProfile[0].userName # The Username
$password = $resourcefile.publishData.publishProfile[0].userPWD # The Password
At this point $username and $password contain your credentials to manipulate the Azure Web App.
AUTOMATED: Steps 3 and 4 are both collated together under VSTS' - 'Azure App Service Deploy' release task here, which uses Kudu's API's under the covers.
4. Let's REST post my zip file at the webroot of the App Service Web App using the Kudu Zip API
MANUAL:
# Post the file at the KUDU rest API
$ZipPath = "path to zip file"
$sitename =
$base64AuthInfo = [Convert]::ToBase64String([Text.Encoding]::ASCII.GetBytes(("{0}:{1}" -f $username, $password)))
$apiRM = "https://$sitename.scm.azurewebsites.net/api/zip/site/wwwroot/"
Invoke-RestMethod -Uri $apiRM -Headers @{Authorization=("Basic {0}" -f $base64AuthInfo)} -Method PUT -InFile $ZipPath
AUTOMATED: Steps 3 and 4 are both collated together under VSTS' - 'Azure App Service Deploy' release task here, which uses Kudu's API's under the covers.
And we're done ! The site should have been uploaded.
I hope this gives you a feel for how to package, authenticate to the App Service APIs and upload both ASP.NET sites and standard HTML sites directly to Azure App Service using powershell scripting from your choice of deployment tool in place of xcopy deployment.
Please use any and or all of these pieces to deploy your sites.
Other things for you to consider might include :-
- Check out the App Service deployment slot swapping task from VSTS.
- Don't forget to automate the creation of your infrastructure using the VSTS 'Azure Resource Group Deployment' task to deploy an Azure Resource Manager template to build your App Service Plan and Site + deploy config.
- Deploying a node.js app to App Service from VSTS
Thanks,
Will Eastbury