IIS on Nano server in a Hyper-V Virtual machine
This blog talks about setting up the IIS on nano server as a guest OS for the Hyper-V virtual machine. I shall write another blog on running my website on Nano within a container.
Before I get into installing IIS on Nano server in my hyper-V, let us get some background on Nano Server.
Nano Server:
- Nano server is available with Windows Server 2016
- This installation option is available for Standard and Datacenter editions of Server 2016.
- It doesn't have the *FULL* .Net Framework installed.
- It is similar to Windows Server Core, but significantly smaller, lighter, has no local logon capability, headless and only supports 64-bit applications and tools.
- It is a remotely administered server operating system optimized for private clouds and datacenters.
- It can be used as a DNS, File storage host, IIS web server to host the application which doesn't need full .net framework. It ideal to be used in a container or as a guest OS in virtual machine. It can also run on physical box.
- It takes up far less disk space, sets up significantly faster, and requires far fewer updates and restarts than Windows Server.
Difference between Server Core and Nano Server:
Server Core:
- Introduced with server 2008 R2
- Has powershell / cmd to help us in the remote administrative management
- GUI can be added if need be using install-windowsFeature
- supports RDP
Nano Server:
- This is not exactly same as server core. This is headless. Meaning there is no logon capability and No GUI option.
- It can be only operated remotely.
- It has fixed set of roles which can be installed.
- It is best for a container / hyper V server. It doesn't support installing the full version of .Net framework. But only a subset of the .net Fx (.net core) which was written specifically for the cloud and cross platform.
Note: Both run on physical and VM. Both run on the container. The dotnet core application which run on nano can run on server core too.
Creating the nano VHD:
I will be using a 180 day free trial ISO downloaded from the Evaluation Center site: https://www.microsoft.com/evalcenter/evaluate-windows-server-2016
Then follow the below steps in order:
1. Extract the ISO and you should be having it in your storage drive. I had it inside my F:\ drive
2. I created a sample folder C:\Nano\ and placed the NanoServerImageGenerator folder from the F:\NanoServer folder which we extracted in Step 1
3. Start Windows PowerShell as an administrator, Navigate to the folder C:\Nano\NanoServerImageGenerator\ and run the powershell command: Import-Module .\NanoServerImageGenerator.psm1 -Verbose
4. After this, you need to run the below command to create a nano server VHD which can be imported as a Guest OS in our Hyper V:
PS C:\nano> New-NanoServerImage -edition Standard -MediaPath F:\ -BasePath C:\nano -targetPath C:\nano\nanodemo.vhdx -deploymentType Guest -Computername nanodemo -storage -Package Microsoft-NanoServer-IIS-Package
This command copies the necessary files from media path F:\ drive into my base path C:\nano\. It converts the Nano Server .wim file into a .vhd file. It then moves the newly created standard edition of VHD to my target path. I have given my computer name as nanodemo and since I will be using it as a Guest OS, I have mentioned Guest in my deploymentType.
I am installing the IIS role using the -package switch while creating the VHD. Note that you can also install the IIS feature later, I will be explaining it later in this blog.
5. It will also prompt you for providing the administrator password. Remember this password and you are expected to provide this password while you login to your nano server.
Setting up the VM:
I have installed the Hyper-V role in my Host machine.
- Open the Hyper-V Manager, On the right-side Actions Pane, click on the Virtual Switch Manager and create a virtual switch. I am making use of an Internal virtual Switch in my demo.
- Click on Newà Virtual Machineà Give a name to Your Virtual machine à You can allocate some startup memory à Assign the Virtual switch connection which you created in Step 1.
- In the next step we can Use an existing Virtual hard disk
à Point it to the Virtual hard disk ( vhd) which we created above. - This will take some time to setup the Guest nano OS. After this, your Virtual machine will be up and running.
- You will be asked to login, use the same password which you had used while creating the vhd.

Configuring the Nano Server:
- After your login, you will see Nano Server Recovery Console as shown below:
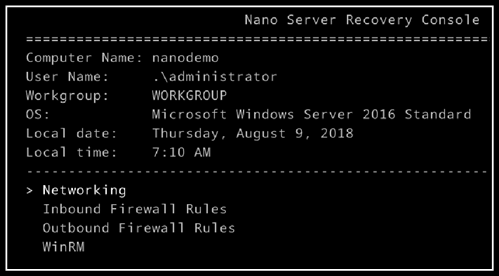
- You can enable the settings as per your requirement. Note: I have enabled the WinRM for remote management and enabled a few of the Inbound and outbound ports needed for my application.
- I have made a note of the IP address of my nano server from the Networking setting.
- Since I mentioned that the nano server is headless, we will be making use of the powershell to access the nano server remotely.
Accessing nano server remotely:
I am making use of the below powershell script to remotely login to the Nano server VM. Note: I have an entry in the C:\Windows\System32\drivers\etc\hosts file to map the nanodemo with the IP address found from Networking setting in my nano server.
$server="nanodemo"
Enter-PSSession -VMName $server -Credential administrator
The above command will prompt you to enter the administrator credentials. On successful login, the powershell is ready to accept your commands:
[nanodemo]: PS C:\Users\administrator\Documents>
If you haven't used the switch -Package Microsoft-NanoServer-IIS-Package while creating the nano VHD, you can also install the IIS remotely using the below commands:
Install-PackageProvider NanoServerPackage
Import-PackageProvider NanoServerPackage
Install-NanoServerPackage -Name Microsoft-NanoServer-IIS-Package
To see all the available packages on Nano server, you can use the command: Find-NanoServerPackage
Creating IIS website:
We will be making use of the newly introduced iisadministration module.
Remotely create the folder structure needed for your website and place your application code in nano server. Note: If you want to make use of the SMB ( \\nanodemo\ ) to access the nano server files remotely, ensure that the File and Remote sharing Firewall setting is enabled on nano server.
Import-Module iisadministration
New-IISSite -Name samplesite -BindingInformation "*:80:" -PhysicalPath C:\inetpub\samplesite
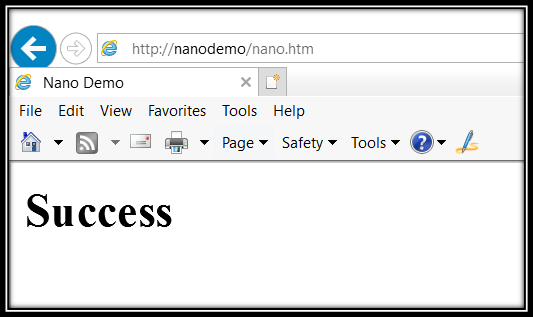
3. After this you can access the website:
References:
/en-us/windows-server/get-started/nano-server-quick-start /en-us/windows-server/get-started/getting-started-with-nano-server /en-us/windows-server/get-started/iis-on-nano-server
Hope this helps