Tip #43: Did you know... The way you register your IHttpModule depends on the request processing pipeline in which your module will run?
To get your custom IHttpModule up and running you need three simple things:
- Source code compiled into dll
- Registration in .Net
- Registration in IIS config system
Suppose, you have a simple module that raises an event with HttpContext as an argument before authentication happens, on BeginRequest:
 public void Init(HttpApplication context)
{
    context.BeginRequest += new System.EventHandler(context_BeginRequest);
}

public void Dispose() { }

public class PreAuthEventArgs : EventArgs
{
    public HttpContext httpContext;

    public PreAuthEventArgs(HttpContext context)
    {
        httpContext = context;
    }
}

public delegate void PreAuthRequestEventHandler(object sender, PreAuthEventArgs e);
public event PreAuthRequestEventHandler PreAuthEvent;

void context_BeginRequest(object sender, System.EventArgs e)
{
    if (PreAuthEvent != null)
    {
        PreAuthEvent(this, new PreAuthEventArgs(HttpContext.Current));
    }
}
}
Now, compile the module into a dll. To do this, right-click on the project in Visual Studio, choose Properties-->Application tab and specify “Class Library” for output type.

2. Now to register the dll for your website you have two options:
a) Register it with GAC, for which you have to have administrator privileges on the box – in most cases your development box. Use gacutil to add the assembly to GAC:
gacutil /if YouModule.dll
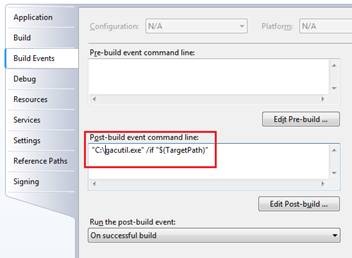
You can also gac a dll every time the project is compiled. You can accomplish this by gac’ing the target dll in Post-build event from the Properties of your project: right-click on the project in Visual Studio, choose Properties-->Build Events. Specify
<path to gacutil> /if $(TargetPath)
b) However, the most common solution is to place your dll into the /bin folder of your website. This option speaks in favor of portability of your website, which will not break xcopy deployment of your website.
3. Finally you need to register your module with IIS config system. The whole point of the article is to show that there are different ways of registering your module depending on the pipeline in which your website is executing in.
IIS7 introduced a concept of Integrated mode where requests are processed using the integrated IIS and ASP.Net request processing pipeline. In IIS6, IIS and ASP.NET request pipelines are separate, which for backward compatibility is called Classic mode in IIS7. If your website/application is executing in Classic mode or on IIS6 server you need to register your module differently.
For IIS6 and IIS7 Classic Mode register your module in web.config in the following manner:
 <configuration>
  <system.web>
    <httpModules>
      <add name="AuthenticationCheckerModule " type="AuthenticationCheckerModule "/>
    </httpModules>
  </system.web>
</configuration>
For IIS7 in Integrated Mode do the following:
 <configuration>
  <system.webServer>
    <modules>
      <add name="AuthenticationCheckerModule " type="AuthenticationCheckerModule "/>
    </modules>
  </system.webServer>
</configuration>
For more detailed information refer to this MSDN article:
Walkthrough: Creating and Registering a Custom HTTP Module
https://msdn.microsoft.com/en-us/library/ms227673.aspx
Kateryna Rohonyan
SDET, IIS Team