Tip #5 Did you know… How to Databind a ListView control?
ListView control is a new data control that is available with Visual Studio 2008. Using this control you can easily do Insertion, Deletion, Editing, Paging and Sorting of Data. This controls also gives you the flexibility of displaying data in various format by defining user-defined templates.
Here are the steps to databind a ListView to a SQLDataSource:
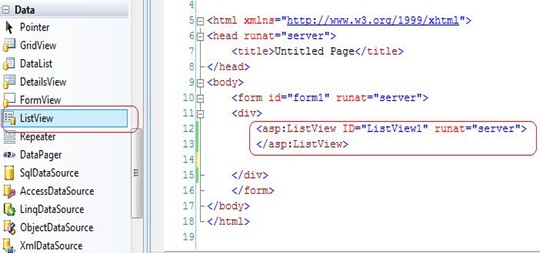
1. Add a list view control from the Data tab in ToolBoxand Visual Studio will generate code as shown in the image below.
2. Now let us try to bind this control to a SQLDataSource. For this, let us copy NorthWind.mdf to the App_Data folder in your web site.
3. Configure this SQLDataSource to use “Categories” table. This will generate the following piece of code:
 <asp:ListView ID="ListView1" runat="server" DataSourceID="SqlDataSource1">
</asp:ListView>


<asp:SqlDataSource ID="SqlDataSource1" runat="server"
            ConnectionString="<%$ ConnectionStrings:ConnectionString %>"
            SelectCommand="SELECT * FROM [Categories]">
</asp:SqlDataSource>
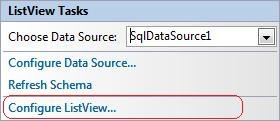
4. Bring up the ListView Tasks by clicking on the smart tag. Click on “Configure ListView” to bring up the “Configure ListView” dialog.
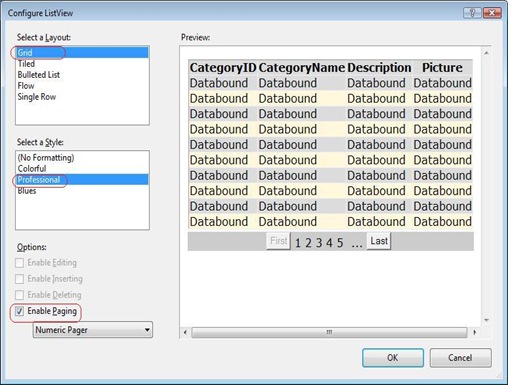
5. The Configure ListView Dialog will look like this. Here, you can select a layout and select one of the predefined styles. In this case, we have used “Grid” and “Professional”. If you want paging to be enabled you can check the “Enable Paging checkbox” as show in the dialog below. Click OK.
6. If you look at the Source View, you can see that Visual studio has inserted a bunch of ListView templates. The two important once are, LayoutTemplate and ItemTemplate. You will also see that there is DataPager control added . This control takes care of paging for you.
  <LayoutTemplate>
    <table id="Table1" runat="server">
    <tr id="Tr1" runat="server">
    <td id="Td1" runat="server">
        <table ID="itemPlaceholderContainer" runat="server" border="1"
        style="background-color: #FFFFFF;border-collapse: collapse;">
        <tr id="Tr2" runat="server" style="background-color:#DCDCDC;color: #000000;">
        <th id="Th1" runat="server">
        CategoryID</th>
        <th id="Th2" runat="server">
        CategoryName</th>
        <th id="Th3" runat="server">
        Description</th>
        <th id="Th4" runat="server">
        Picture</th>
        </tr>
        <tr ID="itemPlaceholder" runat="server">
        </tr>
        </table>
    </td>
    </tr>
    <tr id="Tr3" runat="server">
    <td id="Td2" runat="server"
    style="text-align: center;background-color: #CCCCCC;font-family: Verdana, Helvetica,#000000;">
         <asp:DataPager ID="DataPager1" runat="server">
            <Fields>
            <asp:NextPreviousPagerField ButtonType="Button" ShowFirstPageButton="True"
            ShowNextPageButton="False" ShowPreviousPageButton="False" />
            <asp:NumericPagerField />
            <asp:NextPreviousPagerField ButtonType="Button" ShowLastPageButton="True"
            ShowNextPageButton="False" ShowPreviousPageButton="False" />
            </Fields>
         </asp:DataPager>
    </td>
    </tr>
    </table>
</LayoutTemplate>
 <ItemTemplate>
    <tr style="background-color:#DCDCDC;color: #000000;">
    <td>
    <asp:Label ID="CategoryIDLabel" runat="server"
        Text='<%# Eval("CategoryID") %>' />
    </td>
    <td>
    <asp:Label ID="CategoryNameLabel" runat="server"
        Text='<%# Eval("CategoryName") %>' />
    </td>
    <td>
    <asp:Label ID="DescriptionLabel" runat="server"
        Text='<%# Eval("Description") %>' />
    </td>
    <td>
    <asp:Label ID="PictureLabel" runat="server" Text='<%# Eval("Picture") %>' />
    </td>
    </tr>
</ItemTemplate>
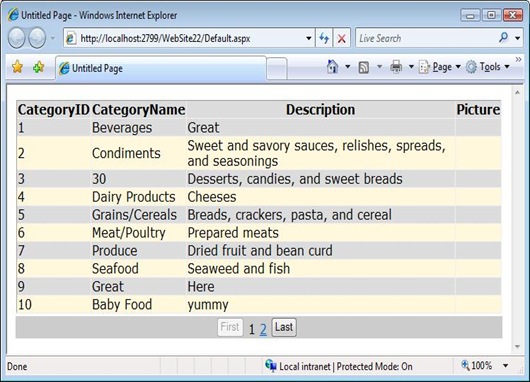
7. Run the page and this will display the page with paging enabled.
Happy coding !
Reshmi Mangalore
SDET, Web Development Tools


