Get the Outgoing IP address of your Azure Web Site
There are numerous reasons you might want an Azure Web Site outgoing IP address. For example, you need to configure a firewall to allow a request to connect to your internal systems or you want to add it to a white list.
The way I do this is by:
- Create an HTTP request using WebRequest
- Execute the HTTP request
- Download and analyze IIS Logs
Take note that the IP address you receive after performing an NSLOOKUP, for example, for RESERVED.azurewebsites.net, as shown in Figure 1, is not the outgoing IP address. It is instead the IP address that is resolved by the DNS system when your domain name is used.
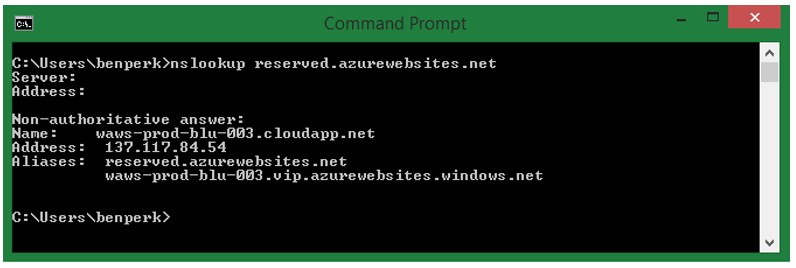
Figure 1, NSLOOKUP for my Azure Web Site
To find an outgoing Azure Web Site IP address, I started by creating 2 Azure Web Sites. One named STANDARD and another named RESERVED, for example. My goal is to find the outgoing IP address for RESERVED.
Create an HTTP request using WebRequest
Create some custom code similar to that shown in Figure 2 and point the sURL to a web site where you have the ability to download and analyze the IIS logs. I.e. https://standard.azurewebsites.net/outgoing.aspx is the STANDARD Azure Web Site, which I do have access to analyze the IIS logs. The code shown in Figure 2 is deployed to the RESERVED Azure Web Site and uses the System.Net.WebRequest class to create the HTTP request.
The outgoingip.aspx file, referenced via the sURL string on the STANDARD Azure Web Site URL is empty and contains no logic. It is only there to accept the request so that the IP address of the calling client (C-IP) can be written to the IIS logs. You can name the file anything you would like.
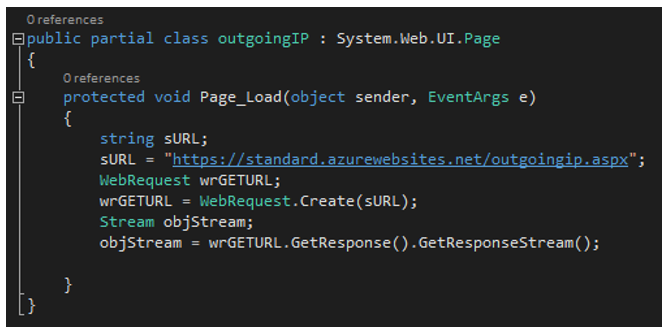
Figure 2, code to get the outgoing IP address from a Azure Web Site
Execute the HTTP request
Once the outgoingip.aspx file has been deployed to the STANDARD Azure Web Site to accept the request and the code shown in Figure 2 is deployed to the RESERVED Azure Web Site, execute the request from the RESERVED Azure Web Site.
As the code shown in Figure 2 is in the Page_Load() method of the ASP.NET page, the request is executed automatically when the page on the RESERVED Azure Web Site is requested.
Download and analyze IIS Logs
There are numerous ways to access the IIS logs. I wrote an article here which discusses how to configure the storage of the logs into an Azure Storage account. It is also possible to access them via FTP as illustrated in Figure 3.
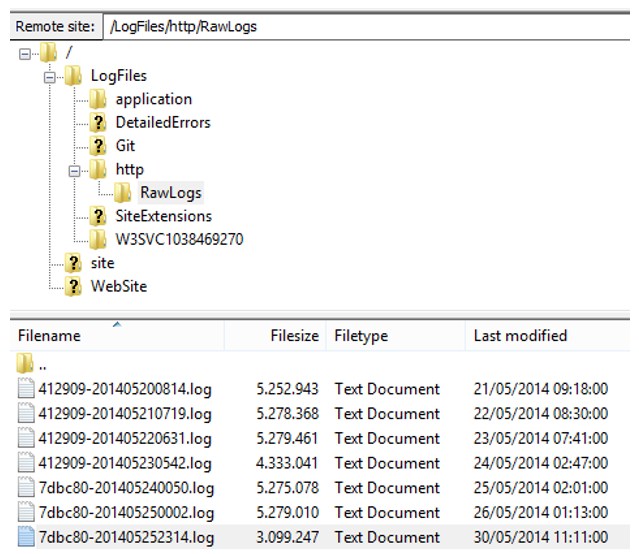
Figure 3, access File System IIS logs on Azure Web Sites
When I open the IIS log and search for, in this example, outgoingip.aspx, I find the request that was sent from my RESERVED Azure Web Site, which is the web site I want the outgoing IP address of. I look for the C-IP value which is the outgoing IP address, as illustrated in Figure 4.

Figure 4, the outgoing IP address of a Azure Web Site
You notice that the C-IP address shown in Figure 4 is not the same as the IP Address shown in Figure 1.
NOTE: There is currently **no guarantee** that outgoing IP addresses will remain static. For this reason you should consider opening the firewall or allowing access using a range of IP addresses. There is an official list available here. Given the current rate of change, your outgoing IP address may not yet exist in the downloadable document. At a point in the future the IP range document will be updated.
UPDATE 10-NOV-2014: Although there is still no guarantee that outgoing IP addresses will remain static, the range of IP addresses for a given stamp has been set to 4. Here is a list that contains the 4 IP addresses for your stamp.