Transform your Microsoft Azure Web Site
Microsoft Azure Web Sites is a multi-tenant hosting environment. An IIS applicationhost.config is generated by runtime for each Azure Web Site. This applicationhost.config contains well optimized default settings which is good for most scenarios. In some specific scenarios, you may want to change the default settings based on your application requirement. There is no way to edit the configuration file directly. To do this, you have to use the powerful XML Document Transformation.
In this article, we will talk about how to use XDT transform to change the web site configuration.
XML Document Transformation
XML Document Transformation is a feature released with ASP.NET 4. The Transformation Engine takes a source XML file (for example, web.config file) and a transform XML file (e.g. web.prod.config) and produces an output file (web.config ready for production environment). The XDT engine library is available on Nuget.
The root element of a transform file must specify the XML-Document-Transform namespace in its opening tag. The XML-Document-Transform namespace defines two attributes to specify the transformation actions: Locator and Transform.
The Locator attribute tells the Transformation engine how to find element or set of elements that you want to change/transform. The supported ways are:
- Match on value of a node’s attribute
- Exact XPath of where to find a node
- A condition match to find a node
The Transform attribute informs the Transformation engine what you want to do to the elements that the Locator attribute finds. The actions supported are:
- Replacing a node
- Inserting a node
- Delete a node
- Removing Attributes
- Setting Attributes
For details regarding the XML Document Transformation, please read the MSDN document.
Transformation Azure Web Site Configuration
The Azure Web Site allows changing the site’s applicationHost.config based on XML Document Transformation (XDT). To use this feature, you need:
1. Create the transform file and name it to applicationHost.xdt, then upload this file to the site root.
/site
applicationhost.xdt
/wwwroot
2. Restart the site. You can restart the site via Azure Management Portal, or via SCM site.
There are a set of environment variables passed to the XDT to assist in locating the appropriate elements and set the proper property.
- XDT_SITENAME is the current site name
- XDT_SCMSITENAME is the current SCM site name
- XDT_EXTENSIONPATH is the version specific extension physical path
- HOME is the site root path
Transformation Samples
Enable Failed Request Tracing (FREB) for slow requests
Failed Request Tracing feature logs detailed information on failed requests, including a trace of the IIS components used to process the request and the time taken in each component. This can be useful if you are attempting to increase site performance or isolate what is causing a specific HTTP error to be returned.
For how to use this feature, please reference this document.
After you enabled this feature for your site running on Azure Web Site, a tracing file will be generated if the HTTP response status code is between 400~600. Sometimes, you want use FREB tracing for requests which are slow but success. Years ago, I wrote a blog talked about how to enable FREB tracing for slow requests. That method requires manually merge tracing configuration to your root web.config. Now, I will show you how to do this via XDT transformation.
1. Create an applicationhost.xdt with follow content and upload to /site folder.
<?xml version="1.0"?>
<configuration xmlns:xdt="https://schemas.microsoft.com/XML-Document-Transform">
<system.applicationHost>
<sites>
<site name="%XDT_SITENAME%" xdt:Locator="Match(name)">
<traceFailedRequestsLogging enabled="true" customActionsEnabled="true" directory="D:\home\LogFiles" xdt:Transform="SetAttributes(enabled) "/>
</site>
</sites>
</system.applicationHost>
<system.webServer>
<tracing>
<traceFailedRequests>
<add path="*">
<failureDefinitions statusCodes="400-600" timeTaken="00:00:10" xdt:Locator="Match(statusCodes)" xdt:Transform="SetAttributes(timeTaken) "/>
</add>
</traceFailedRequests>
</tracing>
</system.webServer>
</configuration>
2. Restart the site
This transform file enables the FREB tracing and changed the default failure definition. Now, a tracing file will generated as long as:
- Request took longer than 10 seconds in IIS pipeline.
- Or, HTTP response status code is between 400~600.
Increase Fast CGI MaxInstances
By default, the maxInstances of FastCGI is set to 15 for standard site. If you are running single PHP site on large standard instance, default value of maxInstances may not able to fully utilize the CPU. Set maxInstances to (10 * number of processors) is a best practice. Follow transformation file changes the maxInstances of PHP 5.4 to 40 (large instance has 4 CPU cores.).
<?xml version="1.0"?>
<configuration xmlns:xdt="https://schemas.microsoft.com/XML-Document-Transform">
<system.webServer>
<fastCgi>
<application xdt:Locator="Match(fullPath)" xdt:Transform="SetAttributes(maxInstances)"
fullPath="D:\Program Files (x86)\PHP\v5.4\php-cgi.exe" maxInstances="40" />
</fastCgi>
</system.webServer>
</configuration>
Insert Environment Variable
If your Node.js application uses bson module, you may got follow error when deploy from GIT.

This is due to the bson project is based on Visual Studio 2005. By default, we try to build it using the VS 2005 MSBUILD which is not available on Azure Web Sites.
Follow applicationHost.xdt insert an environment variable to tell Node.js build the project using VS 2012 version MSBUILD.
<?xml version="1.0"?>
<configuration xmlns:xdt="https://schemas.microsoft.com/XML-Document-Transform">
<system.webServer>
<runtime xdt:Transform="Insert">
<environmentVariables>
<add name=" GYP_MSVS_VERSION " value="2012"/>
</environmentVariables>
</runtime>
</system.webServer>
</configuration>
You can find more examples on the kudu Xdt transform samples.
Troubleshooting Transformation
XDT is very powerful but not so easy to use. You may need try many times to get the expected result. Testing with WAWS is time consuming and may not acceptable for production environment. In this section, we will talk about how to test locally and troubleshooting transformation issues.
Using CTT Test on Local
XDT Transformation tool is a command tool based on XDT transform engine, which allows you to run XDT transformation on any XML files. The CTT tool is available on CodePlex.
You need follow the steps below to use CTT to test your transformation.
1. Using Kudu Console to download your site’s applicationHost.config to local machine.
2. Create your site’s applicationHost.xdt file
3. Run CTT tool with follow options.
ctt s:"applicationHost.config" t:"applicationhost.xdt" d:"result.xml" v
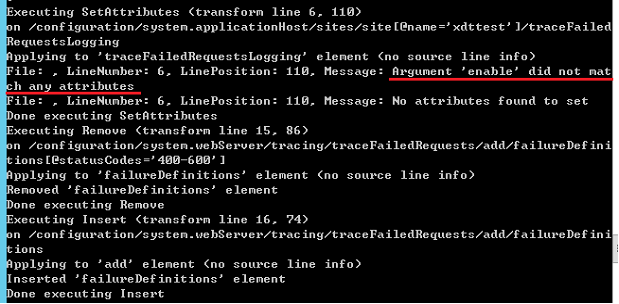
The “v” option request CTT print verbose output. If there is anything wrong, you can find useful information in the output. Figure 2 is a sample console output of CTT.
In addition, you can open the result.xml to verify the transformation result.
Azure Web Site Transform Logs
Azure Web Site generate a log file when executing the transform. If there is any problem during transform, Azure Web Site logs the details information. Below is a sample error message in the transform log.
2014-05-27T06:14:38 :(15,12), Microsoft.Web.XmlTransform.XmlNodeException: No attribute 'name' exists for the Match Locator ---> Microsoft.Web.XmlTransform.XmlTransformationException: No attribute 'name' exists for the Match Locator
at Microsoft.Web.XmlTransform.Match.ConstructPredicate()
at Microsoft.Web.XmlTransform.Locator.ConstructPath()
at Microsoft.Web.XmlTransform.Locator.ConstructPath(String parentPath, XmlElementContext context, String argumentString)
at Microsoft.Web.XmlTransform.XmlElementContext.ConstructXPath()
As Figure 3 showed, the transform log file is under /LogFiles/Transform.
![]()
Warning:
- The transformation happens before your site start. So, you need to restart your site after updated applicationhost.xdt.
- You may not able to access your site if there is an error during transformation.
- You may not able to access your site if the configuration is invalid after transformation. For example, inserted duplicated configuration item(s).
Reference
XML Document Transformation
https://msdn.microsoft.com/zh-cn/library/dd465326(en-us,VS.100).aspx
kudu Xdt transform samples
https://github.com/projectkudu/kudu/wiki/Xdt-transform-samples
CTT
New Azure Web Sites feature: configurable environment variables