No More Missed Requirements
Testing organizations in today's world find it challenging to plan a testing effort based on the requirements or user stories being written by business analysts, and to stay ahead of the developers' implementation schedule. Quite commonly test cases are authored in response to a requirement already having been implemented, which introduces a wasteful lag in the testing schedule and, more importantly, a collaborative gap between the testers and other players in the org.
How can we get the testers involved earlier?
Microsoft Test Manager (MTM), available for download with Visual Studio Team System 2010 Beta 1, makes it easy for testers to track requirements and plan test coverage in parallel with implementation so that testing can begin at first opportunity.
In this article we'll walk through an end-to-end scenario in which you, as a test manager, create a test suite that is based upon a newly authored requirement, keep the suite parked in a ready state pending implementation of the requirement by developers, then kick off testing by your team when the requirement becomes available.
Create a Requirement-based Suite
Once you've connected to your team project and created a test plan in Microsoft Test Manager (MTM) you can begin adding test suites that are based on requirements or user stories.
To start, go to the Testing Center in MTM, click Plan, then click Contents and then click Add requirements:

This brings up a dialog box listing all requirement work items in your project. You can use the searching, sorting and filtering capabilities of this dialog to help you zero in on the particular requirements that you want to test in the current plan. Select these items and click Add requirements to plan.
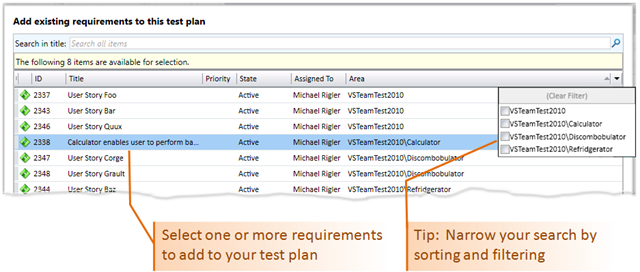
A requirement-based suite is created for each item you add to the plan. By default, the suite is given a name based on the ID and Title of its corresponding requirement, a name such as "2338: Calculator enables user to perform basic arithmetic". You can change the name by double clicking the suite or right clicking and pointing to Rename.
Newly created suites have State: In progress by default; but you should change this to State: In planning if you are not yet ready to run the tests in a suite. By parking the suite in a planning state you keep it from displaying in the Run Tests activity until you decide conditions are right for testing to begin. Later, when your suite is ready to be run -- and the requirement is ready to be tested -- you can flip back to State: In progress, thereby surfacing the suite in the Run Tests activity and enabling the testers on your team to begin running the tests.
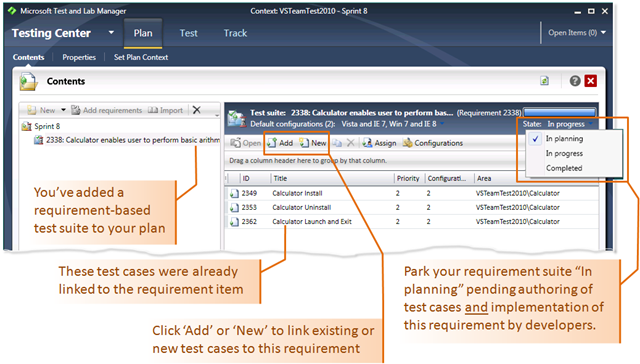
In the meantime, you'll want to finish your test suite. A requirement-based suite is automatically populated with any test cases in the project that are currently linked to the requirement work item in the TFS project. You can link new or existing test cases by clicking New or Add.
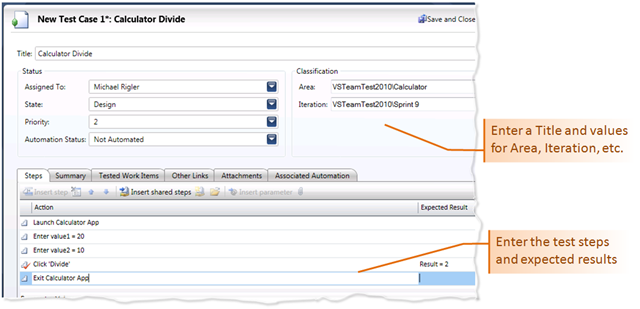
Click New to add a new test case to your requirement-based suite . Give the new test case a Title and enter details including the actions and expected results for each test step, and then click Save and Close. Your new test case is automatically added to the test suite, and is also automatically linked to the corresponding requirement work item.
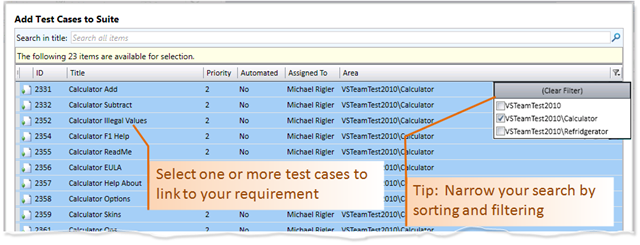
To add existing test cases to your requirement-based suite, click Add, which brings up a dialog box listing all test cases in your project. You can use the searching, sorting and filtering capabilities of this dialog to help you zero in on the test cases that cover this requirement. Select these items and click Add test cases to suite. Note that by adding test cases to the requirement-based suite, you are also linking those test cases to the requirement work item.
If you are concerned with testing your requirement across a matrix of configurations of hardware, OS, software, browsers, languages, or other characteristics, MTM gives you fine control over which tests are to be run on which test configurations.
When you add test cases to the suite they automatically inherit the default test configurations associated with your test plan; but you can click the down arrow adjacent to Default configurations to modify the defaults for your requirement-based suite . Furthermore, you can click the Configurations button to override the suite-level defaults and specify the exact configuration coverage of each test case in the suite. You might do this, for example, if you wanted to economize by running your highest priority test cases on multiple configurations while restricting your lower priority test cases on a single configuration. Or you might have a subset of test cases in your suite aimed at functionality that is only relevant to a particular configuration.
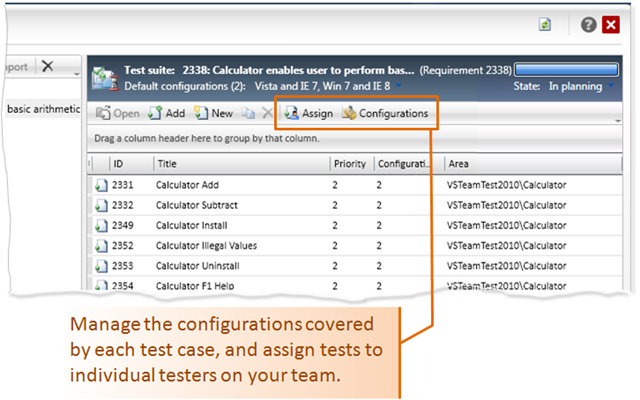
Now that you've built a requirements-based suite covering a matrix of test configurations, you can click the Assign button to delegate testing to individual testers on your team. This enables you to load balance resources across your team, or to assign testing based on areas of expertise or people's access to machines with particular configurations.
Let's say you've made your testing assignments and your requirement-based suite is good to go. At this point, if the requirement is already available in current builds of your product you can immediately pull the trigger by setting the suite State: In progress, thereby enabling your test team to begin running tests from the MLTM Run Tests activity.
In an ideal world, however, you would have done your planning early enough to beat the developers to the punch, and would now be poised to kick off testing when the developers finish their implementation tasks and check the requirement into the build.
Determining Which Builds Have New Requirements
As a tester, you can use MTM to "tune in" to the build cycle (TFS Team Build) and track the developers' progress toward implementing a requirement. You achieve this by assigning a build number to a test plan and subscribing to information about the availability and content of future builds.
From the Testing Center in MTM, click Plan, then click Properties, and then click the down arrow next to the Build Candidates value, which is initially set to "Any definition or build quality" for a new test plan.
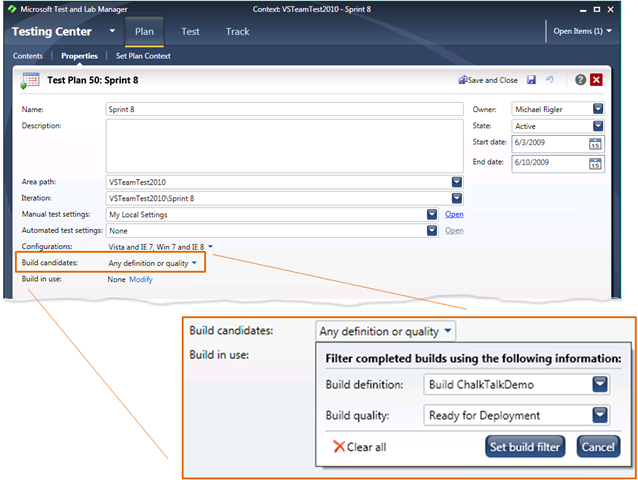
When you click the down arrow a small dialog box pops up to help you specify which build definition and build quality tag you want to track with the current test plan.
Having established a build definition to track, click the Modify link adjacent to the current Build in use to open the Assign Build activity. This activity shows you which build numbers are currently available and lets you assign one to your plan as a starting point for testing.
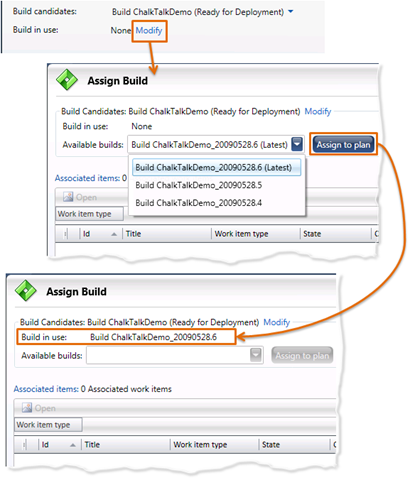
Note that while a particular build number is assigned to the plan, that build number is displayed on the Run Tests activity and stored with the results of any tests that are run.
You can access the Assign Build activity directly from the MTM Testing Center by clicking Track and then clicking Assign Tests. Use this activity to monitor the availability of new builds, view associated TFS work items such as resolved bugs, tasks and requirements, and evaluate whether and when to take a new build into test.
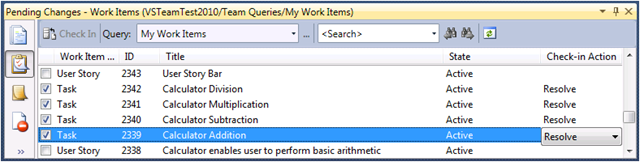
In particular, you'll want to know when the requirement for which you've created a test suite is available for testing with a particular build. The developer performing a check in using Visual Studio Team System 2010 has the opportunity to add a comment to a change set:
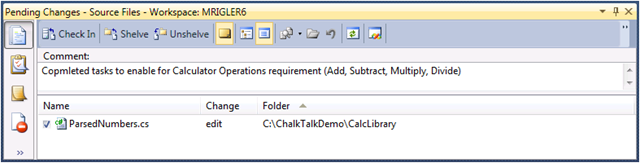
The developer can also associate bugs, task or other work items, and as a best practice should associate any tasks resolved by the check in:
This change set information surfaces in the MLTM Assign Build activity when the new build is available:
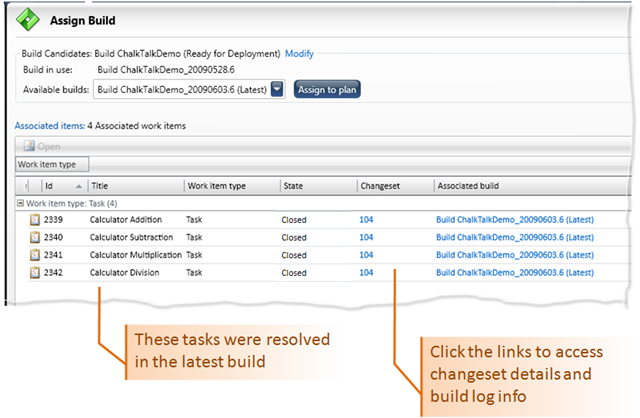
You now have the opportunity to drill down on the associated task items and the requirement they link to, and can open the detailed build and change set information, if needed, to ascertain whether the requirement is indeed ready to test. Having made that determination you can click Assign to plan to take the new build into test.
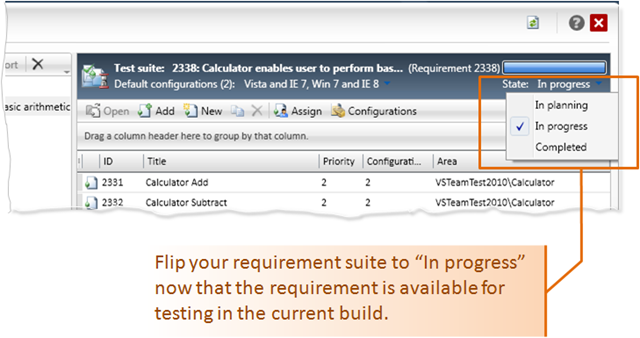
As a final step, return to Testing Center > Plan > Contents and change the state of your requirement-based suite to State: In progress.
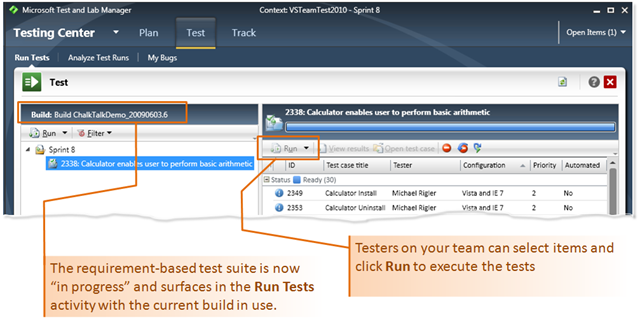
Now your requirements suite is open for testing in the Run Tests activity. The assigned testers can begin running the tests in the suite.
No More Missed Requirements
To recap what we've accomplished in this scenario with Microsoft Test Manager (MTM):
- We created a test suite based on a new requirement
- We prepared the suite for testing by --
- Authoring and adding test cases
- Ensuring adequate coverage of test configurations
- Assigning tests to individual testers on the team
- With the suite ready to go we monitored information about new builds
- And finally kicked off a round of testing when the requirement became available
This type of workflow brings the testers into earlier and stronger collaboration with the people in their org who are authoring and implementing requirements, thereby increasing the impact, effectiveness and efficiency of the test org.
Please give this a try with your Beta1 build and let us know what you think. We'd love to hear your feedback.
Thanks and Regards,
Michael Rigler