Deploying documents with content types and associating content types with libraries (Part I)
Content type, document and a library
In this series of posts I will show you how to create a content type project, deploy a Word document template together with the content type, and then associate the content type with document library on the SharePoint site. When developing content types, one common scenario is to deploy a document template along with the content type. The deployed document template appears on the New menu for the SharePoint library content type it is associated with. So, let’s start by creating a new C# SharePoint 2010 Content Type project.
- Start Visual Studio 2010 with administrator privileges.
- Click File à New Project and select the Content Type project under the SharePoint à 2010 node.
- Name the project MyContentType and click OK.
- Select the Deploy as a farm solution option in the wizard and click Next. We are creating a farm solution because we want to deploy the document using mapped folders and mapped folder can be used only in farm solutions.
- Select Document for the base content type.
- Click Finish to create the project.
Once the content type project is created, we can add a document to the project. This document will be deployed as a part of our content type. As mentioned earlier we are going to use a mapped folder to deploy the document. Right-click the project name and select Add -> SharePoint "Layouts" Mapped folder. This command creates the Layouts and MyContentType subfolder in the project as shown below.
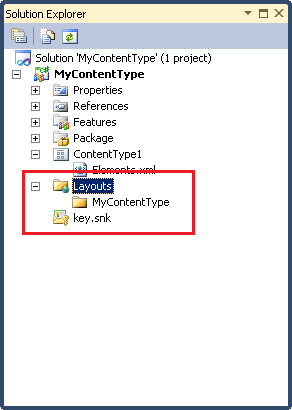
Assuming your document is prepared and ready you can right-click the MyContentType folder (under the Layouts mapped folder in the project) and select Add à Existing Item. Browse to the document you want to use, select it and click Add to add it to the mapped folder. When you add a document to the mapped folder the deployment type and location properties are automatically to the required values.
The next step is to associate this document with the content type. To do this, open the Elements.xml file under the ContentType1 folder and insert the DocumentTemplate element right after the FieldRefs closing tag:
<DocumentTemplate TargetName="/_layouts/MyContentType/MyDocument.docx"/>
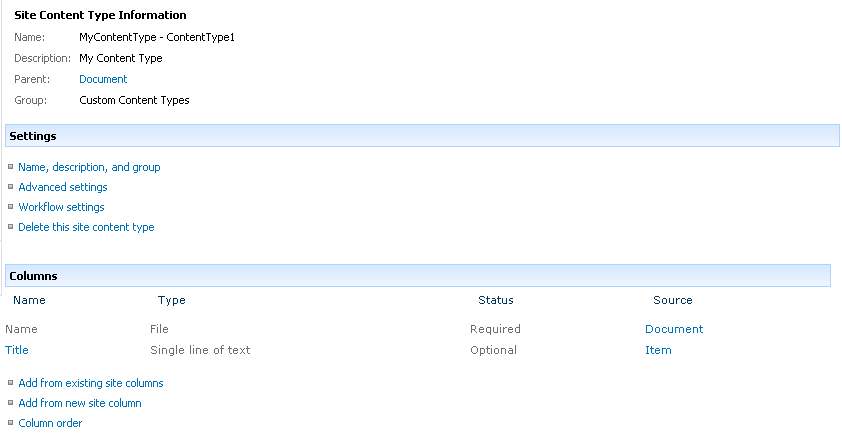
Using the DocumentTemplate tag we are pointing to the document that is going to be deployed to the layouts folder. You can press F5 now to deploy the project and start debugging. By default the Site Content Types page opens. Click MyContentType - ContentType1 in the list to open the content type settings page which should look similar to the one below.
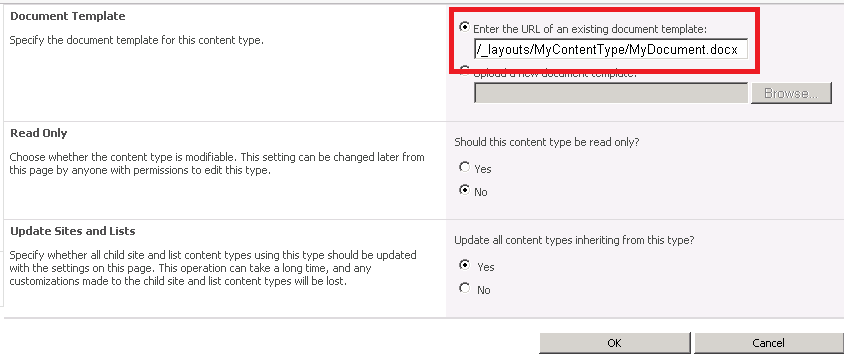
Click the Advanced settings link. Notice that the URL for the Document Template is set to the document we deployed as shown below.
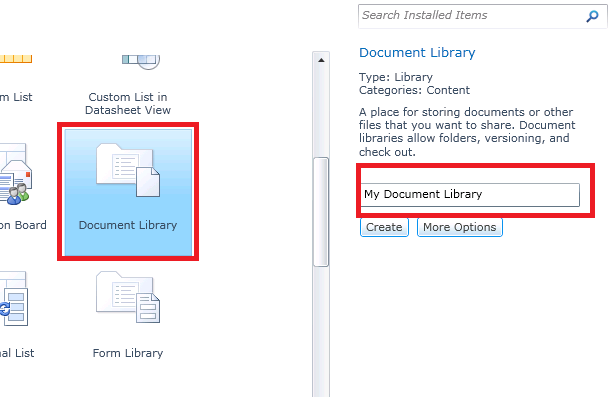
Let's try to associate this content type with the new document library. Click the Libraries link on the SharePoint site and then click the Create link to create a new library. Select the Document Library item from the list and name it My Document Library as shown below.
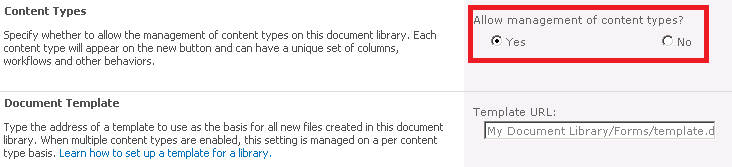
Click the Create button to create the document library. Now that we have the document library we need to associate the content type with it. Click the Library Settings button to open Document Library Settings page. The default content type for document libraries is Document content type - we need to change that in order to use the content type we deployed. But before we do that we have to allow the management of content types in this library. To do this, click the Advanced settings link and on the Advanced Settings page, click Yes to allow management of content types as shown below and click OK to save changes.
We are redirected back to the Document Library Settings page and you will notice the Content Types section on the page is now visible. Click the Add from existing site content types link to add our content type to the library. Select the MyContentType - ContentType from the list and click Add to associate the content type with the library. Click OK to save the changes - the content types section on the settings page now shows our content type.
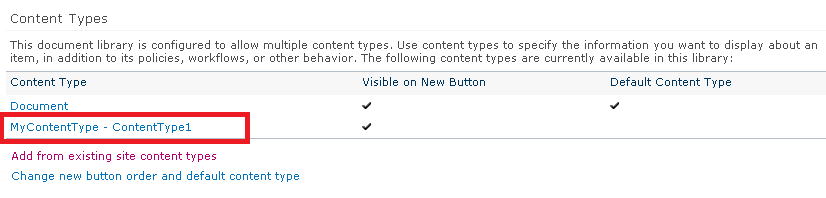
However, the Document content type is still set to be the default. We can easily change that by clicking the Change new button order and default content type link. On the page that opens uncheck the Document content type and click OK to save changes. This hides the Document content type and makes our content type the default.
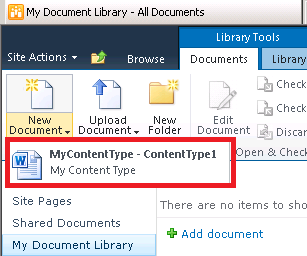
Finally, navigate back to the My Document Library and click the Documents tab on the ribbon. If you click the New Document button you will notice the document we deployed shows in the list.
Deploying and associating documents with content types is fairly easy. Associating the content type to a library however requires a bit more (manual) work. In the next post I will show you how to automatically allow management of content types in the library and make the content type a default one.
Peter Jausovec