Setup a Windows Development Environment in a Virtual Machine and Beyond
Let me explain how you can build your own Windows development system for anything Windows development from Windows Store app and Windows Phone, all the way to Windows Azure. All based on free and/or trial software.
Over the past couple of weeks I have been working on a small project to do exactly that. Developers on our team run a globally distributed series of HackFest events with varying attendees from inside Microsoft. The topics of HackFests range from building a Windows Phone app to improving an Azure service written at an earlier HackFest and more.
One of the challenges they faced was that people show up with a wide variety of development environments. Many have Windows installed, some come with their MacBook, running the latest Mac OS. Others had Ubuntu or Redhat installed. Yes, we are a diverse bunch too.
The goal of my project was to enable this smorgasbord of configurations to setup a proper development environment with a good number of tools installed. They should be up and running within the first hour of a HackFest.
Impossible? Well, let me explain how I did it and the limitations of this solution.
Let's start with some boundary parameters so I spare you time and you can stop reading if this doesn't match your requirements. Please read in full.
- The environment is built on Windows 8.1 and uses only Windows tools
- It is based on the concept of a virtual machine (VM) or Windows To Go
- It either requires hardware capable of running a Hypervisor (Hyper-V, Parallels, Fusion, VIrtualBox) or the hardware must be able to boot from a USB drive
- In order to use the described method to create a Windows To Go drive you will need to build your VM on Windows 8.x Enterprise Edition. There's plenty of other methods available (supported and unsupported) to build a Windows To Go drive.
- The preparation time is between 6-8 hours depending on your system's performance
- If you need to keep this image updated and maintained, there's very well documents processes and products available. None of it is part of this document.
Before going into more detail, here's a diagram to further explain deployment scenarios of the end result:
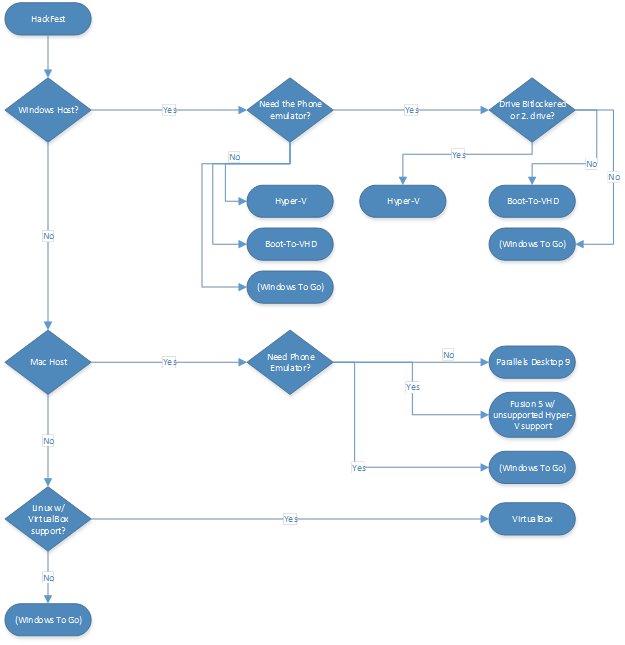
In a second post I'm going to explain how you get to the scenario that matches best your needs. For now let's get started and look at building the environment. BTW, if you want to setup a physical system instead, all of the software installation steps highlighted below – except for the VM stuff of course – apply.
All information is provided as-is. I cannot guarantee it will work in your environment, nor can I be held liable for any issues caused by following the steps or using the resulting image.
Creating the Developer Image
Initial VM setup
The virtual machine can be built on a Windows client system as well as on Windows Server. For my project I used both, Windows 8.1 with client Hyper-V installed and Windows Server 2012 with Hyper-V role installed.
- In Hyper-V Manager create a new VHD file via New…/Hard Disk. Make sure to create a Generation 1 VHD file. The size should be set to 60GB, dynamically expanding
- Create a new virtual machine using Windows 8.1 Enterprise 64-bit Eval. bits
- In Hyper-V manager create a new virtual machine. Attach the VHD file created in step 1. Install Windows 8.1 Enterprise. Do NOT connect to the network. Follow the installation until you get to the final Windows desktop.
- During installation you will create a local user account (hal9000 [no password] used throughout this document)
- Do NOT connect to the network while creating the virtual machine (allows you to setup a local user account)
- Make sure to turn off Windows Update via Control Panel/Turn Automatic Updating On or Off
- In Hyper-V Manager, Connect the VM to the network but DO NOT APPLY ANY UPDATES via Windows Update yet
At this point you should have a running version of Windows 8.1. In the next step we are going to setup the software you might need for developing a Windows, Windows Phone, or Windows Azure app. Well, almost any app you might want to develop for the Windows/Azure world. Kernel mode components like drivers excluded. :)
Setup of development software
Install Chocolately by running the following from an elevated command prompt:
@powershell -NoProfile -ExecutionPolicy unrestricted -Command "iex ((new-object net.webclient).DownloadString('https://chocolatey.org/install.ps1'))" && SET PATH=%PATH%;%systemdrive%\chocolatey\bin
Run the following commands in that order from the same elevated command prompt
cinst VisualStudio2012Ultimate
cinst dogtail.vs2012.3Once finished, continue and run the following command to install the .Net Framework 3.x
DISM /Online /Enable-Feature /FeatureName:NetFx3 /All /LimitAccess /Source:d:\ sources\sxs
(Where d:\ should be replaced with the drive containing your Windows installation source)
Reboot
Install Visual Studio 2013 Ultimate (select all options)
Reboot, log on as hal9000, and wait for the installation of Visual Studio to finish. Do NOT launch Visual Studio
From an elevated command prompt, run the following commands in the order presented
cinst nodejs
cinst fiddler4
cinst 7zip
cinst githubforwindows
cinst webpicommandline
choco webpi WPDTV3_RTM
cinst NugetPackageManager
cinst git
Exit the command prompt and start a new elevated command prompt
Run the following command
cinst poshgit
Reboot and log on as hal9000
Create a directory c:\temp
md c:\temp
Run the following command from an elevated prompt
webpicmd /install /products:"ARR,ARRv2_5_KB2589179,ARRv3_0,ASPDOTNETandWebTools2012 _2,BasicAuthentication,ClientCertificateMappingAuthentication,DACFX,DefaultDocument,DigestAuthentication,DirectoryBrowse,ECacheUpdate,ExternalCache,HTTPErrors,HTTPLogging,HTTPRedirection,IISClientCertificateMappingAuthentication,IISExpress,IISExpress_7_5,IISExpress_ByPlatform,IISManagementConsole,MVC3,MVC3Loc,MVC4Vs2010_Loc,MySQLConnector,NETFramework35,NETFramework4Update402,NetFx3,NetFx4,NetFx4Extended-ASPNET45,PowerShell,RequestFiltering,ServerSideIncludes,SMO,SMO_11_0,SQLCE,SQLCE_4_0,SQLCEforWM,SQLCETools,SQLCETools_4_0,SQLCLRTypes,SQLDOM,SQLLocalDB,SSDTVS2012,StaticContent,StaticContentCompression,UrlRewrite2,VWDOrVs11AzurePack,VWDOrVs11AzurePack.2.1,VWDOrVs2013AzurePack,VWDOrVs2013AzurePack.2.1,WASConfigurationAPI,WASProcessModel,WebMatrixWeb,WIF,WindowsAuthentication,WindowsAzureLibrariesNET_2_0,WindowsAzureLibrariesNET_2_1,WindowsAzurePowershell,WindowsAzureSDK_2_0,WindowsAzureSDK_2_1, WindowsAzureSDK_2_2,WindowsAzureXPlatCLI,WindowsInstaller31,WindowsInstaller45,WorkflowClient,WorkflowManagerTools" /accepteula /log:c:\temp\webpi-log.txt
If asked for the SQL server password, enter hal9000 or anything of your liking (jot it down somewhere). The installation will ask you to reboot to continue installing all components still missing from the initial run.
Allow the reboot and log back on as hal9000. The installation will continue to finish the application of productsInstall Git Tools for Visual Studio
Reboot and log on as hal9000
At this point, feel free to install any other tools and applications
Useful stuff might be:
cinst sublimetext2
cinst paint.net
cinst adobereader
cinst flashplayerplugin
cinst skydrive
cinst truecrypt
cinst synergy
cinst steam
cinst javaruntime
cinst notepadplusplus
Manually install all updates to the OS and installed application via Windows Update (Choose updates for Operating System and installed Microsoft products)
You may want to delete existing Restore Points from earlier installations to free up some disk space by running "Disk Cleanup" from Control Panel/Administrative Tools
The virtual machine is now ready and can be prepared for redistribution. At an elevated command prompt run the following commands:
cd sysprep
sysprep /generalize /oobe /shutdown
After the machine has shut down it is now ready for redistribution.
Final step
In our case, I did an extra step compressing the image as described below. This makes it easier for our teams to download the bits from our FTP servers.
Independent of your distribution method, it is recommended to compress the created VHD file using a tool like WinRAR. Using WinRAR it is recommended to create a self-extractable archive (SFX) with high compression (Note: The EXE file which will only run on Windows. In case you want to support on-Windows operating systems you should create just a simple archive). I recommend breaking it up into about 100 MB size chunks to make it easy to restart failed downloads. You can download WinRAR from this website. If required, make sure to buy a proper license.
(Optional) Creating a Windows To Go USB Device
Windows To Go allows you to run a fully configured development environment w/o any modifications to your system. As a condition the system must support booting from an external device like a USB stick or USB drive.
This method requires a system with a USB 3 port. Creating the Windows To Go device will only work with approved USB devices or fast USB 3 connected disk drives. Find a list of certified devices on the Microsoft website.
The fastest way to get to a Windows To Go USB device is to use the above created VHD file as source. The following steps assume you have a VHD readily prepared VHD file available.
Download the "Windows Automated Installation Kit (Windows AIK)" from here
Install the kit
Mount the created VHD file using Windows explorer or Windows Disk manager. Mounting the VHD file will "create" 2 local drives. For the next steps you will need the drive letter of the drive containing the Windows directory (the larger of the two drives).
Open an elevated command prompt
If it does not exist, create a local directory c:\temp
md c:\temp
Navigate to "C:\Program Files (x86)\Windows Kits\8.0\Assessment and Deployment Kit\Deployment Tools\x86\DISM\" or to where the imagex executable has been installed to
Run the following command and build a so called WIM file.
imagex /capture h: c:\temp\hackfest.wim "HackFest"
Where h: represents the volume the VHD file has been mounted under (step 3.) and c:\temp is any local directory to hold the WIM file. The tool will run for some time (up to 45 minutes or more), be patient
On your system, go to Control Panel/ Windows To Go
Insert a USB disk (Windows To Go Ready) in an available USB 3 port
Follow the dialog and add c:\temp to the Windows To Go search path. The HackFest WIM file will show up in the dialog as an option
Use this WIM file to create a Windows To Go USB device by clicking Next
Click Save and Exit
Once the tool has applied the WIM image to the USB device (30-60 minutes) it is ready to be used on any PC that supports booting from a USB device. Be aware that users of a Windows To Go devices with a MacBook will need to install the Boot Camp drivers once the system is readily configured and booted. I downloaded and installed the files on the USB drive prior to first boot and installed the drivers at the first occasion possible.
Using the Image
Based on the diagram at the top of this post I will explain in more detail how to use the image and what the different limitations are. Please stay tuned for a second post very soon.
I hope this was helpful and you will be able to follow my description to build your own developer image. It was my goal to thoroughly document the steps I took to create the image we use internally.
Please share your feedback as well as your experience with this image - should you use it. Any suggestions for additional software inside the virtual machine? Tell me.
[Update]
Installed Software
- Visual Studio 2012
- Visual Studio 2013
- Fiddler 4
- Chocolatey
- ASP.NET and Web Tools 2012.2
- Microsoft SQL Server 2012 Data-Tier Application Framework (DACFx) (May 2013)
- IIS: Default Document
- IIS: Directory Browsing
- IIS: HTTP Errors
- IIS: HTTP Logging
- IIS 7.5 Express
- IIS 7.5 Express (Sep 2011)
- IIS 8.0 Express (Windows Vista and up) Or IIS 7.5 Express (Windows XP)- August 2012
- IIS: Management Console
- ASP.NET MVC 3 (Visual Studio 2010)
- ASP.NET MVC 3 Tools Update Language Packs
- ASP.NET MVC 4 with Language Packs (August 2012
- MySQL Connector/Net
- .NET Framework 3.5 SP 1
- Microsoft .NET Framework 4 - Update 4.0.2
- .NET 3.5 for Windows 8
- .NET 4.5 for Windows 8
- .NET 4.5 Extended with ASP.NET for Windows 8
- PowerShell - Windows PowerShell
- IIS: Request Filtering
- SQL Server Shared Management Objects (2012 on Vista and up) or (2010 on XP or 2003 server)
- SQL Server 2012 Shared Management Objects (April 2012)
- Microsoft SQL Server Compact Latest
- Microsoft SQL Server Compact 4.0 SP1
- Microsoft SQL Server Compact 4.0 SP1 CTP1
- Microsoft SQL Server Compact Latest Scripting Tools
- Microsoft SQL Server Compact 4.0 SP1 Scripting Tools
- Microsoft System CLR Types for Microsoft SQL Server 2012 SP1 (Latest)
- Microsoft SQL Server 2012 SP1 Transact-SQL ScriptDom (Latest)
- Microsoft SQL Express Local DB Edition 11.0
- IIS: Static Content
- IIS: Static Content Compression
- Windows Azure SDK for .NET - 2.1
- Windows Azure SDK for .NET - 2.2
- IIS: WAS Configuration API
- IIS: WAS Process Model
- Microsoft WebMatrix 3
- Windows Azure Libraries for .NET - 2.0
- Git Tools for Visual Studio
- PoShGit
- NodeJS
- Git for Windows (command line and GUI)
- Windows Azure Libraries for .NET - 2.1
- Windows Azure PowerShell
- Windows Azure SDK - 2.0
- Windows Azure SDK - 2.1
- Windows Azure Cross-platform Command Line Tools
- Windows Installer 3.1
- Windows Installer 4.5
- Workflow Client 1.0
- Workflow Manager Tools 1.0 for Visual Studio 2012
- Windows Phone SDK 8.0
Setup a Windows Development Environment in a Virtual Machine and Beyond.pdf