Step by Step: Kerberos in NLB with Shared Content
SCENARIO:
| IIS SERVER | : | WIN2K3OWA (192.168.0.2) and VIVEKKUMIIS (192.168.0.3) |
| NLB CLUSTER | : | TESTWEBLB (192.168.0.30) |
| FILE SERVER | : | WIN2KIIS-VPC (192.168.0.4) |
| DOMAIN | : | ANJANEYA.local (192.168.0.1) |
All the servers are member of the ANJANEYA.local domain
CONFIGURATION:
Step 1:
Configuring NLB Cluster
Network Load Balancing can be installed from the Local Area Connection Properties.

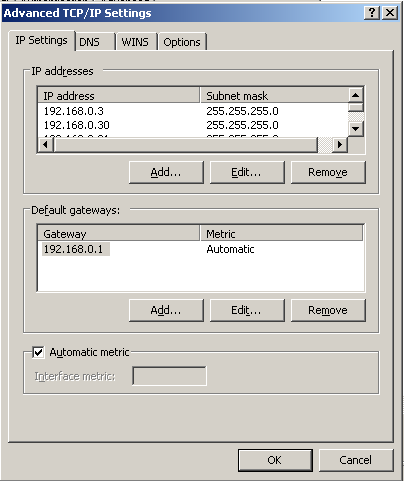
Click TCP/IP properties and add the Virtual Cluster IP Address in the IP addresses.
Open Network Load Balancing Manager from Start -> All Programs -> Administrative Tools
Right click on Network Load Balancing Clusters and click New Cluster

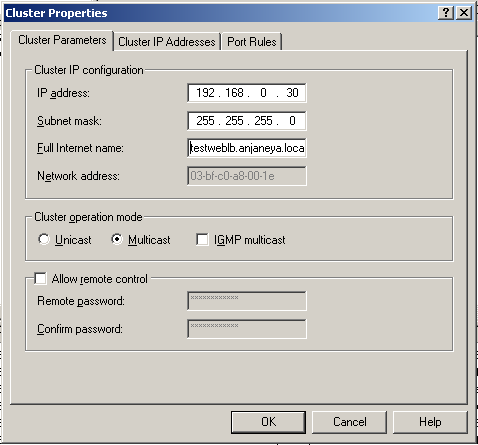
Add the Cluster IP Address, Full Internet name and click Multicast.
Click Next.
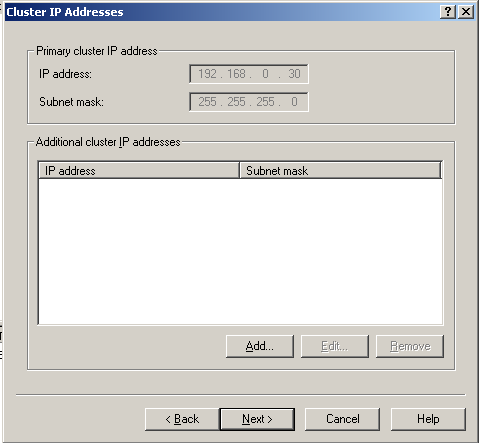
You can add additional cluster IP addresses if required
Click Next.

Click Next.
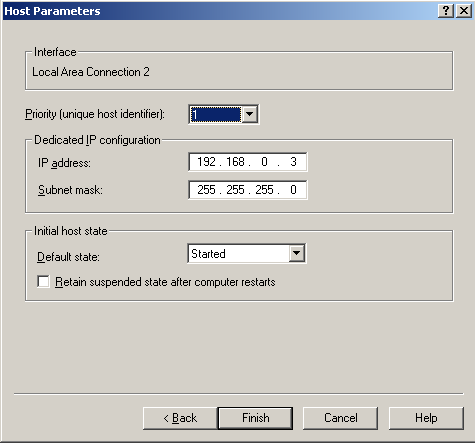
Enter the Host and click Connect.

Click Next.
Verify that the settings are correct.
You can decide the Priority of the host on this screen.
Click Finish.
Now add other host in the cluster by right clicking on the cluster name and clicking Add Cluster Host.
You will get the following error
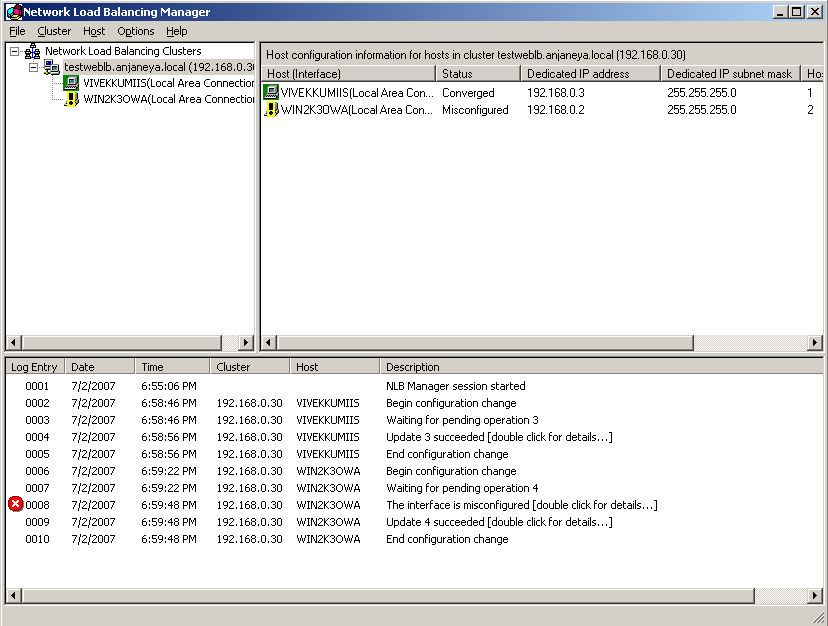
Double clicking on the error shows the following error:

Add the Cluster IP Address in the TCPIP properties on the second node and the issue will resolve.
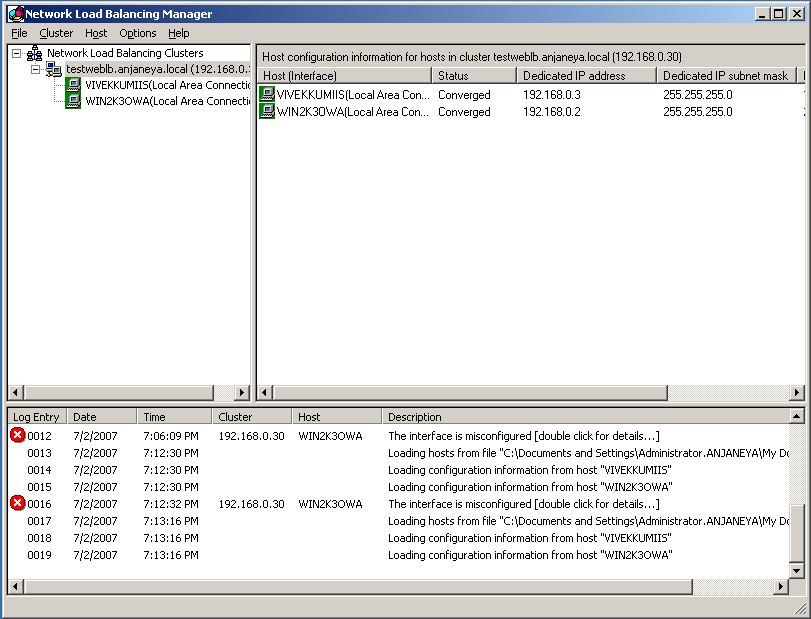
The successful configuration of NLB Cluster nodes looks like this.
Step 2:
Share folder with adequate permission on the File Server
- Right click on the folder which contains the web content.
- Click Sharing and Security… (Windows 2003) and Sharing… (Windows 2000).
- Click Share this folder and type Share name in the text box (wwwroot).
- Click Permissions.
- Remove Everyone and click Add… .
- Under Users, Computers and Groups, under Look in: select the Entire Directory or the domain name (Anjaneya.local).
- Under the text box, type Domain Users and click OK.
- Give Read permission for the Domain Users.
- Click Security Tab uncheck Allow inheritable permissions from parent to propagate to this object.
- Click Copy in the Security dialog box.
- Remove Everyone from the list and click Add… .
- Under Users, Computers and Groups, under Look in: select the Entire Directory or the domain name (Anjaneya.local).
- Under the text box, type Domain Users and click OK.
- Give Read & Execute, List Folder Contents and Read permission for the Domain Users.
Step 3:
Creating User in Active Directory Users and Computers
- Click Start, point to Administrative Tools, and then click Active Directory Users and Computers to start the Active Directory Users and Computers console.
- Click the domain name that you created (Anjaneya.local), and then expand the contents.
- Right-click Users, point to New, and then click User.
- Type the first name (serviceaccount), last name, and user logon name of the new user (serviceaccount), and then click Next.
- Type a new password, confirm the password, and then click Password never expires.
- Click Next.
- Review the information that you provided, and if everything is correct, click Finish.
Step 4:
Configuring IIS on the Servers
Creating Application Pool in IIS
- Click Start, point to All Programs, point to Administrative Tools, and then click Internet Information Services (IIS) Manager.
- In the Internet Information Services snap-in, click the name of the server (VIVEKKUMIIS) on which you want the Application Pool to be created.
- Right click on the Application Pools folder and click New and then click Application Pool… .
- In Application pool ID: type the Application Pool name (Kerb).
- Under Application pool settings, click Use existing application pool as template.
- Select DefaultAppPool from the drop down Application pool name and click OK.
- Right click on the application pool we created (Kerb) and click Properties.
- Click Identity and click Configurable.
- Click Browse and click Locations… , select Entire Directory or the domain name (Anjanaye.local), click OK.
- Type the domain account we created (serviceaccount), click Check Names to verify the account.
- Click OK.
- Enter the password and confirm password, click OK.
Creating Website in IIS
- Click Start, point to All Programs, point to Administrative Tools, and then click Internet Information Services (IIS) Manager.
- In the Internet Information Services snap-in, click the name of the server (VIVEKKUMIIS) on which you want the Web site to be created.
- Right click on the Web Sites folder and click New and then click Web Site… .
- When the Web Site Creation Wizard starts, click Next.
- On the Web Site Description page, type your Web site description in the Description box (Kerb Test), and then click Next.
- On the IP Address and Port Settings page, click the Cluster IP address that you are using (192.168.0.30), type the TCP port you are using (if it is different than the default port), type the host header (testweblb), and then click Next.
- On the Web Site Home Directory page, type the path to your server's home directory in the Path box (\\WIN2K3-VPC\wwwroot), uncheck Allow anonymous access to this Web site and then click Next.
- On the Web Site Security Credentials, accept the defaults and then click Next.
- On the Web Site Access Permissions page, click Read and Run scripts (such as ASP) and then click Next.
- Click Finish, and then verify the creation of your Web site in the console tree in the left pane.
- Right click on the website (Kerb Test), click Properties.
- Click on Home Directory and under Execute Permission select Scripts only.
- Under Application Pool click on the drop down and select the application pool we created (Kerb).
Follow the above steps on the other IIS server as well.
Step 5:
Adding the domain user in IIS_WPG group on IIS Server
- Open Computer Management
- In the console tree, in Local Users and Groups, click Groups.
- Click the group (IIS_WPG) and click Properties.
- Click Add.
- Click Locations... and select the Entire Directory or the domain name (Anjaneya.local), click OK.
- Type the names of the users in the lower box (serviceaccount), and click Add.
- If you want to validate the user click Check Names.
- Click OK.
Step 6:
Configuring the User and Computers to delegate on the Domain
- Click Start, point to Administrative Tools, and then click Active Directory Users and Computers to start the Active Directory Users and Computers console.
- Click the domain name that you created (Anjaneya.local), and then expand the contents.
- Right click on the domain name (Anjaneya.local) and click Find… .
- Under Find, select Users, Contacts, and Groups.
- Type the user name (serviceaccount) and then click Find Now.
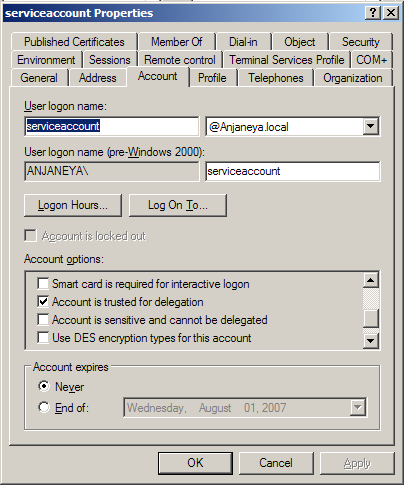
- In the Search results pane you will find the user (serviceaccount), right click on it and click Properties.
- Click Account tab and under Account options: scroll down and check Account is trusted for delegation.
- Click OK.
- Under Find, select Computers.
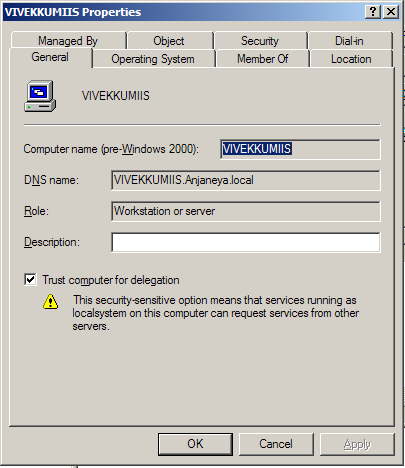
- Type the computer name (VIVEKKUMIIS) and then click Find Now.
- In the Search results pane you will find the user (VIVEKKUMIIS), right click on it and click Properties.
- Click Trust computer for delegation.
- Click OK.
- Follow the steps from 9 to 13 for the other computer (WIN2K3OWA).
Step 7:
Create a DNS entry
- Click Start, point to Administrative Tools, and then click DNS console.
- Expand the Server Name, expand Forward lookup Zones.
- Expand the Domain Name (Anjaneya.local).
- Right click on the domain name and click New Host (A)… .
- Under Name type the name you will be using for the virtual cluster (testweblb).
- Type the IP address of the virtual cluster (192.168.0.30).
- Check the Create associated pointer (PTR) record.
Step 8:
Create a SPN for the domain account
This is a Service Principal Name and it allows a client to connect/authenticate to a service. It basically identifies the service in Active Directory. If there is no SPN or it is invalid then we can't connect to service using Kerberos authentication.
Automatic registration of SPN
When a service starts it will attempt to automatically register an SPN. To do this it must be either a domain administrator or local system account.
Setspn.exe tool is part of the Windows Resource kit. You may already have this if you've installed resource kit. It will install to C:\Program Files\Resource Kit\ by default (when installed via resource kit). Use it to create, delete and list SPNs.
Windows Server 2003 Service Pack 2 32-bit Support Tools
Windows 2000 Resource Kit Tool : Setspn.exe for Windows 2000
Syntax:
SetSPN –A ServiceName/<ComputerName>.<DomainName> <AccountName>
Here:
SetSPN –A HTTP/testweblb.anjaneya.local anjaneya\serviceaccount
SetSPN –A HTTP/testweblb anjaneya\serviceaccount
Use QuerySPN.vbs file to verify the SPN’s created.
C:\>cscript queryspn.vbs http/testweblb
Microsoft (R) Windows Script Host Version 5.6
Copyright (C) Microsoft Corporation 1996-2001. All rights reserved.
CN=serviceaccount,CN=Users,DC=Anjaneya,DC=local
Class: user
User Logon: serviceaccount
-- http/testweblb
-- http/testweblb.anjaneya.local
You will need to replicate the Active Directory to reflect the changes or logoff and login on the client to test the application.
Step 9:
Configure Internet Explorer
- Open Internet Explorer.
- Click Tools -> Internet Options….
- Click Security tab and click Customer Level… .
- Under User Authentication, verify that you have Automatic logon only in Intranet zone.
- Click Sites… click Advanced… and add the URL in the Add this Website in this zone: if the URL has a dot(.) in it.
- Click Add and click Close.
- Click OK.
- Click on Advanced tab and under Browsing uncheck the Show friendly HTTP error messages and under Security verify that you have Enable Integrated Windows Authentication checked.
- Click OK.
- Restart Internet Explorer.
Browse the website, https://testweblb and walla..
Hope this helps you configure Kerberos in your network.
Stay tuned for more on Kerberos Configuration and Troubleshooting