Yet another CI/CD post - Java, Apache spark, Cloudera, Azure and TFS
The Visual Studio Team Services (VSTS) and Team Foundation Server (TFS) team is committed to the "Any language, any platform" principle and this article describes just one of the infinite and diverse CI/CD workloads you can setup on VSTS/TFS.
In this article we’ll demonstrate how to pull together all the technologies and tools mentioned in the title into a solid Continuous Integration/Continuous Delivery (CI/CD) workflow using Team Foundation Server (TFS).
Big data workloads and security considerations between an on-premise TFS and Azure resource groups are out of scope for this article.
Let’s start with a basic glossary (assuming we can skip Java & Azure  ).
).
Glossary
Apache Hadoop is a collection of open-source software utilities that offers distributed storage and distributed processing of very large data sets on computer clusters built from commodity hardware. Hadoop services provide for data storage, data processing, data access, data governance, security, and operations.
Apache Spark is a fast, in-memory data processing engine with development APIs to allow data workers to efficiently execute streaming, machine learning or SQL workloads that need fast frequent access to datasets.
Cloudera is a leading provider that offers a unified platform for storing, processing and analyzing data based on Apache Hadoop ecosystem. The platform is available both on-premises and across multiple cloud providers.
Cloudera's Stack diagram ![clip_image003[4]](https://msdntnarchive.blob.core.windows.net/media/2018/04/clip_image00343.png "clip_image003[4]")
For more information, you can refer to the Getting started on Microsoft Azure guide on Cloudera’s documentation page.
Code
In this example we are using TFS 2018, which is the on-premises offering of VSTS, to host our Git repository for the Apache Spark based application.
However, you can host the repository wherever you want (GitHub, Bitbucket or any other remote Git repo) and still use the CI/CD capabilities of TFS.
Java is the chosen programming language for this task although you can write Apache Spark apps with Python or Scala.
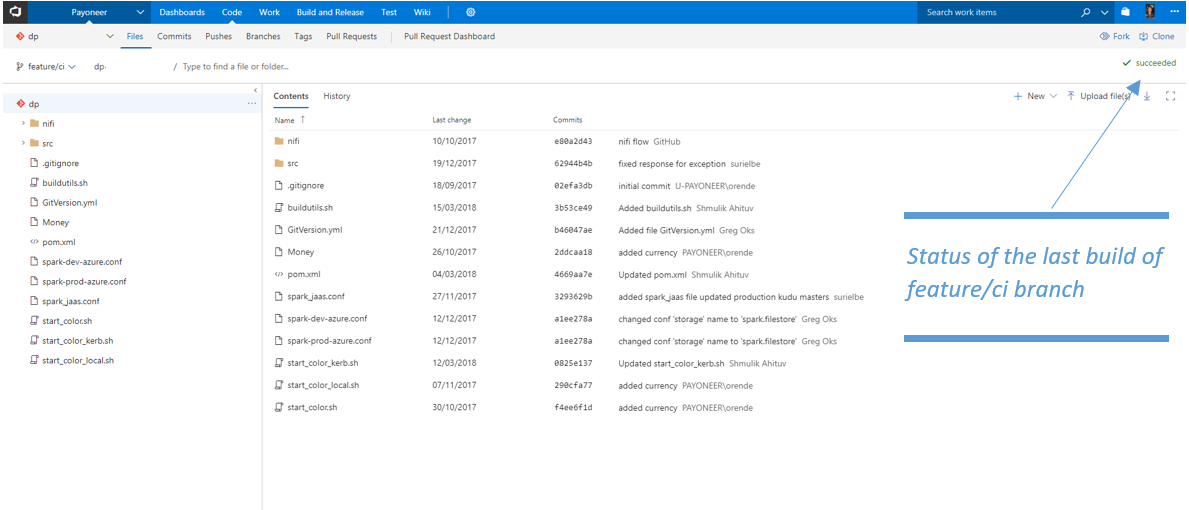
By using the Feature branch workflow, which consists of one long-lived branch (aka master) and feature branches for isolation, we can leverage the great Pull Requests (PR) features in TFS. PRs in TFS provide us with an easy mechanism for code review and discussion, as well as for applying policies on the master branch such as requiring a successful build before a merge or specific reviewers on specific paths of the Git repo.
Status of the last build of feature/ci branch
Continuous Integration (Build)
Now we need to build and test our Spark application with every new change to the repo.
On the triggers tab, you can choose whether to trigger a build only upon changes in the master branch or upon changes to all branches.
You can also choose Xthe platform for the build - Linux, Windows or Mac. In our example, we build for changes to all branches and we run on a Linux agent hosted in Azure (we’ll explain later in this post why the agent is hosted on Azure).
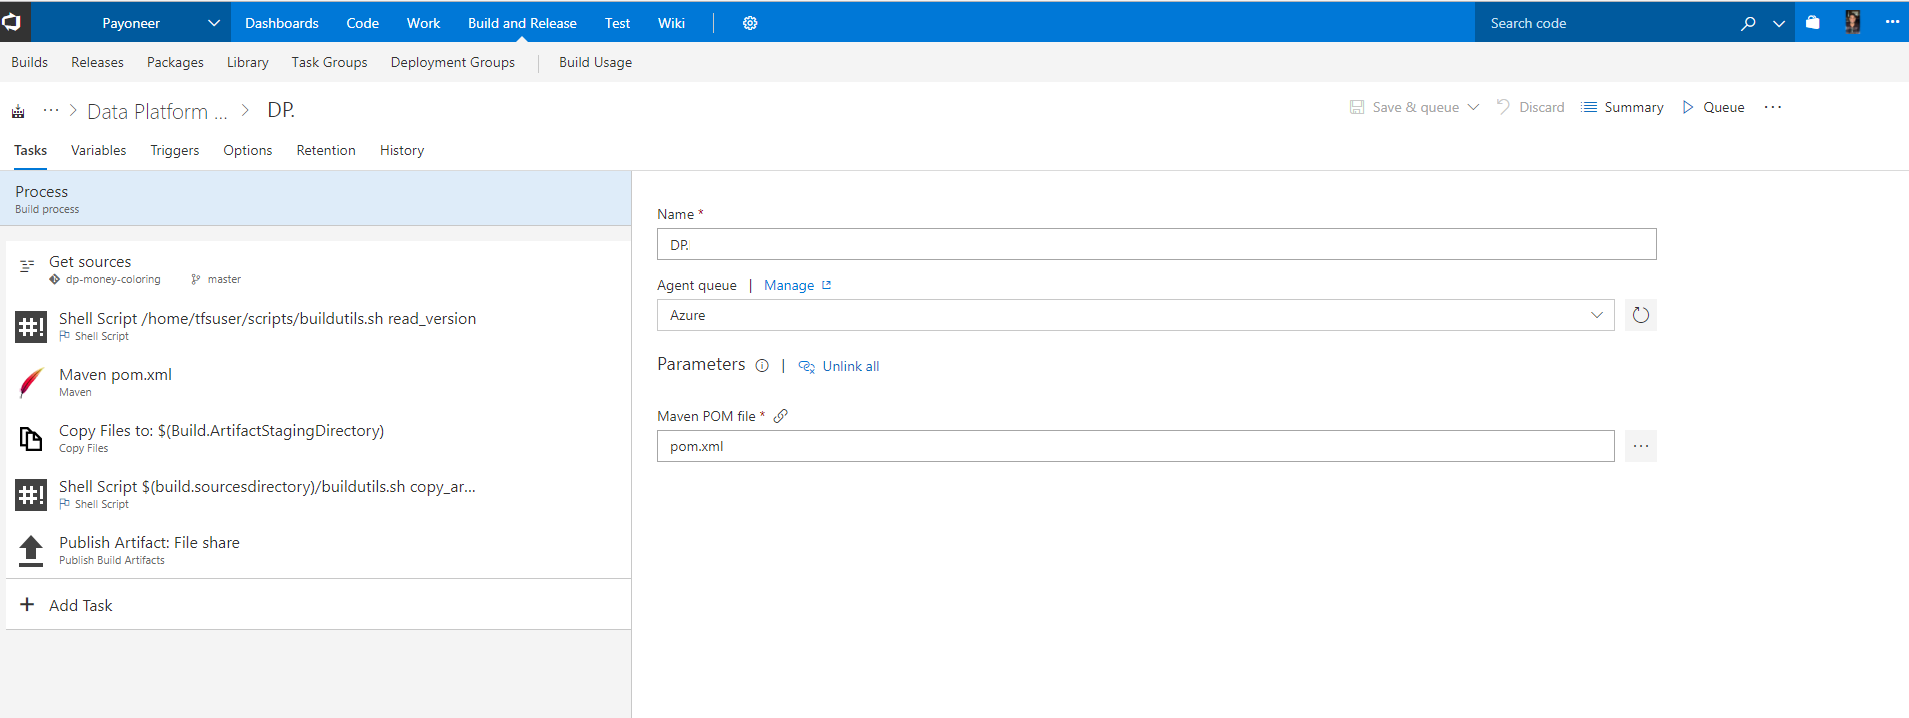
When it comes to building a Java app we have several options. In this example, we use Maven for managing our dependencies as well as for building, testing and packaging our app.
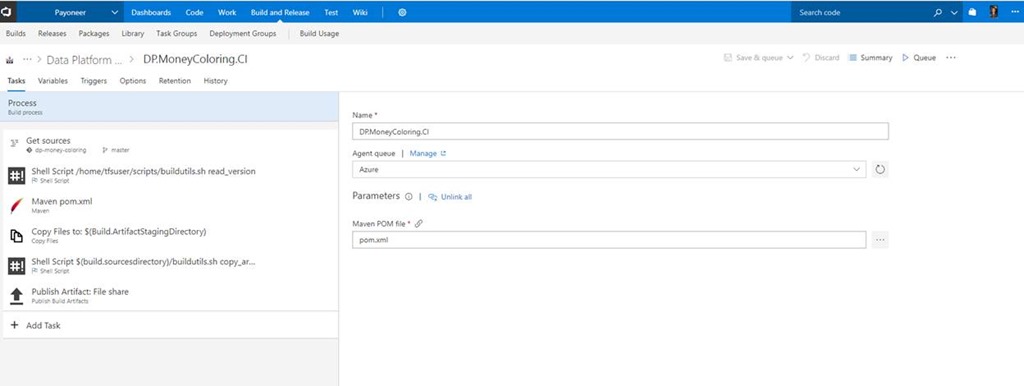
The following is a detailed description of the build steps (see screenshot below):
- Get sources - gets the sources out of the repository
- Shell script - runs a custom bash script to:
- Read the SemVer out of a yml file located in the repo
- Set a new build number in runtime that includes the new version number.
- Expose the version number to make it available and accessible for the rest of the build tasks
- Maven - uses the Built-in maven task in TFS to build, test and produce our Jar artifact for our java application. We are also passing the version number from the previous step to Maven
- Copy files - copies the required artifacts (Jar, Bash scripts and configuration files) to the artifact staging directory
- Shell script - runs a custom bash script to copy the artifacts from the artifact directory to a Linux based file share server hosted on Azure.
- Publish artifact - publishes an empty artifact so that it’s available in the pick list when creating a new Release in TFS Release management.
Build Artifacts on Linux & Uber jars:
When it comes to publishing an artifact in VSTS/TFS There are 2 options: ‘File share’ (which works only on windows) and ‘Server’ (which stores the artifact in TFS server).Q: Ok, we are running on a Linux agent, why not use the ‘Server’ option when publishing the artifact?
In any other case using the ‘Server’ option would be the correct approach. But building an Apache spark application requires you to package all of the dependencies alongside your own code in order to distribute it to a Spark cluster. This can leave you with a 200 MB sized jar (AKA Uber jar) that can quickly blow up your TFS database.Q: Why use Azure for storing build artifacts when using an on-prem TFS?
As our Spark cluster is hosted in a Cloudera manager on scalable Azure resource group, we chose to copy the artifacts to a file share within the same resource group of the Cloudera manager. This ensures that the deployment of the Uber jar will be as fast as possible, as opposed to copying it from our on-premise servers to Azure.
Continuous Delivery (Release)
So far, we’ve written the app, pushed it to our Git Repo hosted in TFS, built, tested, and packaged it, and we are ready to ship it into a pipeline that consists of 2 environments:
TEST -> PROD:
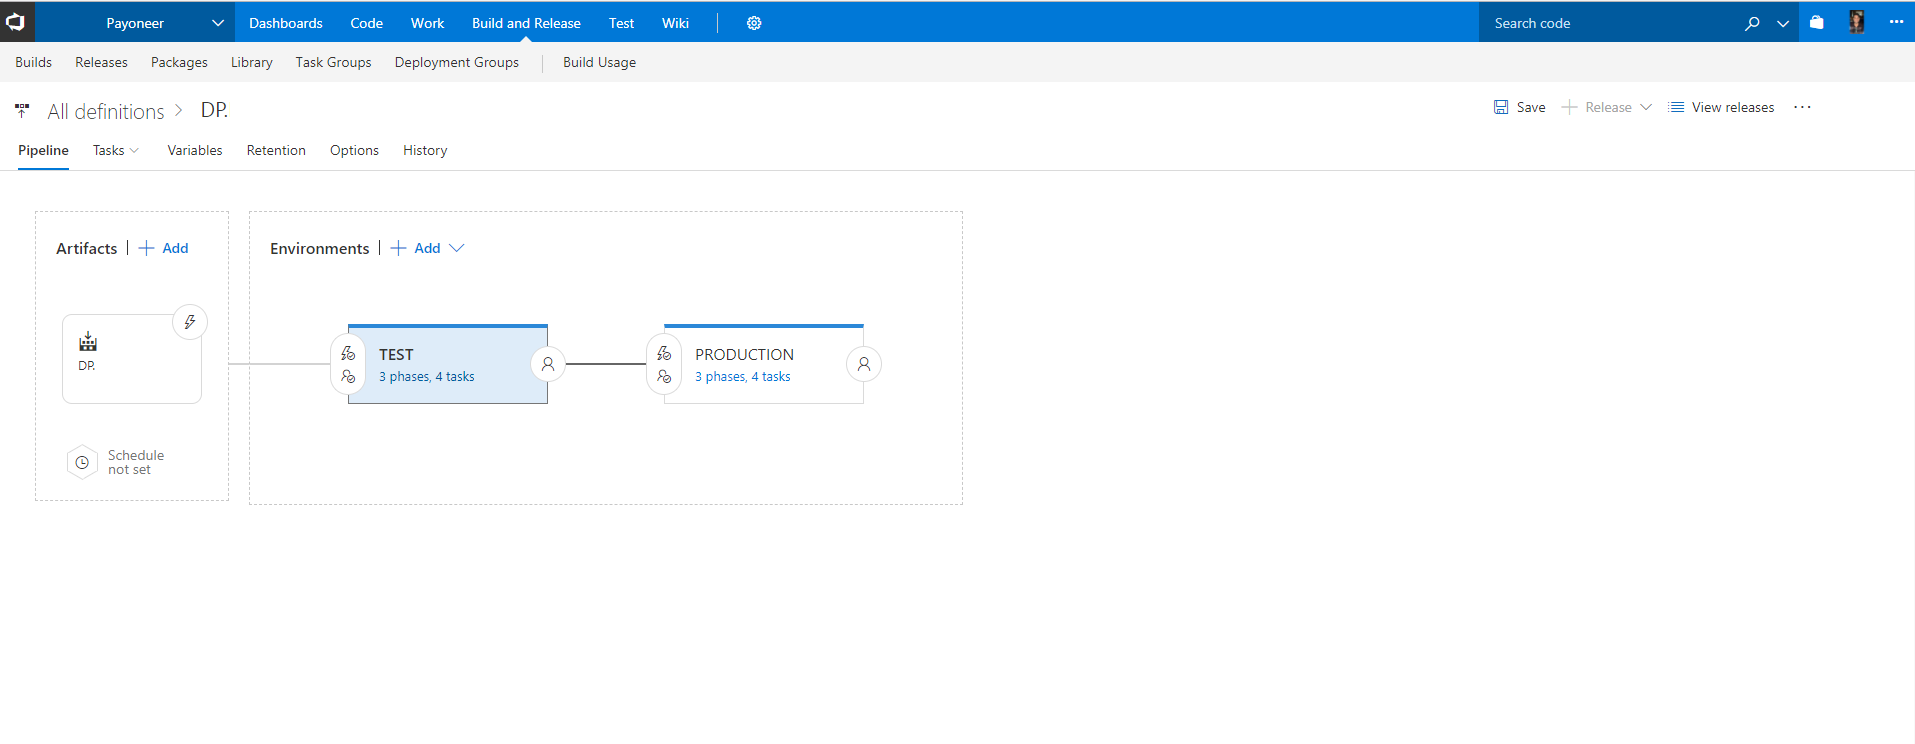
Our artifact source is of course TFS build, but you can use Jenkins, Team city or any other CI system to deploy artifacts.
This is not CD per se since we’re using the semi-automated processes with approvals and on-demand deployments that are available in TFS Release management.
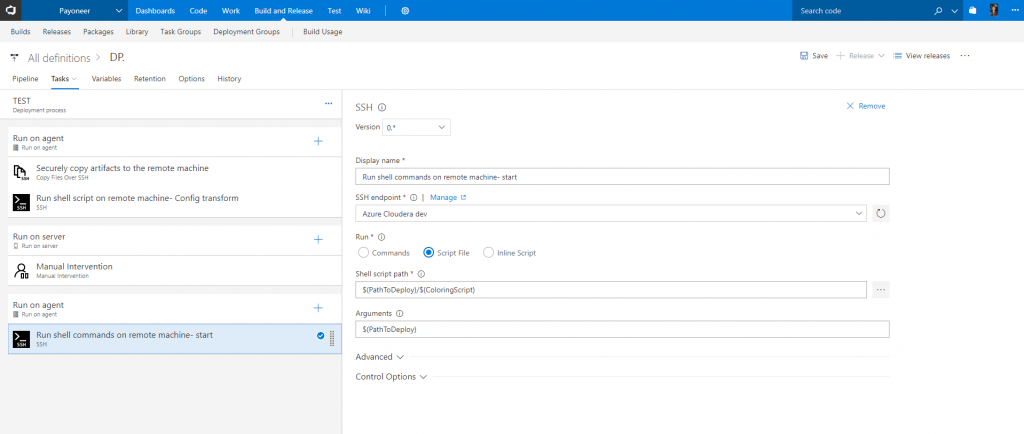
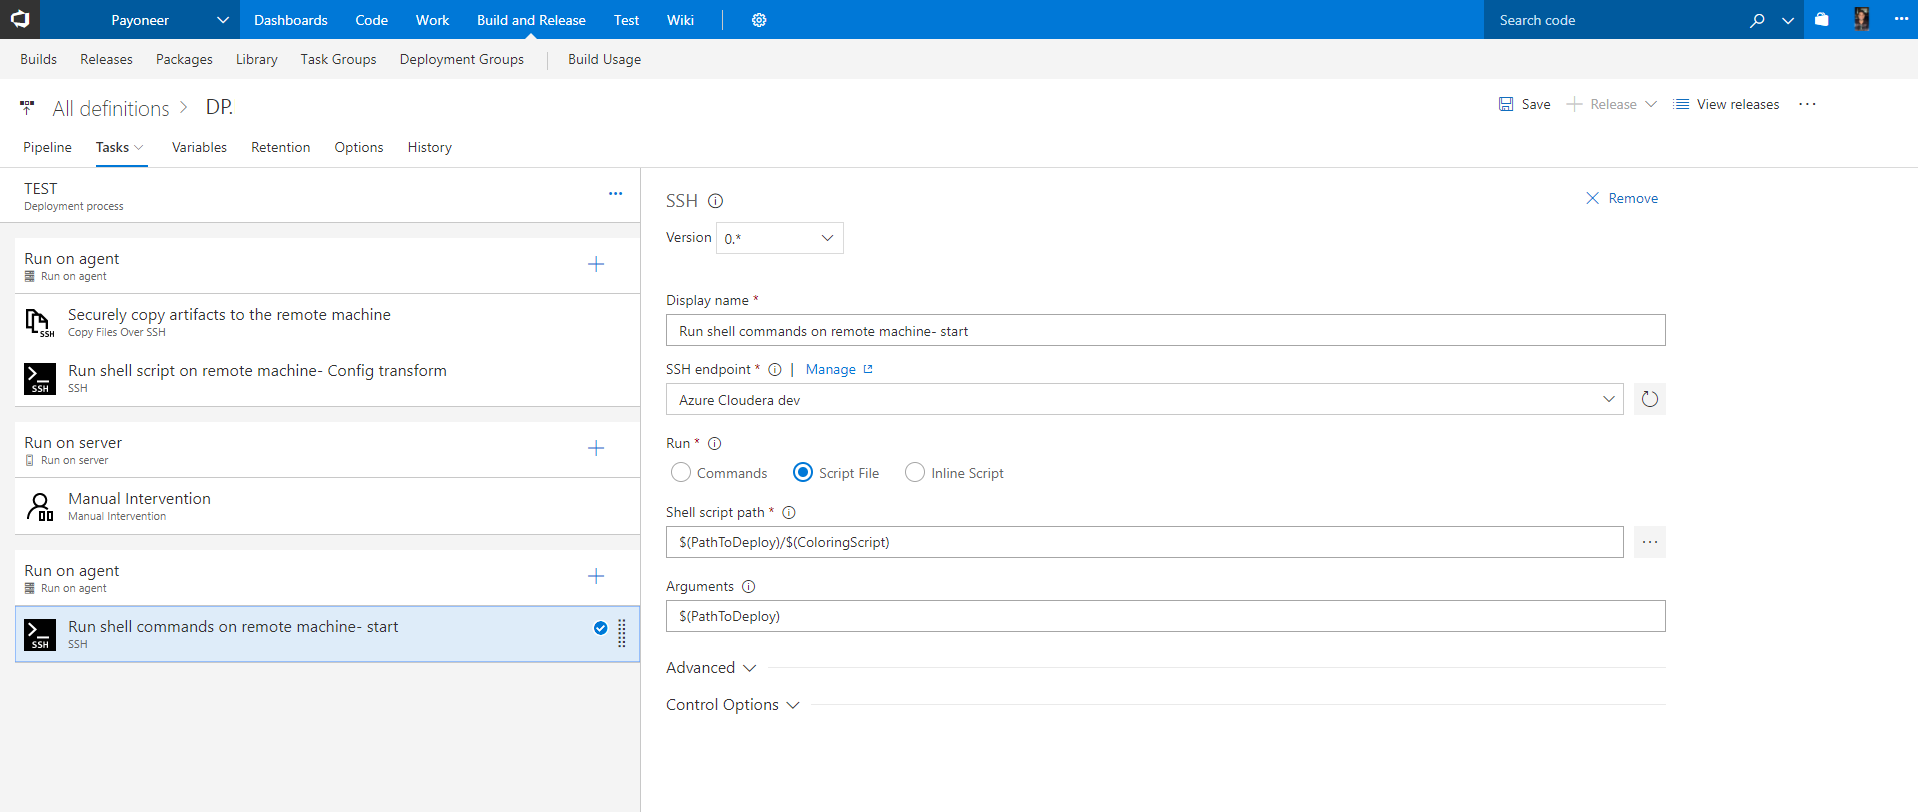
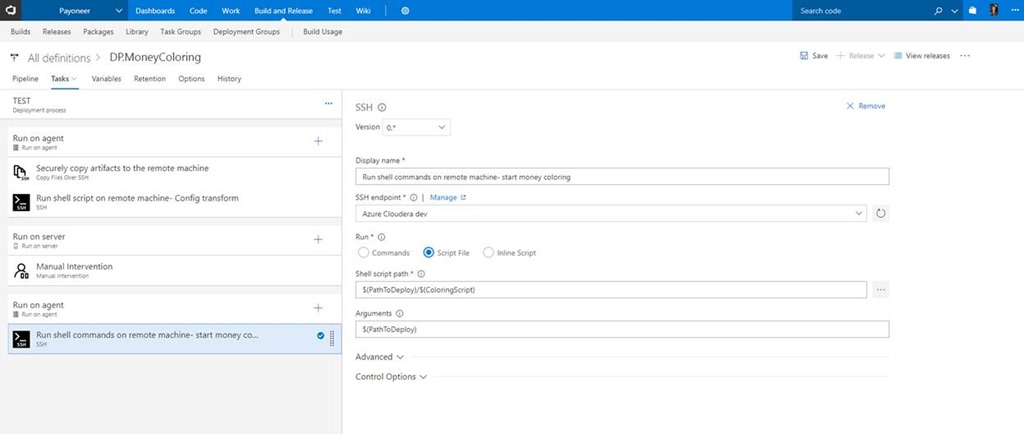
So, let’s dive into the deployment steps and tasks (see screenshot below):
Copy Files Over SSH - Securely copies the build artifacts from our Linux file share server to our Azure Cloudera test manager pre-defined SSH endpoint*.
*Like most of the tasks presented here, there are other ways to do this such as running a custom copy script with the ‘Shell task’ or using Deployment groups.Run shell on remote machine - runs a custom bash script on Azure Cloudera test manager to choose the right config files according to our pipeline environment.
Now we have our Apache Spark Java app deployed on our Cloudera cluster in Azure and thanks to the fact that the build artifacts with the Uber jar were located on the same resource group and region in Azure, the copy was pretty fast.But now we need to run our app.Manual intervention - allows us to pause an active deployment within an environment and wait for user approval or rejection.
Here we are sending a request to the development team asking them whether they would like to submit their newly deployed app to the Spark cluster managed by Cloudera.Run shell on remote machine - Depends on the action from the previous ‘manual intervention’ step, we are executing the submit application script used to launch applications on a Spark cluster.
To Summarize
In this post we’ve explained how we collaborate on code changes using TFS hosted Git, how we build, test and package our Apache Spark Java app using TFS Build, and how we use TFS Release Management to deploy the app into our pipeline which is hosted in Azure and managed by Cloudera.
If you have questions just post them here :)
Thanks to our reviewers: Henry Been, Lia Keston