Ask Learn
Preview
Please sign in to use this experience.
Sign inThis browser is no longer supported.
Upgrade to Microsoft Edge to take advantage of the latest features, security updates, and technical support.
Note
Access to this page requires authorization. You can try signing in or changing directories.
Access to this page requires authorization. You can try changing directories.
Visual Studio Team Services provides a number of extensibility options enabling users to enrich their DevOps environment or integrate with other applications and services. In previous versions, extensibility was supported using TFS object model. Today, a number of options are available such as REST API, Service Hooks and Extensions. In terms of build system, custom build activities, pre-build, post-build, pre-test and post-test scripts were the common ways to extend the build functionality.
In VSTS/TFS 2015 Build, extensibility is provided by creating build tasks. The process of creating build tasks is remarkably simpler as compared to it's predecessor. In this post, we will create one such task.
Assuming you want to send out an email from build definition. This is usually done to notify users of a build failure or to give information like results from a test run triggered by the build. While you may think about email Alerts as a simple way to do so, you assume the user will configure alerts per build definition, but we need a more flexible (push) model for the alerts. For example, you might want to send emails out to the person who triggered the build.
In this post, we will create a VSTS Build task that allows sending emails to the build requestor. Build tasks are Node.js based. So, to create a new build task, the following needs to be installed on the machine
We start with using tfx-cli to create the task shell i.e. all the files that the tasks needs. To do this, type in the following on windows command prompt
tfx build tasks create
The tool prompts for details such as task name, friendly name, description and author. The following details are provided for our task: 
A new folder bearing the same name as the task name is created with the following four files
Since, we only use the node implementation for our task, it’s safe to delete the PowerShell file sample.ps1. Our task is called emailNotifier, so the file sample.js is renamed to emailNotifier.js.
The task.json file contains following information
The contents of the default task.json look like following
 {
  "id": "92fa37d0-b5c7-11e6-9c14-0dffa48df7cc",
  "name": "emailNotifier",
  "friendlyName": "Email Notification Task",
  "description": "A task that send notification emails to requestor",
  "author": "Visual Studio ALM Rangers",
  "helpMarkDown": "Replace with markdown to show in help",
  "category": "Utility",
  "visibility": [
    "Build",
    "Release"
  ],
  "demands": [],
  "version": {
    "Major": "0",
    "Minor": "1",
    "Patch": "0"
  },
  "minimumAgentVersion": "1.95.0",
  "instanceNameFormat": "emailNotifier $(message)",
  "inputs": [
    {
      "name": "cwd",
      "type": "filePath",
      "label": "Working Directory",
      "defaultValue": "",
      "required": false,
      "helpMarkDown": "Current working directory when emailNotifier is run."
    },
    {
      "name": "msg",
      "type": "string",
      "label": "Message",
      "defaultValue": "Hello World",
      "required": true,
      "helpMarkDown": "Message to echo out"
    }
  ],
  "execution": {
    "Node": {
      "target": "sample.js",
      "argumentFormat": ""
    },
    "PowerShell3": {
      "target": "sample.ps1"
    }
  }
}
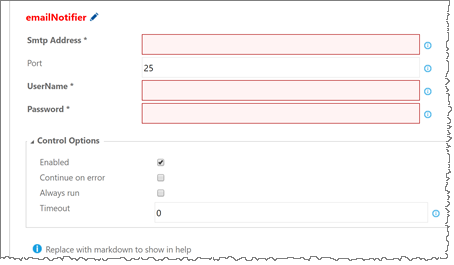
We want to keep our task as simple as possible and the only thing unknown for our task are the details of SMTP server, so we will add the following 4 parameters to our task.
The only other changes we make in the file are to rename the execution target to emailNotifier.js and removing the PowerShell file reference. Our final task.json file looks as following
 {
  "id": "92fa37d0-b5c7-11e6-9c14-0dffa48df7cc",
  "name": "emailNotifier",
  "friendlyName": "Email Notification Task",
  "description": "A task that send notification emails to requestor",
  "author": "Visual Studio ALM Rangers",
  "helpMarkDown": "Replace with markdown to show in help",
  "category": "Utility",
  "visibility": [
    "Build",
    "Release"
  ],
  "demands": [],
  "version": {
    "Major": "0",
    "Minor": "1",
    "Patch": "0"
  },
  "minimumAgentVersion": "1.95.0",
  "instanceNameFormat": "emailNotifier $(message)",
  "inputs": [
    {
      "name": "smtpAddress",
      "type": "string",
      "label": "Smtp Address",
      "defaultValue": "",
      "required": true,
      "helpMarkDown": "The Smtp server to use"
    },
    {
      "name": "port",
      "type": "string",
      "label": "Port",
      "defaultValue": "25",
      "required": true,
      "helpMarkDown": "The Smtp port to use"
    },
    {
      "name": "username",
      "type": "string",
      "label": "UserName",
      "defaultValue": "",
      "required": true,
      "helpMarkDown": "The User name to use"
    },
    {
      "name": "pwd",
      "type": "string",
      "label": "Password",
      "defaultValue": "",
      "required": true,
      "helpMarkDown": "The Password to use"
    }
  ],
  "execution": {
    "Node": {
      "target": "emailnotifier.js",
      "argumentFormat": ""
    }
  }
}
Now that the manifest file has all the details, the next step is to write the body of our task. Since, we chose to use Node.js to write our functionality, we start with initializing the node package module for our task by typing in following on command line
npm init
Select default options for each of the prompts. A package.json file is generated as a result. The next step is to include any node modules that we need in our project. We need the following two modules for our task
To include the above modules, type in the following on the command prompt
 npm install vsts-task-lib
npm install nodemailer
The mode package manager will download the desired modules and store them in the node_modules folder. At this stage, we have all what we need. So now, it’s time to write our code. To do that, open the file emailnotifier.js and type in the following code
 const tl = require('vsts-task-lib/task');

var requestor = tl.getVariable("Build.RequestedForEmail");
var host = tl.getInput("smtpAddress", true);
var port = tl.getInput("port", true);
var usr = tl.getInput("username", true);
var pwd = tl.getInput("pwd", true);

const t2 = require('nodemailer');

var connection = {
    host: host,
    port: port,
    secure: true,
    auth: {
        user: usr,
        pass: pwd
    },
    logger: true
};

var transporter = t2.createTransport(connection);
var mailOptions = {
    from: usr,
    to: requestor,
    subject: 'Emai from Build ' + t1.getVariable("Build.DefinitionName"),
    html: 'The build '+ t1.getVariable("Build.BuildNumber") + ' created this email.'
};

transporter.sendMail(mailOptions);
We start with adding reference to task module and using its getVariable and getInput variables to fetch the email address of the Build requester and details of the smtp server respectively. The next step is to add reference to the nodemailer module and use it’s transport object to send the email.
Observe the use of built-in variables like “Build.DefintionName”. These are the new build environment variables. The list of all build variables is available at https://www.visualstudio.com/en-us/docs/build/define/variables.
To deploy the build task, we make use of the tfx-cli utility again. If you are not already logged into your VSTS account, type in the following to authenticate yourself
tfx login
You will be prompted to enter your service URL and personal access token (PAT). Once you are logged in, simply type in the following at the directory above your task’s directory.
tfx build tasks upload
The task would be packaged and deployed to the specified VSTS project and available for use.
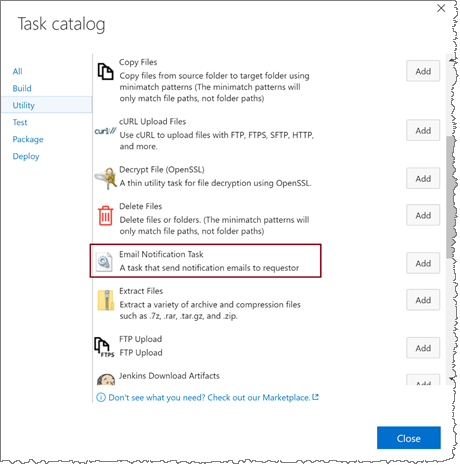
To use the new task, click on the “Add Build Step” button on the build definition. Since, we set the category for the task as utility, the new task would be available in the “Utility” page of the “Task Catalog” dialog:

Click on the add button to use the task. It is added to the build with the input options to specify the SMTP server used for sending out emails. It can be used anywhere in your build definition. 
In this post, we have demonstrated how easy it is to send emails by creating a simplest of all build tasks. The functionality in task can be extended further to include options such as customizing emails, select different recipient types, etc. The use of Node.js means that we have a choice to use rich already existing modules and extend as we like.
Please sign in to use this experience.
Sign in