
The New Exception Settings Window in Visual Studio 2015
In Visual Studio 2015 we’re pleased to introduce the new Exception Settings tool window for configuring the debugger’s exception settings. In this post I will walk you through the features of this new window. For more information on exception classifications in Visual Studio, see Understanding Exceptions while Debugging with Visual Studio.
Now in a Tool Window In previous versions of Visual Studio, when you wanted to configure exception settings you would have to go to the
modal, slow-opening, hard-to-search Exceptions Dialog. We heard all of your feedback, so we built an improved Exception Settings window. We have taken all of the useful functionality of that old dialog and put it into this convenient and easy to use tool window.  To access this window go to the Debug menu and select Windows -> Exception Settings.
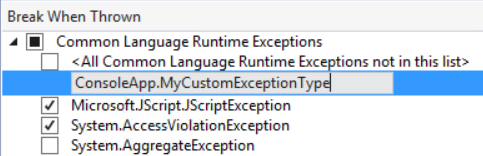
Enabling Exceptions to Break When Thrown The Exception Settings window contains a list of the default exceptions provided by Visual Studio. These exceptions are grouped into categories that correspond to the different
debug engines you might use. Checking a checkbox next to an exception means that you are instructing the debugger to break execution when that exception is thrown. When a box is unchecked or an exception is not in the list, the debugger will only break execution when that exception type is unhandled. 
Using the Toolbar From the new Exception Settings window you can filter the exceptions list to show you only enabled items, add exceptions to the list, remove exceptions from the list, and reset the list to its default configuration, and quickly search through the list to find what you are interested in. This is not a master list of every exception that could break your application, just a set of default exceptions we provide to get you started. The following are the features offered to you by the toolbar as shown in the screenshot, from left-to-right:
- Filter – Show only checked exceptions. You can use this filter to see what exceptions you have enabled to Break when Thrown. If you have a set of exceptions that you need to temporarily disable, this filter provides an easy way to do that.
 * **Add to list. **You can add exceptions to the list that you would like to configure to break when thrown. This is especially useful if you are using custom exception types in your code. Click on the category in which you would like to add an exception, and then click the “Add” button. An editor will open in the window underneath the category. Type in your exception and then hit enter to save your new exception to the list. Pressing Esc or hitting the remove button will cancel adding the new exception to the list. Exceptions you add to the list will be persisted with the solution.
 * **Remove from list. **You can remove individual exception types or entire categories from the list. For example, if you are managed debugging and uninterested in native exception types, you can remove the “C++ Exceptions” category so that it is not cluttering your view. Removed exceptions are treated as being unchecked and will break when unhandled. Exceptions removed from the list will not currently be persisted when you close and reopen the solution. We plan to enable this is a future release by allowing exceptions you remove from the list to be persisted with the solution.
* **Reset to default list. **You can use this button to return the state of your list to the default configuration. Removed exceptions will be added back, and added exceptions will be removed. The state of all the checkboxes will also be reset to default values.
* **Search. **You can use this as a convenient and quick way to find the exception type you want to configure in the list. Search works as a filter that will scope your list to all items matching your search term. For example searching the term “null” will show you all exceptions containing “null” so you no longer have to scroll through the entire list to find the exception you are looking for.
* **Remove from list. **You can remove individual exception types or entire categories from the list. For example, if you are managed debugging and uninterested in native exception types, you can remove the “C++ Exceptions” category so that it is not cluttering your view. Removed exceptions are treated as being unchecked and will break when unhandled. Exceptions removed from the list will not currently be persisted when you close and reopen the solution. We plan to enable this is a future release by allowing exceptions you remove from the list to be persisted with the solution.
* **Reset to default list. **You can use this button to return the state of your list to the default configuration. Removed exceptions will be added back, and added exceptions will be removed. The state of all the checkboxes will also be reset to default values.
* **Search. **You can use this as a convenient and quick way to find the exception type you want to configure in the list. Search works as a filter that will scope your list to all items matching your search term. For example searching the term “null” will show you all exceptions containing “null” so you no longer have to scroll through the entire list to find the exception you are looking for.

Using the Context Menu You can also add, remove, and reset the list as described above by using the context menu. Additionally, you can enable certain exceptions to “Continue when unhandled in user code” by selecting this option from the context menu. (This is the same setting that was toggled from a second column of check boxes in the old modal dialog.) This option is currently only supported for debugging Managed or JavaScript applications with
Just My Code enabled. You can view which exception types have this option enable by showing the Additional Actions Column under “Show Columns”. If you have Just My Code disabled you will not see these two context menu items because they do not apply. 
Important Notes
- This new window contains all of the same functionality as the old modal dialog. No capabilities of the debugger have changed only the way you can access them
- The debugger will always break when an exception is unhandled
- The setting to change if the debugger breaks on user-unhandled exceptions has moved under a context menu
- The menu location has moved to Debug -> Windows -> Exception Settings
Try It Out! In this post I only described the new and improved UI experience for exception settings; to learn how to take advantage of this window to diagnose bugs in your code, please read my other blog post on
Understanding Exceptions while Debugging with Visual Studio. You can experience the new Exception Settings tool window right now by installing Visual Studio 2015 CTP6. If you run into issues or have any other feedback you’d like to share about this new window, please let us know in the comments below, through Visual Studio’s Send a Smile feature, or in our MSDN forum.
 Light
Light Dark
Dark
0 comments