Deploying Azure Cloud Service using Release Management
Summary
You have downloaded the Release Management for Visual Studio client, and are connected to either your Visual Studio Online account.
You have an Azure Cloud Service project and want to use Release Management to update the same using the latest drop from a TFS build
In the current state, you will have to write Powershell scripts on your own to be used in a stage. We’ll be looking to add a number of pre-done actions to help you avoid dealing with powershell scripts in upcoming releases.
This article will help you author Powershell scripts and configuration to update an existing cloud service deployment with the latest bits.
Prerequisites
Before we get started, here are some pre-requisites that need to be fulfilled.
- Baseline Cloud Service is deployed using Visual Studio Publish Option as mentioned here.
- The profiles is checked in along with the sources.
- Azure Publish Settings file for the subscription hosting the cloud service is downloaded (as mentioned here)
- An additional Azure Environment that shall be used for executing the Deployment Scripts is available in the same subscription as the Cloud Service
Customizing the Visual Studio Solution
In this section, we shall talk about the specific customizations required to the visual studio solution in order to include the deployment scripts and ensure that they are appropriately present in the build drop.
We assume that the cloud service in question has a Web Role and a Worker Role as a part of this illustration.
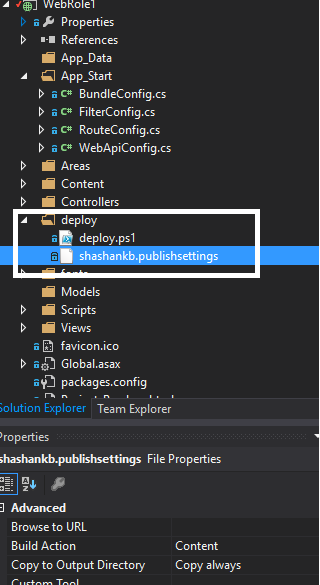
- Add a folder called “Deploy” in the Web Role Project
- Add deploy.ps1 (present in the attached zip) and the publish settings file for the subscription in the Deploy folder.
- Ensure that both these files are marked “Copy Always” in the properties.
The project shall look like the following –
4. Edit AzureCloudService ccproj (right click on cloud project, click Unload Project, followed by Edit ccproj)
5. Right before </Project>, copy the following:
<Target Name=”CopyPackgeFilesToTargetCore” AfterTargets=”CorePublish” DependsOnTargets=”CorePublish” Condition=”$(AutomatedBuild) != ””>
<Message Text=”Post Publish Event – Copying Files After CorePublish” />
<Message Text=”SourceFiles=$(PublishDir)$(AssemblyName).cspkg DestinationFolder=$(OutDir)deploy\” />
<Copy ContinueOnError=”true” SourceFiles=”$(PublishDir)$(AssemblyName).cspkg” DestinationFolder=”$(OutDir)deploy\” OverwriteReadOnlyFiles=”true” />
<Message Text=”SourceFiles=$(PublishDir)ServiceConfiguration.$(TargetProfile).cscfg DestinationFolder=$(OutDir)deploy\” />
<Copy SourceFiles=”$(PublishDir)ServiceConfiguration.$(TargetProfile).cscfg” DestinationFolder=”$(OutDir)deploy\” OverwriteReadOnlyFiles=”true” />
</Target>
6. Checkin the changes to VSO
Customizing the Build Definition
We have the source setup to drop the deployment scripts and also copy the cloud service packages to the drop. We now need to ensure that the cloud service packages are generated as a part of the VSO build.
In this section, we shall customize the VSO build definition to make this possible.
- Using Visual Studio, edit the build definition added for the cloud service project of interest.
- In case a build definition is not present, then create a new one as mentioned here.
- Go to the Advanced Build Process Parameters under the Process Tab
- Specify MSBuild Arguments as – /target:Publish /p:TargetProfile=Cloud /p:AutomatedBuild=True /p:PublishDir=”.pkg\” (as shown below)
- Save the build defintion
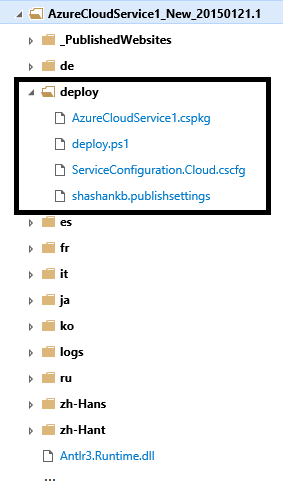
Trigger a new build with the configured build definition and the updated sources. Ensure that the drop contains the scripts and the package in the deploy folder.
Preparing the Deployment Target Server
On the target server that shall be used to execute the deployment scripts, install WMF 4.0 and Azure Powershell.
Authoring Deployment Sequence
Configure a Release Template using Release Management to continuously deploy to Azure deployments for the build definition of interest, as mentioned here.
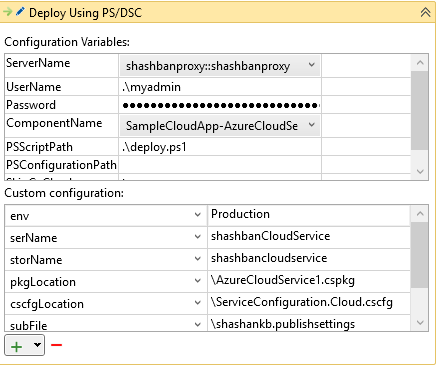
Ensure the deployment target server is chosen as the environment and “deploydeploy.ps1” is provided as the script to execute.
Modify the release template using the release management client such that it contains –
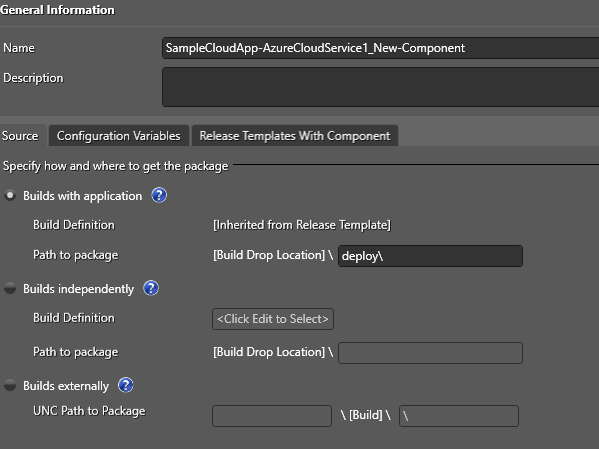
- Component
- Server –> The deployment target server configured
- Deployment Sequence
|
Action |
Properties and additional configuration |
|
|
Deploy using PS/DSC |
|
Triggering Releases
Now, you are ready to trigger a release and verify that all of the actions are run.
Disclaimer
The scripts provided in this blog are provided as-is, and may have to be modified to work with your application and your environment.


 Light
Light Dark
Dark
0 comments