
Hit Count Breakpoints
This blog post is part of a series on breakpoints in the Visual Studio debugger and has been updated to reflect the experience of using Visual Studio 2015. If you are interested in details about setting hit count breakpoints using earlier versions of Visual Studio please see the MSDN documentation.
As mentioned in an earlier post, we will be writing about all of the different breakpoint functionality available in Visual Studio. In this first part, we discuss the hit count breakpoint. If you wish to follow along, the code samples below are available for download.
Sample Problem
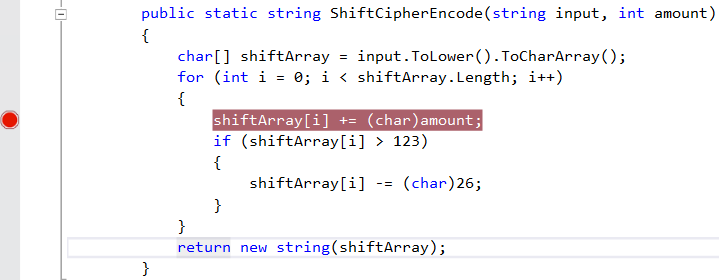
Consider the following method that applies a basic shift cipher to a string. A shift cipher (or Caesar cipher) simply shift the letters of a message by a fixed amount.

We have a breakpoint set on the return statement of the method. Now let’s see what happens when we run the following code:

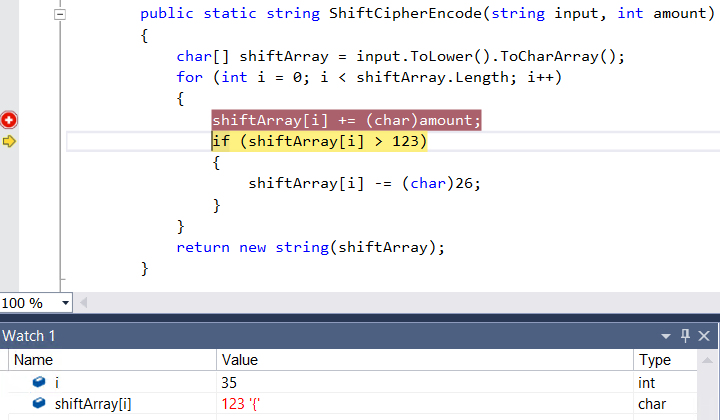
When we are stopped at the breakpoint, we inspect shiftArray and see that we have a problem.

While the rest of the encoded message does not make it obvious that there is a problem, we can see that we have ‘{‘ in the 35th position, which is obviously wrong. We suspect that the problem is in the loop that is encoding each letter, but we really want to examine the 36th iteration of the loop. If we just set a breakpoint in the loop, we would have to sit there and continue it 35 times before we can really get down to debugging. This is where using hit count breakpoints comes in handy. Creating the Hit Count Breakpoint. To create the hit count breakpoint, first start by simply creating a regular breakpoint in the loop you want to examine.
Then hover over the breakpoint to bring up the breakpoint’s toolbar and click the “Settings…” icon.

You can also right click on the breakpoint to bring up the context menu and click on “Conditions…”, or press Alt+F9, C to use the keyboard shortcut.

This will bring up the Breakpoint Settings peek window. (Tip: Using the context menu or shortcut key will open the window with the Conditions box already checked.)
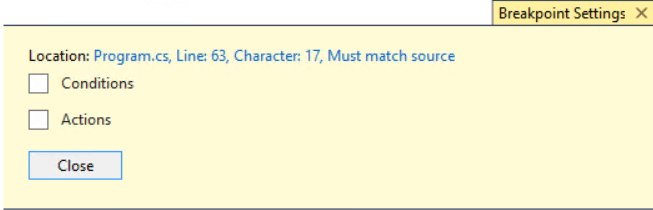
Select “Conditions” by checking the box and change the type of condition in the first dropdown from “Conditional Expression” to “Hit Count”.
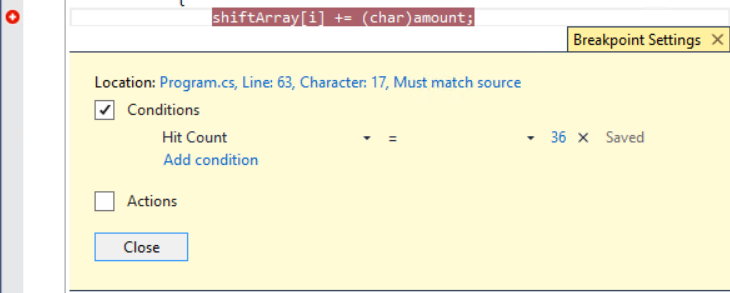
Then enter 36 as the hit value and press the “Enter” key. Notice that after you enter a value, the condition is saved automatically when you hit “Enter” or click outside of the edit space.

You’ll also notice that the breakpoint now has a ‘+’ inside indicating that this is an advanced breakpoint.
Now when I start the application under the debugger, I stop right where the code is changing the value of shiftArray[35].
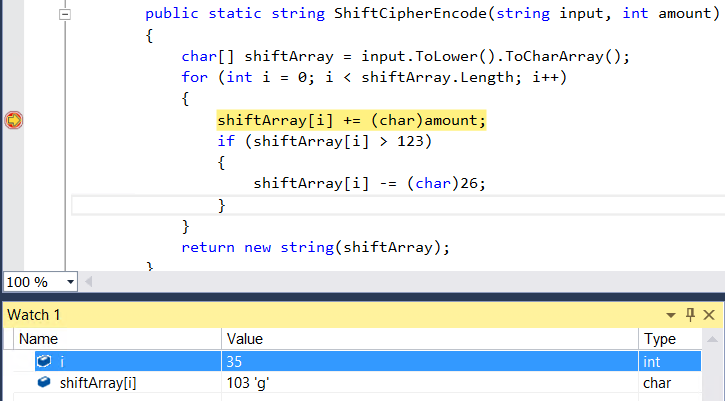
And as I step through, I can see the problem. First the letter is shifted off the end of the alphabet.
But then when I step again, I can see that it skips the code that is supposed to push the letter back into the alphabet range.
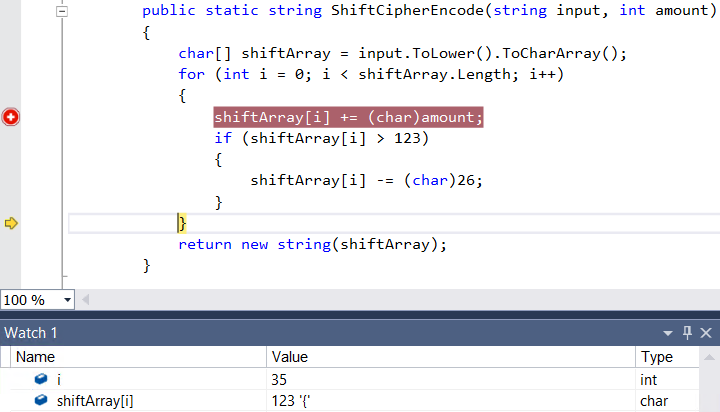
Now I have found my problem. The condition should be shiftArray[i] >= 123 instead of shiftArray[i] > 123. And I found this more quickly by using a hit count breakpoint than I would otherwise.
Skipping Ahead
Hit Count breakpoints can also be used when you need to skip ahead in the execution of your code, but you don’t quite know exactly how far ahead you want to go.
Consider the following recursive function that calculated the greatest common divisor (GCD) of two numbers.

As a developer, you may want to debug through this function in order to see the intermediate values during the GCD calculation. Given two large numbers, you know that this function is likely to run for a long time, but you don’t know quite how long. In this case you can use hit count breakpoints to save you some time.
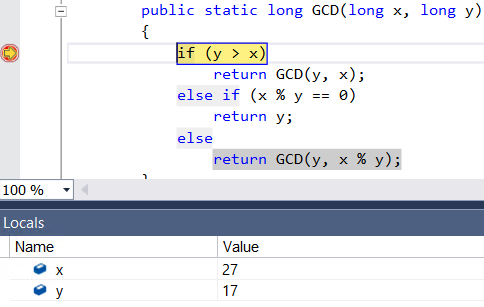
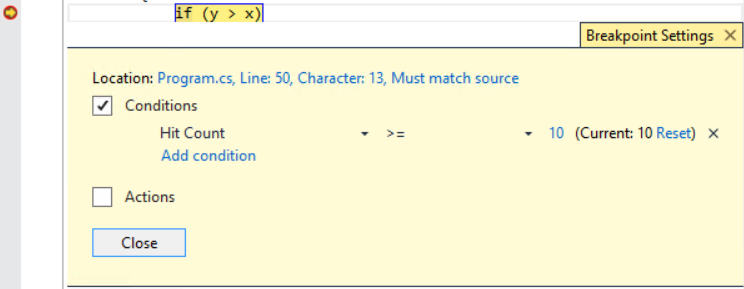
As before, you can bring up the Breakpoint Settings peek window by clicking the “Settings…” icon on the breakpoint’s toolbar, by using the keyboard shortcut Alt+F9, C, or by right-clicking on the breakpoint and selecting “Settings…” This time still select Hit Count as the condition, but select the “>=” option and enter a value of 10.

This will allow you to skip through the first 10 calls to the function to get closer. Now consider calling the function with the following two integers,
![]()
Running to the breakpoint gets me down to small numbers for x and y so that I can follow the rest of the calculation.
And if I continue the application, the application will continue to stop at the breakpoint each subsequent time it hits it.
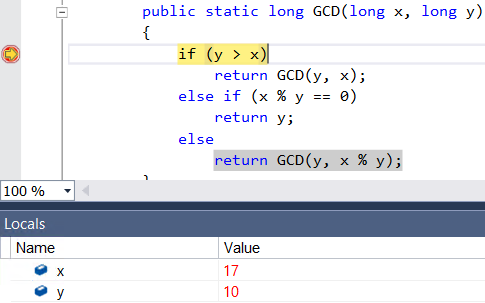
To view the current hit count, I can hover over the breakpoint and read the tooltip.
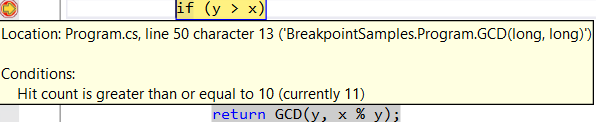
If I open the Breakpoint Settings peek window, I can also view the current hit count for the breakpoint, and click the reset button to avoid stopping on the breakpoint for another 10 iterations.
Counting Iterations
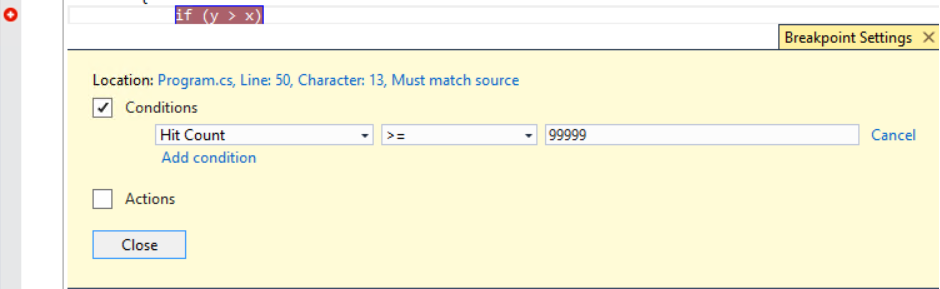
Finally, hit count breakpoints can also be used simply to count the number of times the breakpoint is hit. Let’s say we wanted to count the number of iterations in our GCD example. As a before, you want to create a hit count breakpoint and select the option “>=”. This time, instead of choosing a number to break on, instead choose an arbitrarily large number like 99999.
With a number this large, the breakpoint will never be hit. Now set another breakpoint somewhere after all of the iterations of GCD will already be complete. When you stop at this breakpoint, you can see the hit count in the tooltip for the breakpoint, as well as the Breakpoint Settings peek window.

You can always see current hit count information for all of your breakpoints in the Breakpoints Window (available from the Debug -> Windows menu).

So you know that the program went through the GCD function 14 times.
 Light
Light Dark
Dark
0 comments