
Building iOS Apps in TFS
Note: The iOS sample code used for this blog is located @ https://tfsiosbuild.codeplex.com Especially interesting is a script @ scripts/cibuild.sh
It is becoming more and more common for software shops to build applications and apps for multiple platforms and devices. In addition to other applications and platforms that you need to build, you may also need to build iOS or Mac OSX applications. In a future post, I will cover running iOS tests and uploading them to Team Foundation Server.
It’s desirable to keep all of your source code assets in the same repository regardless of the target platforms you are building for. Developers should also work how they want to work with source control integration in their IDEs. For iOS and Mac OSX, that would most likely be Xcode with integrated git for source control. So, we started the git-tf open source project which allows developers to use the built in git integration in Xcode against a local git repository and push their changes up to TFS when sharing with their team. The git-tf way of working means you can take advantage of the IDE experiences for version control but also makes working with an older version of Team Foundation Server such as TFS 2010 easier.
As part of checking in code, a team typically wants to have the changes validated by building the code and possibly running tests. This is typically done by using a Continuous Integration build system. It is a critical part of the development lifecycle. But, Xcode needs to build on Mac OSX. It is possible to build iOS projects on Mac OSX using Team Foundation Build automation, but many iOS teams are more familiar with Jenkins (the popular cross platform open source build system) which comes with an actively maintained TFS plugin so I thought I would show you how to use what they already know.
Let’s first take a look at the tools we’ll need to do this …
Tools
Multiple tools will be configured together to achieve our scenario.
Team Foundation Server: Visual Studio Team Foundation Server 2012 (TFS) is the collaboration platform at the core of Microsoft’s application lifecycle management (ALM) solution.
Git-Tf: A set of cross-platform, command line tools that facilitate sharing of changes between TFS and Git. These tools make it easy to clone sources from TFS, fetch updates from TFS, and update TFS with changes committed locally in Git.
Jenkins: An extensible open source and cross platform continuous integration server. This will run on Mac OSX and build apps using Xcode.
TFS Plugin for Jenkins: This plugin integrates Jenkins with Team Foundation Server.
Team Explorer Everywhere Command Line Client (TEE CLC): Command line version of the cross platform tools to work with Team Foundation Server. The Jenkins TFS Plugin will use this to check for changes in TFS.
Xcode: Xcode is the integrated development environment for creating great apps for Mac, iPhone, and iPad. Xcode includes the Instruments analysis tool, iOS Simulator, and the latest Mac OS X and iOS SDKs.
Git: A free and open source distributed version control system. Git is integrated into the Xcode development environment.
Overview
This is the tools and flow which could be all installed on a minimum one Mac OSX machine plus a Windows or cloud based TFS server. For larger teams it could also be configured on separate machines.
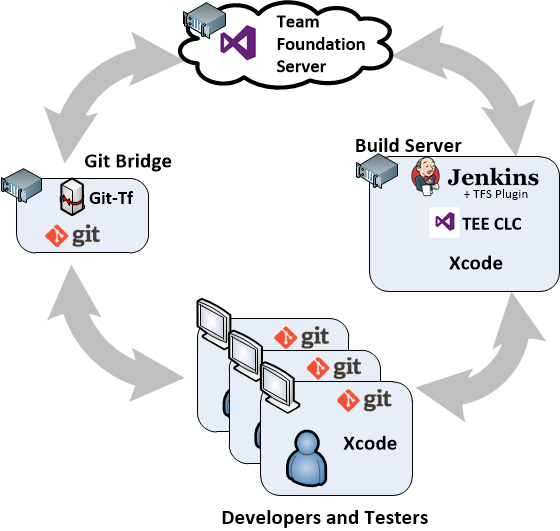
Developers work with Xcode and integrated git locally. When developers want to promote their changes, they can push their changes to a central git repository. That central git repository has Git-Tf installed on it, which is a bridge that allows changes to be pushed to the Team Foundation Server. Git-Tf is a cross platform tool written in Java so it can be on an OS including one of the developer’s machines running OSX. In a small team, this is a common scenario.
In this model the conflicts are resolved in the shared git repository and if changes are only checked into TFS from the shared git repository there will be no conflicts. The shared git repository is the master and it is pushed to the Team Foundation Server. This configuration allows the Xcode developer to work in the prescribed flow with git and is not aware of or affected by the main TFS repository and build mechanics.
In a much smaller team, the number of machines can be condensed where Git-Tf is on the developer’s machine along with git and Xcode.
Once the changes are pushed to TFS, a change set occurs. The Jenkins TFS plugin will poll the TFS server on a configured interval and if changes have occurred it will pull down the changes to disk and kick off a build. The Jenkins plugin calls the TF command line and since is on Mac OSX, it’s calling the Team Explorer Everywhere command line (TEE CLC).
In Jenkins we will configure a matrix of builds to run. For example, we will build for both iPhone OS and the iPhone simulator. We will also build Debug and Release builds for each. After builds are produced, testers can pick up the builds and either run them using the iOS simulator or install them to the iOS device using the Xcode organizer.
Let’s start by configuring the necessary setting in TFS for Git-Tf to connect …
Configuring Team Foundation Server
If this is a cloud base TFS, you will need some configuration. The only configuration needed on the Team Foundation Server side is per account/collection, alternate credentials so Git-Tf can connect with basic authentication. In a secure environment, ensure you have SSL configured (https). If you are using Team Foundation Server in the cloud, https is the only protocol enabled.
Configure Alternate Credentials for Your Account/Collection
After you log on to your account, in the upper right hand corner under your name, expand and choose User Profile. Select the **credentials **tab to enable alternate credentials.
Enter your live id and a password for the alternate credential.
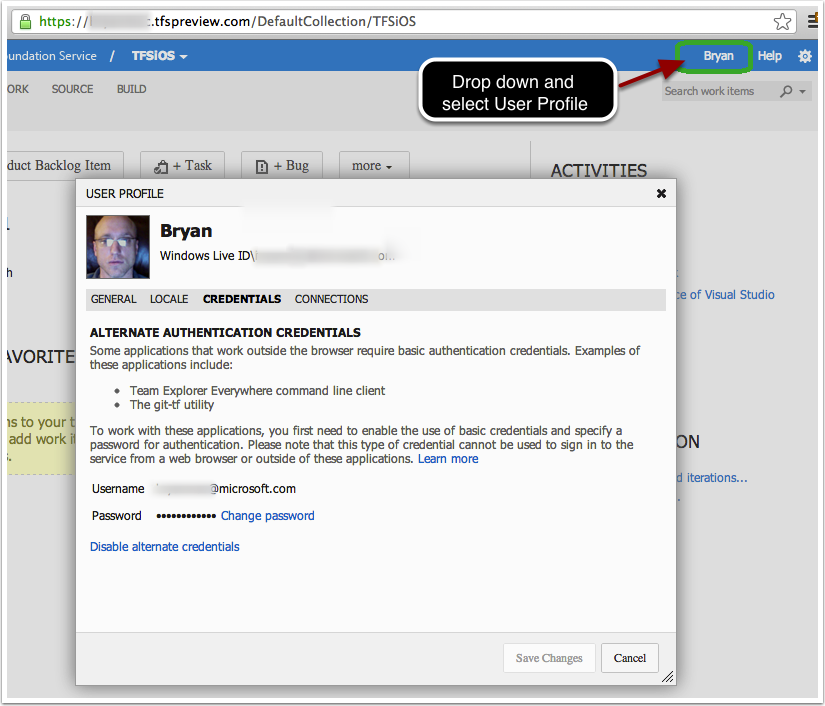
Your account’s collection is now configured to accept basic authentication from Git-Tf.
Configuring your XCode Project and Workspace For Developers
We will build the iOS app by referencing an XCode workspace. An Xcode workspace contains a collection of Xcode projects and most importantly has one build output.
Enable Git Source Control
The Xcode project should be enabled for git source control. This can be done at the time of project creation (a checkbox) or enabled after the fact in Xcode of from the command line with git init.
Configure your Workspace
An XCode workspace… has one build directory. In our Jenkins build, we will reference the workspace so it must be shared so the build job can reference it.
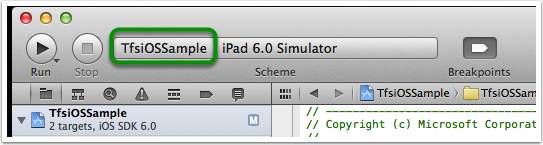
In Xcode, you can either create a workspace or use the default created one, which goes by the
Check the shared box so when it is pulled down to other machines like the build machine, it’s an available scheme to build.
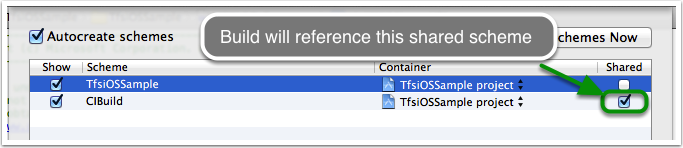
Now, when the code is retrieved by the build system it can call xcodebuild referencing the “CIBuild” workspace. All of the build configuration settings specified in the GUI for that scheme will be used.
Note that if you use this scheme, you need to checkin project.xcworkspace and xcshareddata folder contents which is under the
Using Git-Tf
Changes from the developers desktop or a shared git repository will use the cross platform Git-Tf tool to check in changes to the Team Foundation Server.
Configuring Git-Tf
Git-Tf is available at http://gittf.codeplex.com. There is a link on the front page to the download link. The Git-tf_GettingStarted.html doc covers installation and basic usage.
Note that if you’re using http proxy servers and you’re checking in code to TFS outside those proxy servers (for example, in the cloud) then you may have to the http_proxy and https_proxy environment variables.
The two main commands you will use are configure and checkin. In the example below, I went to the root of my git project and did git tf configure and specified my TFS collection URL (DefaultCollection used so didn’t specify) and specified the path on the TFS server ($/TFSiOS/TfsiOSSample) to map it to. This will store this information in the git configuration file.
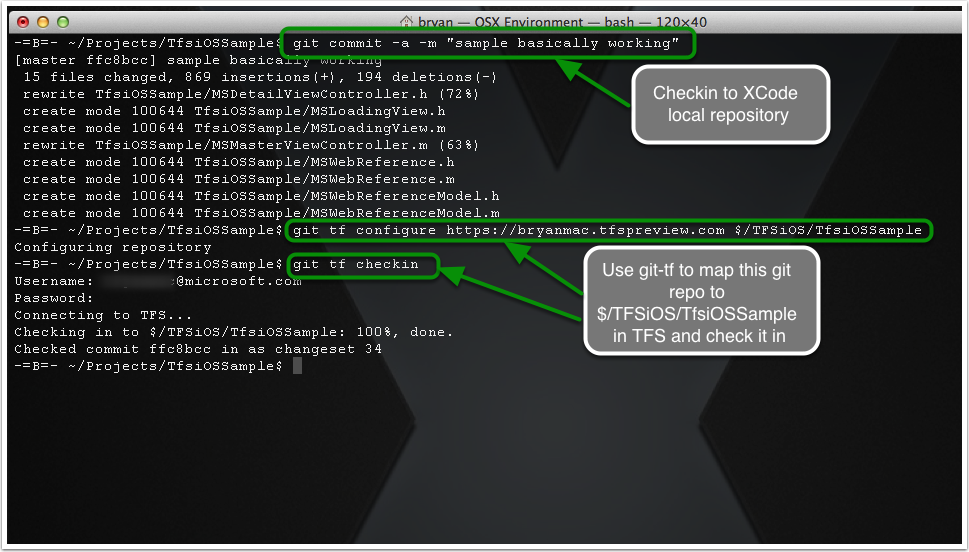
After configuring, we need to checkin the code to the Team Foundation Server.
Checkin with Git-TF
After it is configured, running git tf checkin will checkin all the git commits to the Team Foundation Server. The credentials specified are the alternate credentials configured earlier if you are using a cloud based Team Foundation Server.
The commit and changeset are output to the console.
Configuring the CI Build Machine
The build machine will have to be Mac OSX with Xcode and the command line tools installed. We will use Jenkins along with the Team Foundation Server Jenkins plug-in to check for changes in TFS and kick off the builds.
XCode on the Build Machine
The command line tools will need to be installed since the supported way to automate builds with XCode is to call xcodebuild which calls many other command line tools. Go to Xcode preferences, downloads and install the command line tools. Once installed, you should be able to run xcodebuild from the terminal.

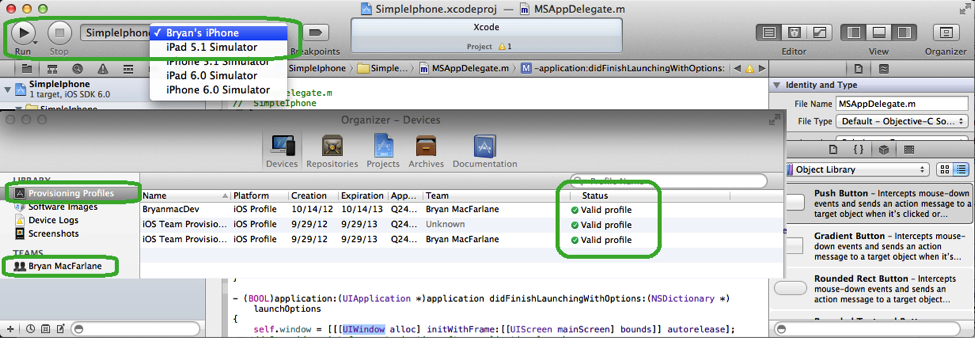
XCode Provisioning Profile
In addition to the emulator, to build for the device your provisioning profile must be configured with your Apple Developer Certificates in XCode on the build machine.
Apple documentation covers this here.
Before continuing with running automated builds on the build machine, ensure you can launch the application with a device at least once. This is a one-time cost when configuring the build machine. Alternatively, you could try to automate the certificate installation process as others have done, but that’s beyond the scope of this integration doc.
Team Explorer Everywhere Command Line Tools
Download the Team Explorer Everywhere 2012 Command line tools here. The command line tools are used by the Jenkins CI plugin to detect checkins. Note the location where you installed it.
In my walk through I installed it in ~/env/bin/TEE-CLC-11.0.0/tf
Jenkins CI
Jenkins CI will detect the changes in TFS, pull down the changes, and build with xcodebuild. We need to install it, add the TFS plugin and create a job to build the matrix of builds.
Installing and Running Jenkins
You can both download and install using the Mac OSX package installer or you can simply download the war file and run from terminal:
java –jar jenkins.war
Note that Jenkins is a Java application so the JRE needs to be installed and able to run from terminal.
After Jenkins is running, open a browser and navigate to http://localhost:8080
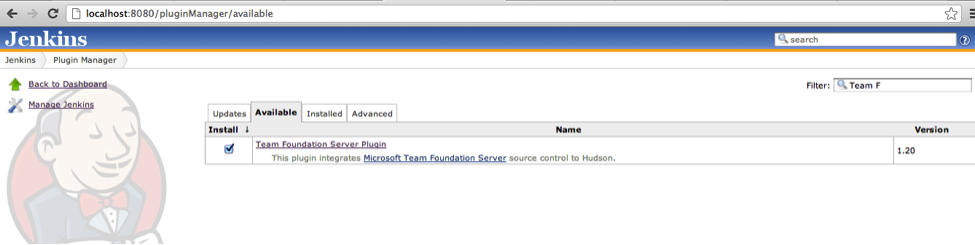
Installing the Team Foundation Server Plugin
From the main Jenkins UI, click Manage Jenkins and then click Manage Plugins. Select the Available tab and in the Filter box type “Team Foundation” – you should see the Team Foundation Server Plugin list, check it to install.
We need to then go into Manage Jenkins, Configure System, and specify where the tf command line is.
Make sure you Apply the changes.
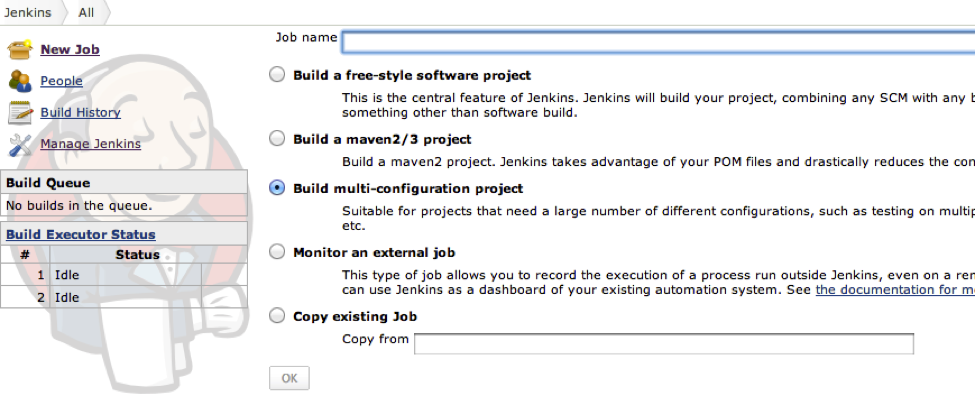
Creating a new Jenkins Job
Select New Job from the main Jenkins menu.
Enter a name for the new job and select the radio button for a multi-configuration job since you will want to build debug and release for device(s) and the simulator.
We will then need to supply the Team Foundation Server settings.
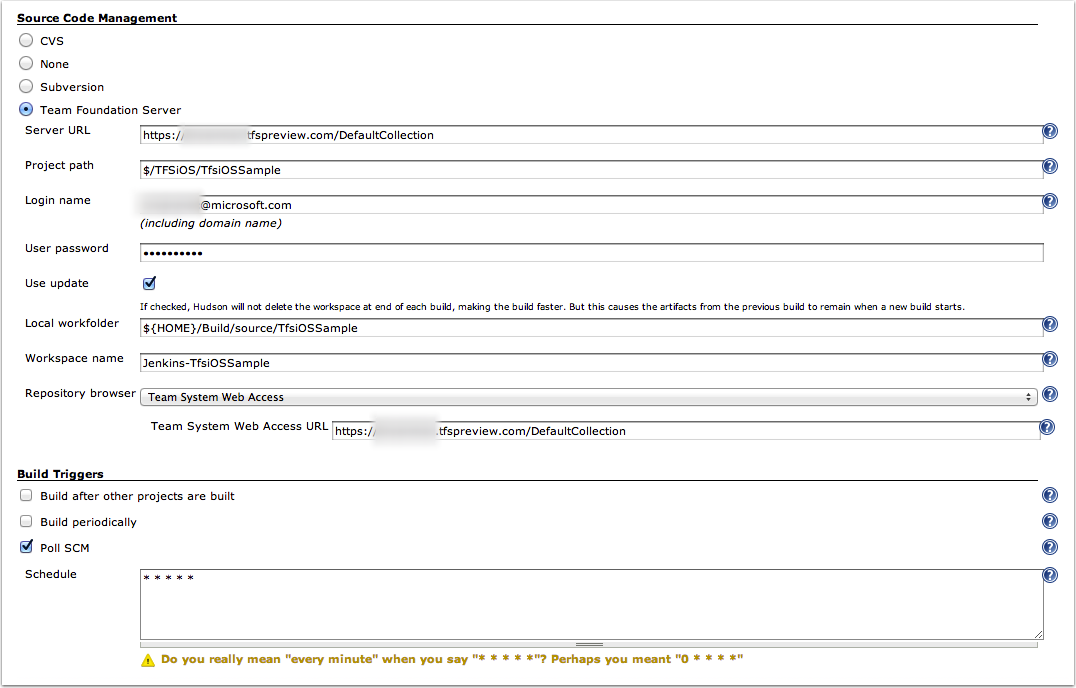
The URL for the server and the project path are used to query for changes. The credentials are the alternate credentials we configured earlier.
Expand the advanced settings and specify the local folder that Jenkins will get code to on your local disk before building. Remember this location.
Specify the workspace name. I changed it to Jenkins-
Enter the Team System Web Access URL.
The Poll SCM settings control the schedule of how often Jenkins will query TFS to check for changes. Click on the question mark for full details. The placeholders are for minutes, hours, etc… Be aware that 10 in the minutes place is not every 10 minutes – that’s when minute = 10. So if hour = * it means all hours when minute is 10. That is effectively on 10 minutes after every hour. If you want it to query every ten minutes, then use “*/10 * * * *”. If you want it to query every minute, then use * * * * *.
Next, we need to configure the matrix and instructions to build.
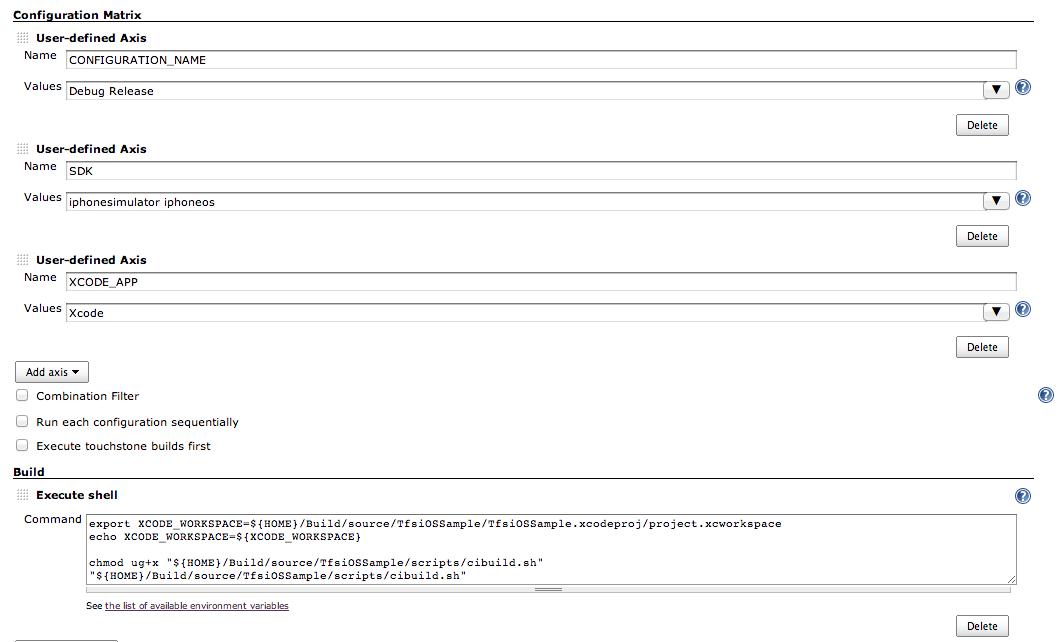
We want to build a matrix of builds for SDK of iphoneos (the device) and iphonesimulator, with Debug and Release of each using the Xcode.app in Applications. Note that if we had another version of Xcode we wanted to validate the build against (for example a preview of the next version), it can be installed side by side in Applications and you would add to the values for XCODE_APP.
Running xcodebuild –showsdks will show the available SDKs. Leaving the version off of the settings uses the latest.
Next we need to specify the command to build our workspace. In the Execute Shell function we will run a shell script that simply validates parameters (environment variables and calls the xcodebuild command line). Another key goal of the script was to be able to build from Jenkins as well as the command line terminal for troubleshooting.
The command exports the XCODE_WORKSPACE, which is the location of the workspace file to build. Earlier we told Jenkins to pull code down to ${HOME}/Build and this specifies the full path. The shell script is checked in so how to build the code follows the code. The next command to chmod simply ensures the file is executable after it pulls it from source control. Finally, we call the shell script to run the build.
Since we are building a matrix of builds, this command will get called multiple times.
The key part of the script simply calls xcodebuild. Pull down the codeplex source to see the full script under the scripts directory.

SYMROOT is the output path, which is set at the top of the script. The full script is included in the sample source at /scripts/cibuild.sh
After configuring the new job, you need to enable the job. You can also go back to root Jenkins and manually running it.
After enabling it, polling for changes will begin.
The CI Build
Change code in Xcode, checkin to your local git, then run git tf checkin to check in the code to the Team Foundation Server.
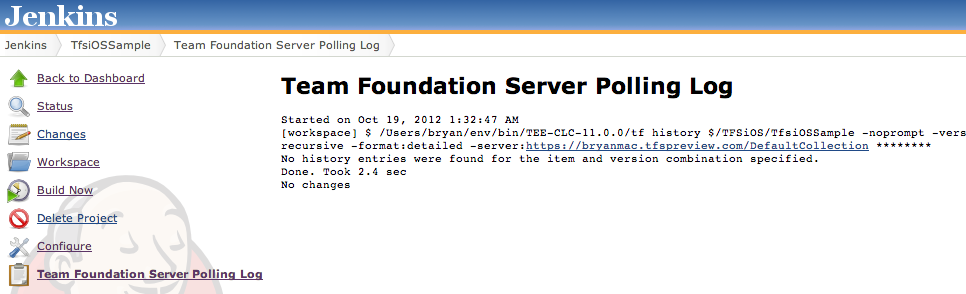
On the polling interval, you will see Jenkins detect the check in and kick off a build. If you ran Jenkins from the command line, you will see output indicating it detected a change. The TFS plugin also has a polling log that you can check to see if there are issues.
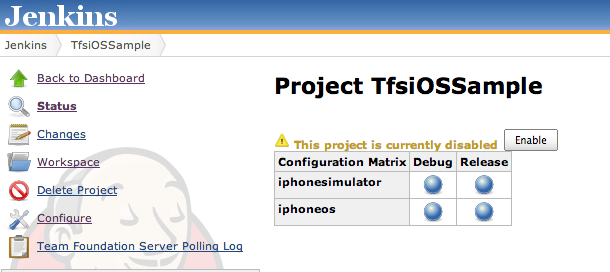
Once the build kicks off, you will see it appear in the web GUI with a progress bar. Clicking on that link will bring you to the build and clicking on the console output will show what’s going on.
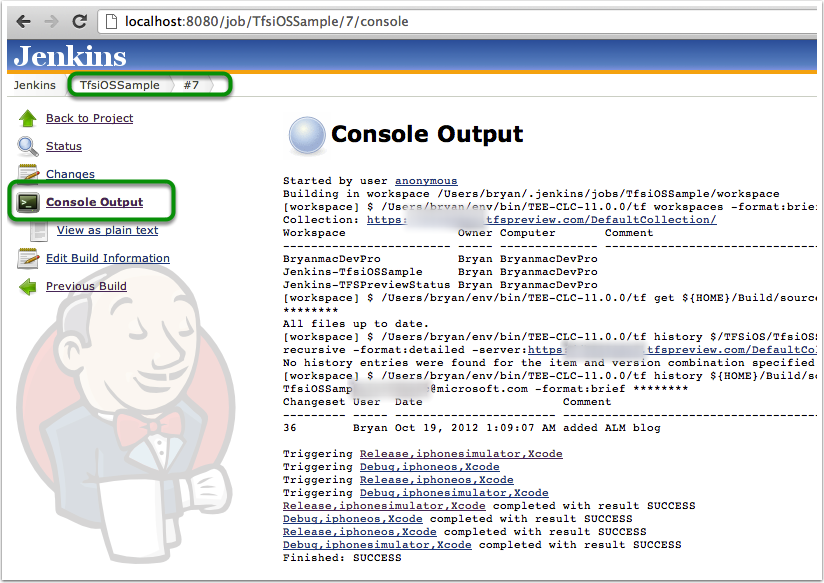
The bottom of the output shows that it triggered the matrix of builds in parallel and the result of each. If you click on the hyperlink of each, you can see the detailed console output which in this case would be output from our shell script and xcodebuild output.
After you run the build, navigating to the build job should provide the build status of each build in the matrix.

Running the iOS Build
To run the simulator build in the simulator, you can either open the project in Xcode and run or you can use the simulator build that was part of the CI build.
There is an iPhone Simulator.app under Applications/XCode.app. I typically setup an alias in my environments bash script like:
export IOS_SIMULATOR_PATH=”/Applications/XCode.app/Contents/Developer/Platforms/iPhoneSimulator.platform/Developer/Applications/iPhone Simulator.app/Contents/MacOS/iPhone Simulator”
alias simulator=”${IOS_SIMULATOR_PATH} -SimulateApplication $@”
For example, we built the app under ~/Build, so I run this command in terminal to launch what we built:

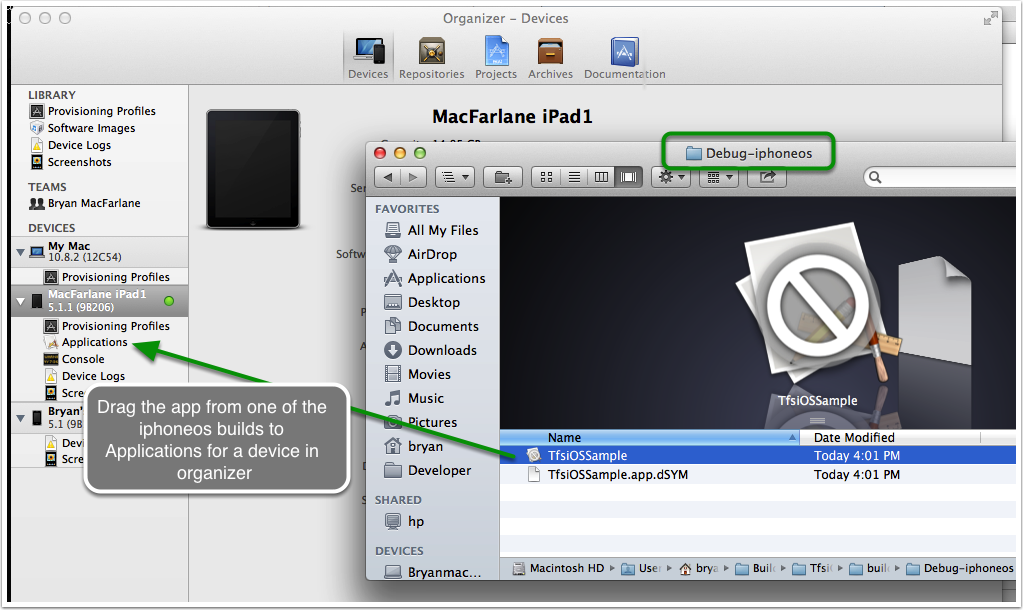
In order to run on a device, open the organizer and drag the app that was built under “Applications” under the device.
In a future post, I will cover running iOS tests and uploading the test results.
 Light
Light Dark
Dark
0 comments