Set Local Workspaces as Default when Upgrading to TFS 2012
I was reminded yesterday by a customer about something in the upgrade process that I thought was a helpful reminder for all the TFS administrators. If you are upgrading from an earlier version of Team Foundation Server to the recently released Team Foundation Server 2012, you’ll want to make sure you add one more step to your post-upgrade plan.
If you aren’t familiar, local workspaces is the new feature in Team Foundation Server 2012 that makes it much easier to get started with working in TFS version control. It also improves the “offline” experience for developers and removes the “read-only” bit for version control items that aren’t checked-out. Brian Harry introduced them in a blog post he wrote about the version control improvements introduced in TFS 2012. Here’s a video that shows how local workspaces are different from the traditional workspaces in previous releases. There is also a really good MSDN article that helps you understand when you should decide between the two options: Decide Between Using a Local or a Server Workspace in TFS 2012.
FYI – Local workspaces is available if you are using Team Explorer Everywhere 2012 on Mac OS, Linux, or Windows Eclipse-based environments.
Post-Upgrade Steps – Set Local Workspaces as Default
Local workspaces are set as the default when you install a brand new version of Team Foundation Server 2012 or when you provision a new Team Foundation Service instance at http://tfspreview.com. It’s important to know though that whenever you upgrade from an earlier version of TFS, the default is kept to “server workspaces” instead to maintain backwards compatibility. I highly suggest you update the default to local workspaces.
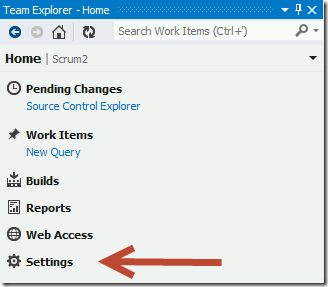
Step 1 – Open Team Explorer in Visual Studio 2012 and connect to your team project collection. It doesn’t matter which team project you end up selecting. Click on the Settings link from the Home page.
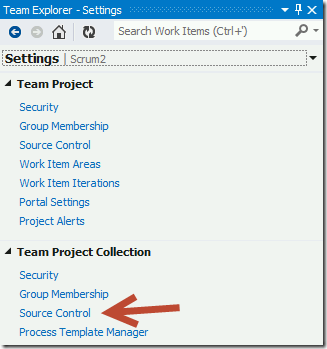
Step 2 – Next, you’ll want to open up the Source Control settings dialog under the Team Project Collection section of the Settings page. If you are connected to a team project, like I am in the screenshot, don’t make the mistake of clicking the team project’s source control settings link.
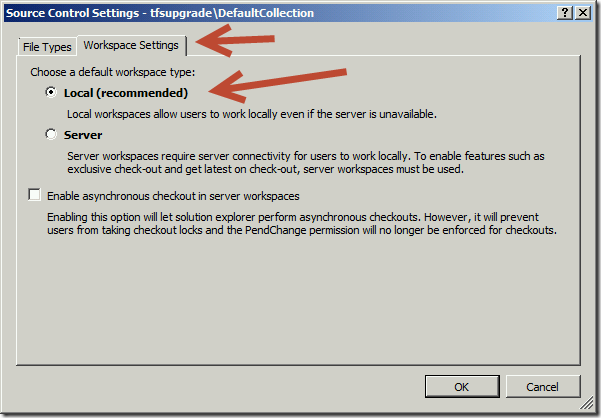
Step 3 – In the Source Control Settings dialog, switch over to the Workspace Settings tab and then choose “Local” from your options and click OK.
Developer Next Steps
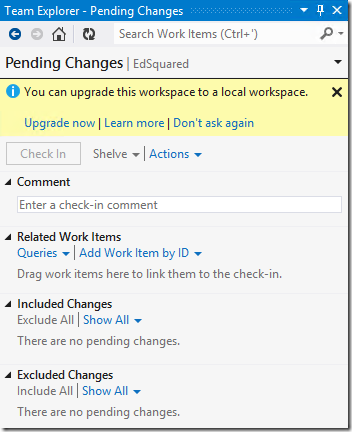
The first time that developers open Visual Studio 2012, their previous workspace will remain as it was but when they navigate to the Pending Changes hub, they’ll get a nice notification that let’s them convert their existing server workspace into a local workspace as shown below. Developer won’t receive that notification if the team project collection’s default is set to server workspaces though so it’s important to update it.
It’s a one-time operation and from that point, developers will be able to leverage a local workspace in Visual Studio 2012!


 Light
Light Dark
Dark
0 comments