最新的Microsoft Office开发工具 Visual Studio 2015
[原文发表地址] Latest Microsoft Office Developer Tools for Visual Studio 2015
[原文发表时间] 2015-11-23
我们很高兴地宣布 Microsoft Office开发工具Visual Studio 2015 Update 1 现在可以使用了。此更新包括工程命名的改变,将Office and SharePoint 改为Office and SharePoint Add-ins以及一些漏洞修复,例如在新建项目对话框中,我们将Office/SharePoint从Visual C#节点下移除。
其次,针对Office开发工具我们也推出下一轮改进的预览版。我们邀请您通过Send-A-Smile或者Microsoft Connect,把自己对工具功能的要求反馈给我们。您可以在预览版中尝试创建新的项目类型,我会在这个帖子中重点介绍。
请按照以下步骤安装预览版:
1. 如果你还没有安装Visual Studio 2015,您可以在aka.ms/VSCommunity2015安装 Visual Studio2015社区版.
2. 通过aka.ms/GetLatestOfficeDevTools获取最新版本的Office开发套件.
3. 去下载中心安装预览版.
4. 请确保您已安装Outlook 2016 。
新功能: 外接应用
在我们的预览版中,我们已经在Office外接应用中添加一个新的项目类型,叫做Outlook Add-in with Commands。外接应用可以在Outlook 功能区添加按钮,启动外界程序显示菜单或者执行一个自定义的JavaScript函数,为用户提供一个无缝的办公室体验。
用VersionOverrides在清单中声明一个命令,忽略旧版本的Office,从而确保与用户的兼容性。
现在让我们创建一个撰写电子邮件时插入自定义文本的外接程序。当报告有关问题时,客户支持人员通常需要询问更多的细节,给出使用说明如何查找版本,序列号等。它会非常方便 — 节省大量的时间 — 在Outlook中插入这种常见的文本按钮。我们将逐步通过一个示例来创建一个写电子邮件时插入自定义文档的外接程序。
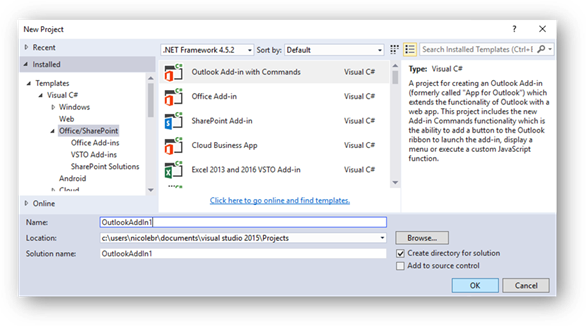
在 Visual Studio 2015 中,通过文件 > 新项目,选择模板 > Office/SharePoint > Outlook Add-in with Commands创建新 Outlook 外接程序命令项目:

若要查看这些按钮,在解决方案管理器中选择OutlookAddIn节点,在属性窗口中将启动操作改为办公室桌面客户端,然后启动Outlook 2016,并按F5:
正如你所看到的,通过选择显示所有的属性按钮启动我们的外界程序,当我们阅读信息时(在清单中定义MessageRead)出现在我们的功能区。现在当我们写邮件 (MessageCompose 表面) 时在功能区添加一个菜单按钮。
停止调试,然后在解决方案资源管理器上点击OutlookAddInManifest节点,并打开 XML 文件清单。
在</ExtensionPoint>标签结束处,向MessageCompose 内添加一个添加菜单按钮的ExtensionPoint标签。
...
<ExtensionPointxsi:type="MessageComposeCommandSurface">
<OfficeTabid="TabDefault">
<Groupid="msgComposeDemoGroup">
<Labelresid="groupLabel" />
<Controlxsi:type="Menu"id="msgComposeMenuButton">
<Labelresid="menuComposeButtonLabel" />
<Supertip>
<Titleresid="menuComposeSuperTipTitle" />
<Descriptionresid="menuComposeSuperTipDescription" />
</Supertip>
<Icon>
<bt:Imagesize="16"resid="icon16" />
<bt:Imagesize="32"resid="icon32" />
<bt:Imagesize="80"resid="icon80" />
</Icon>
<Items>
<Itemid="msgComposeMenuItem1">
<Labelresid="menuItem1ComposeLabel" />
<Supertip>
<Titleresid="menuItem1ComposeLabel" />
<Descriptionresid="menuItem1ComposeTip
" />
</Supertip>
<Icon>
<bt:Imagesize="16"resid="icon16" />
<bt:Imagesize="32"resid="icon32" />
<bt:Imagesize="80"resid="icon80" />
</Icon>
<Actionxsi:type="ExecuteFunction">
<FunctionName>addMsg1ToBody</FunctionName>
</Action>
</Item>
<Itemid="msgComposeMenuItem2">
<Labelresid="menuItem2ComposeLabel" />
<Supertip>
<Titleresid="menuItem2ComposeLabel" />
<Descriptionresid="menuItem2ComposeTip
" />
</Supertip>
<Icon>
<bt:Imagesize="16"resid="icon16" />
<bt:Imagesize="32"resid="icon32" />
<bt:Imagesize="80"resid="icon80" />
</Icon>
<Actionxsi:type="ExecuteFunction">
<FunctionName>addMsg2ToBody</FunctionName>
</Action>
</Item>
</Items>
</Control>
</Group>
</OfficeTab>
</ExtensionPoint>
...
在清单末尾的Resources节点处,用下面的代码替换 ShortStrings 和 LongStrings的节点
...
<bt:ShortStrings>
<bt:Stringid="groupLabel"DefaultValue="My Add-in Group"/>
<bt:Stringid="paneReadButtonLabel"DefaultValue="Display all properties"/>
<bt:Stringid="paneReadSuperTipTitle"DefaultValue="Get all properties"/>
<bt:Stringid="menuComposeButtonLabel"DefaultValue="Insert message"/>
<bt:Stringid="menuComposeSuperTipTitle"DefaultValue="Choose a message to insert"/>
<bt:Stringid="menuItem1ComposeLabel"DefaultValue="Insert custom message #1"/>
<bt:Stringid="menuItem2ComposeLabel"DefaultValue="Insert custom message #2"/>
</bt:ShortStrings>
<bt:LongStrings>
<bt:Stringid="paneReadSuperTipDescription"DefaultValue="Opens a pane displaying all available properties. This is an example of a button that opens a task pane."/>
<bt:Stringid="menuComposeButtonTooltip"DefaultValue="Inserts your choice of text into body of the message."/>
<bt:Stringid="menuComposeSuperTipDescription"DefaultValue="Inserts your choice of text into body of the message. This is an example of a drop-down menu button."/>
<bt:Stringid="menuItem1ComposeTip"DefaultValue="Inserts custom message #1 into the body of the email." />
<bt:Stringid="menuItem2ComposeTip"DefaultValue="Inserts custom message #2 into the body of the email." />
</bt:LongStrings>
...
最后,在 functions/functions.js 的结尾处添加一些自定义的 JavaScript 函数:
...
// Adds text into the body of the item, then reports the results to the info bar.
function addTextToBody(text, icon, event) {
Office.context.mailbox.item.body.setSelectedDataAsync(text,
{ coercionType: Office.CoercionType.Text },
function (asyncResult) {
if (asyncResult.status == Office.AsyncResultStatus.Succeeded) {
statusUpdate(icon, "\"" + text + "\" inserted successfully.");
} else {
Office.context.mailbox.item.notificationMessages.addAsync("addTextError", {
type: "errorMessage",
message: "Failed to insert \"" + text + "\": "
+ asyncResult.error.message
});
}
event.completed();
});
}
function addMsg1ToBody(event) {
addTextToBody("Custom message #1", "icon16", event);
}
function addMsg2ToBody(event) {
addTextToBody("Custom message #2", "icon16", event);
}
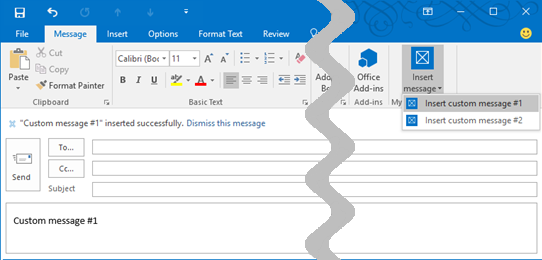
现在运行外接程序查看新菜单。因为我们将菜单添加到MessageCompose上,你需要点击Outlook 2016左上角的创建新邮件图标创建一封新邮件。

就是这个!您已成功添加外界命令程序。如果想学习更多并深入探究如何将命令添加到Office Add-in可以查阅Overview of add-in commands for mail和Create a manifest for add-in commands。
SharePoint 2016 Beta 2
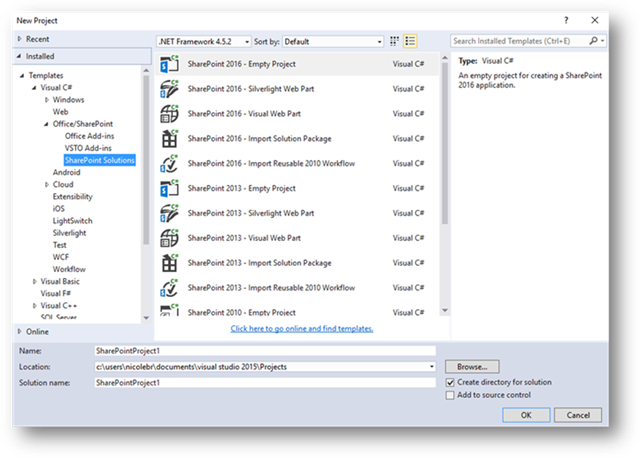
SharePoint 2016 Beta 2 上开发SharePoint 场部署和沙盒部署的模板,在预览版中同样可用。你可以在文件 > 新建项目对话框下的模板 > Office/SharePoint > SharePoint 解决方案下找到。

安装预览版 后,用SharePoint 2013打开现有的 SharePoint 解决方案,将自动提示您需要将项目升级到 SharePoint 2016 。
我们在随后推出的版本中,会注重SharePoint 2016 Add-in的兼容性。关于SharePoint 2016最新的的消息,请查看Office Blogs。
了解更多信息
开发Office平台的程序,请阅读dev.office.com/getting-started页面并了解 Office 365 APIs和Office外接程序模型。
您还可以:
- 使用API沙盒 探索Office APIs
- 在add-in playground 上开始生成你的Office Add-ins
- 在GitHub上尝试一些简单的操作开发你的应用程序
- 加入Office 365 Developer Network并发现最新的功能。
- 通过StackOverflow联系我们来解决任何问题。
- 如果您有任何建议,在UserVoice上让我们知道
如果您有任何问题或疑虑,请通过 Visual Studio 的 Send a Smile功能或通过 Twitter @nicoleabruck! 让我们知道你的想法

