Custom Extension Types with VSIX
DISCLAIMER: While the following technique is supported in Visual Studio 2010, the interfaces and methods exposed by Microsoft.VisualStudio.ExtensionManager.dll are likely to change in future Visual Studio releases. If you create an extension that relies on Microsoft.VisualStudio.ExtensionManager.dll, there is no guarantee that your extension binary will work on future Visual Studio releases without code changes.
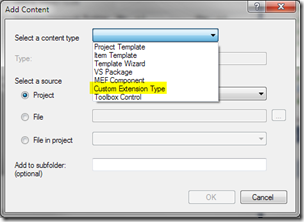
If you’ve used the VSIX Manifest editor when creating an extension for Visual Studio 2010, you may have noticed the various options when you add content to the VSIX container. Clicking the “Add Content” button will bring up a dialog that allows you to select a content type.
Most of the choices are well-known types that Visual Studio already knows how to consume:
- Project/Item Template: A collection of VSTemplate zip files from which a user can create projects and project items.
- Template Wizard: An assembly (distributed with one or more VSTemplates) that contains a template wizard extension to show UI or perform custom logic at template instantiation time.
- VS Package: A PkgDef file containing configuration information for a VSPackage.
- MEF Component: An assembly to be queried and consumed by the VS MEF Host for extending the core text editor and other MEF-based subsystems in the IDE.
- Toolbox Control: An assembly containing one or more controls to publish on the Toolbox for use in the various UI designers in Visual Studio.
You may be wondering what the “Custom Extension Type” entry (highlighted above) is and why you would want to use it.
Let’s say you want to ship an extension to Visual Studio that is itself extensible. If the extensibility points you are exposing involve managed code, a MEF-based solution would be a reasonable option to consider. However, imagine that what you consume from your extenders is more like data or content rather than code. [For a real world example, consider the built-in Project/Item Template extension content types.] In this case, having these extension authors create an assembly (and having Visual Studio load and manage it at runtime) simply to provide data or content is too heavyweight.
This is where the content with a Custom Extension Type comes in handy. “OK”, you may be thinking. “But why couldn’t I just have end-users put these content files into a certain directory on the local machine where my extension would find them?” You certainly could. However, the advantage of using VSIX content with a Custom Extension Type is that the content can be managed by the end-user via the Extension Manager. Installing and removing the content is exactly the same user experience as for any other extension.
Walkthrough: Consuming Custom Extension Content
Let’s create an extension to demonstrate consuming custom content distributed in a VSIX. In this walkthrough, we’ll create a tool window called Image Browser that queries the Extension Manager for content of type WalkthroughImage. Then, we’ll create another extension that provides the content that our tool window will consume. (You must have the Visual Studio 2010 SDK installed to complete the walkthrough.)
- Open the New Project dialog to create a new Visual Studio Package from the Extensibility category under Visual C# called “ImageBrowser”.
- In the Visual Studio Package Wizard, select the “Tool Window” option on Page 3.
- Rename “My Tool Window” to “Image Browser” on Page 5.
- After completing the wizard, replace the content inside the <Grid> element in MyControl.xaml with the following:
<ScrollViewer>
  <WrapPanel Name="wrapPanel1" />
</ScrollViewer>
- Add a reference to Microsoft.VisualStudio.ExtensionManager.dll (located in <VSInstallDirectory>Common7IDEPrivateAssemblies)
- In MyControl.xaml.cs, add the following method:
internal void AddImageFromPath(string path)
{
    const int ImageWidth = 250;
    BitmapImage bitmapImage = new BitmapImage();
    bitmapImage.BeginInit();
    bitmapImage.UriSource = new Uri(path);
    bitmapImage.DecodePixelWidth = ImageWidth;
    bitmapImage.EndInit();
    this.wrapPanel1.Children.Add(new Image()
    {
        Source = bitmapImage, MaxWidth = ImageWidth
    });
}
- Close MyControl.xaml.cs
- Open MyToolWindow.cs and add the following using statement:
using Microsoft.VisualStudio.ExtensionManager; - Add the following code at the end of the MyToolWindow constructor:
//Query the Extension Manager for content of type "WalkthroughImage" const string WalkthroughImageContentType = "WalkthroughImage";
IVsExtensionManager extensionManager = ServiceProvider.GlobalProvider.GetService(typeof(SVsExtensionManager)) as IVsExtensionManager;
if (extensionManager != null)
{
    foreach (string image in extensionManager.GetEnabledExtensionContentLocations(WalkthroughImageContentType))
    {
        ((MyControl)base.Content).AddImageFromPath(image);
    }
}
- Press F5 to debug the extension in the Experimental instance. You can show the tool window you just created from Views –> Other Windows –> Image Browser, but there won’t be any images in the tool window just yet.
- Close the Experimental instance and return to your previous VS instance.
Walkthrough: Creating an Extension with Custom Content
Now let’s create another extension that will provide content to our tool window we just created. We’ll create a VSIX containing the sample images included in Windows 7 so that they display in our Image Browser tool window.
- In the Solution you created in the previous walkthrough, add a New Project to the solution.
- In the New Project dialog, select the “VSIX Project” template from under Visual C# –> Extensibility or Visual Basic –> Extensibility. (There won’t be any code to compile, so the language choice here doesn’t matter.)
- Name the project SampleImagePack and Click OK.
- In the VSIX Manifest Designer after the project is created, click the “Add Content” button.
- Choose “Custom Extension Type” for the content type.
- In the Type field, enter “WalkthroughImage”. (without the quotes)
- For the source, choose the File radio button and navigate to the Sample Pictures in Windows. (They are located in the Public Pictures folder.)
- Select one of the images in the folder.
- Click OK in the Add Content dialog.
- Repeat steps 4-9 for each image you wish to add.
- Press F5 to debug both the Image Browser tool window extension and the SampleImagePack extension in the Experimental instance.
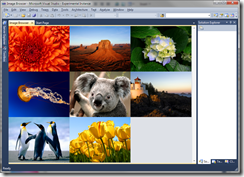
- Show the image browser tool window from View –> Other Windows –> Image Browser and notice that the images added to the SampleImagePack are now displayed in the ImageBrowser control.
- (optional) You can repeat the steps above to create multiple image pack VSIX’s which will be merged together in the Image Browser tool window.
When you bring up the tool window, you should see something like this:
We’re looking forward to seeing how you use this functionality for your own extensions! As always, please let us know what you think.
Aaron Marten – Developer, Visual Studio Platform
Short Bio: Aaron has been on the Visual Studio team for over 6 years with a focus on extensibility. For Visual Studio 2010, Aaron worked on the Extension Manager and the Visual Studio SDK. In addition to contributing to the Visual Studio blog, he also writes about extending the IDE on his own blog at https://learn.microsoft.com/en-us/archive/blogs/aaronmar/.


![aaronm3_2[1] aaronm3_2[1]](https://devblogs.microsoft.com/visualstudio/wp-content/uploads/sites/4/2010/04/aaronm3_25B15D_thumb.jpg)
 Light
Light Dark
Dark
0 comments